Ever wished that the link between your CAD package and RoboDK was more streamlined? With the new plugin, we’ve made your SolidWorks workflow even smoother.
Here at RoboDK, we think our software is easy to use. We work hard to make sure the software is quick to learn, simple to use, and fits right in to your existing workflow.
But, until now there has been one part of the process which was not as quick and easy as we’d have liked it to be: the integration with Computer Aided Design (CAD) packages. Up until now, you’ve had to export your models from your favorite CAD package and import them into RoboDK. Sure, this is very straightforward… but we’ve decided to make it even easier.
Last month, we released a new set of plugins for RoboDK for a selection of third-party platforms, including the all-popular SolidWorks.
If you’re using SolidWorks, the new plugin promises to make your workflow significantly smoother. Let’s take a look at the new plugin and see what’s possible with it.
What is SolidWorks?
If you’re not familiar with SolidWorks… where have you been all your life!?
The brainchild of a Blackjack-playing MIT genius, SolidWorks has become the most popular CAD software in many industries. If you don’t know SolidWorks yourself, you’ve almost certainly used products which were designed with it.
It is primarily a “solid modeler,” which means that models are built from virtual solid parts, much as real objects are made. The alternative to this is “surface modeling” which defines models by their surface geometries. Although these two modeling techniques were traditionally very different, modern versions of SolidWorks can use either of them. It’s a hugely flexible design package.
A bit of fun trivia for you: The software was the brainchild of Jon Hirschtick, one of the members of the famous MIT Blackjack Team who beat casinos using card counting. In 1993, he used some of the money that the team won to assemble a group of engineers and develop the first version of SolidWorks.
Since then, it has become one of the standard CAD packages in many industries. According to a 2015 survey of 215 CAD/CAM users, SolidWorks was by far the most popular CAD software with 27% of users, almost double that of the next most popular package.
Introducing… the RoboDK plugin for SolidWorks
Our new plugin adds a seamless link between SolidWorks and RoboDK.
When you update to the latest version of RoboDK, (which you can get on the Download page), you should find that it is already installed as new “RoboDK toolbar” within SolidWorks. If you can’t find the toolbar, see the documentation page for instructions on how to perform a manual install.
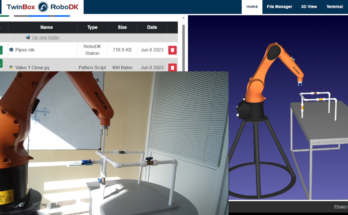
As described on Engineering.com, the plugin acts like a one-way bridge from SolidWorks to RoboDK. You can use this bridge to send paths, curves, points, and models, which will be automatically loaded into RoboDK in a format which makes them easy to use for robot programming.
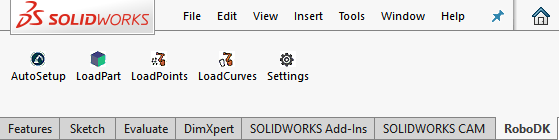
The RoboDK toolbar includes 5 buttons:
- Auto Setup — Simply select whichever geometries (curves, points, models) that you want to add to RoboDK and they will be loaded along with the 3D model.
- Load Part — This sends a 3D model directly from SolidWorks to RoboDK, without having to mess around with exporting parts to external files.
- Load Point(s) — Select a set of points (e.g. for robot drilling) along with their respective surfaces and they will turn up in RoboDK as a “point follow” program.
- Load Curve(s) — The same as the previous one but with curves.
- Settings — Here you can customize the export properties, including changing tolerances, scales, and file type for 3D models.
Is the Plugin Right for You?
If you are already using SolidWorks and RoboDK then the new plugin is a no-brainer. It’s intuitive to use and will streamline your workflow considerably.

If you’re not using RoboDK yet, but you are a SolidWorks user, the plugin is a perfect excuse to give RoboDK a try! You can get a free demo version on the downloads page.
5 Tasks That Are Very Easy With the SolidWorks Plugin
There are a few tasks which have become especially easy with the new SolidWorks plugin. These were already pretty straightforward with RoboDK.
- Welding — Check out this tutorial video from Jeremy, RoboDK’s support-wizard, which shows how to set up the new plugin and use it to create a welding program from within SolidWorks. See this article for an introduction to robot welding.
- Drilling — At the end of his tutorial video, Jeremy also demonstrates a robot drilling application, which is equally easy with the new plugin. See this article for some tips on achieving flawless robot drilling with RoboDK.
- Machining — Almost all robot machining tasks can be achieved with “point follow” and “curve follow” commands which means that robot machining is extra simple with the new plugin. See this article for an introduction to robot machining.
- “Scene-building” — Many of our users like to build the whole “scene” into their robot simulations. This isn’t always necessary for creating a functional robot program, but it does look good. The only problem with this is when you are required to export many parts to external files. The new plugin makes this step very quick. If the part is in SolidWorks, you can export it to RoboDK with the click of a button.
- Setting approach angles — One of the most powerful features of the plugin is the way that it selects the surface normals for curve and point movements. All you have to do is select the adjacent surfaces and the plugin will calculate the appropriate approach angle for the movement.
Above all, the new plugin gives you a seamless link between your favorite CAD package and the powerful robot programming capabilities provided by RoboDK.
Two Final Features You Might Have Missed
Finally, here are a couple of very useful features of the plugin which you might miss on first inspection. They can be found by clicking the Settings button in the plugin toolbar within SolidWorks.
- It has a SolidWorks theme — There’s nothing more annoying than switching from one 3D modeling package to another, only to find that the mouse behavior is different. The plugin includes an option to use the “SolidWorks theme” within RoboDK which matches SolidWorks mouse behavior and also changes the background color.
- It supports multiple instances of RoboDK — If you didn’t know already, you can run multiple instances of RoboDK at once. The plugin allows you to select which RoboDK instance you want it to communicate with via the “communication port.”
Want to try out the plugin for yourself?
The best way is to download the latest version of RoboDK (if you haven’t already) and just give it a spin!
Jeremy’s video is also a great demo of its capabilities and the documentation page explains its functionality in detail.