Game Controller
Introduction to Game Controller Add-In
The Game Controller Add-in for RoboDK is an efficiency tool designed to let you manually drive a robot using a standard gamepad (such as an Xbox controller). This add-in is ideal for quickly teaching targets, testing robot reachability, or demonstrating robot movements in a simulated or real environment.
Installation
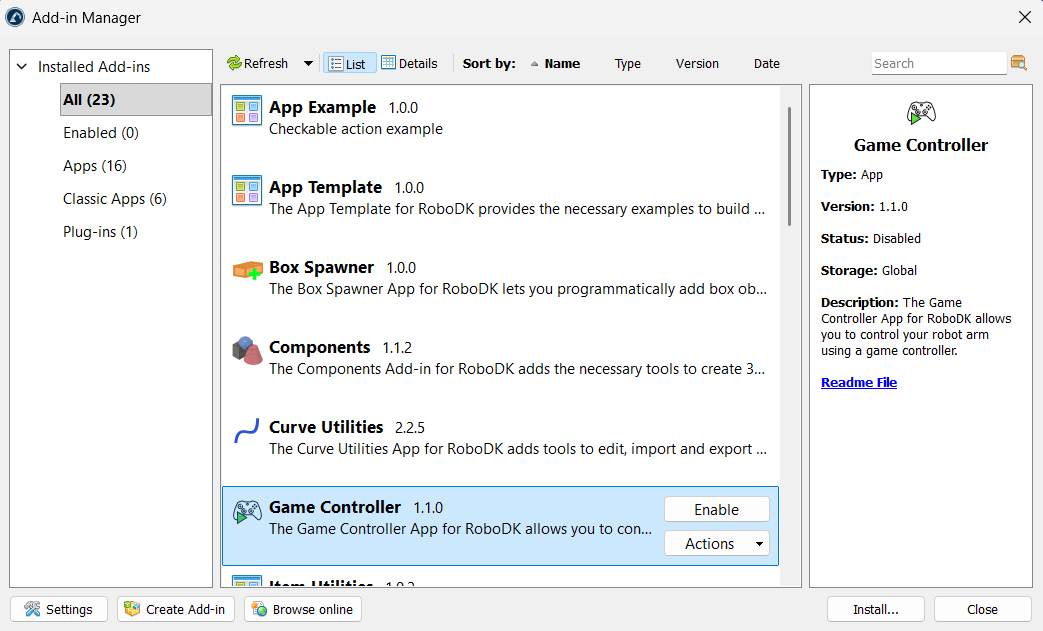
You can install the Game Controller Add-in from the RoboDK Online Library. Another way to do this from RoboDK software itself is by going to Tools-Add-in Manager and Enable the Game Controller add-in.
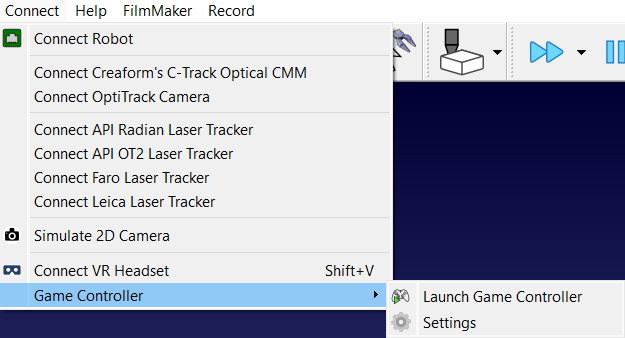
After installation, the Game Controller options can be found in the Connect menu. You can also find the Launch Game Controller icon in the toolbar.
Using the Controller
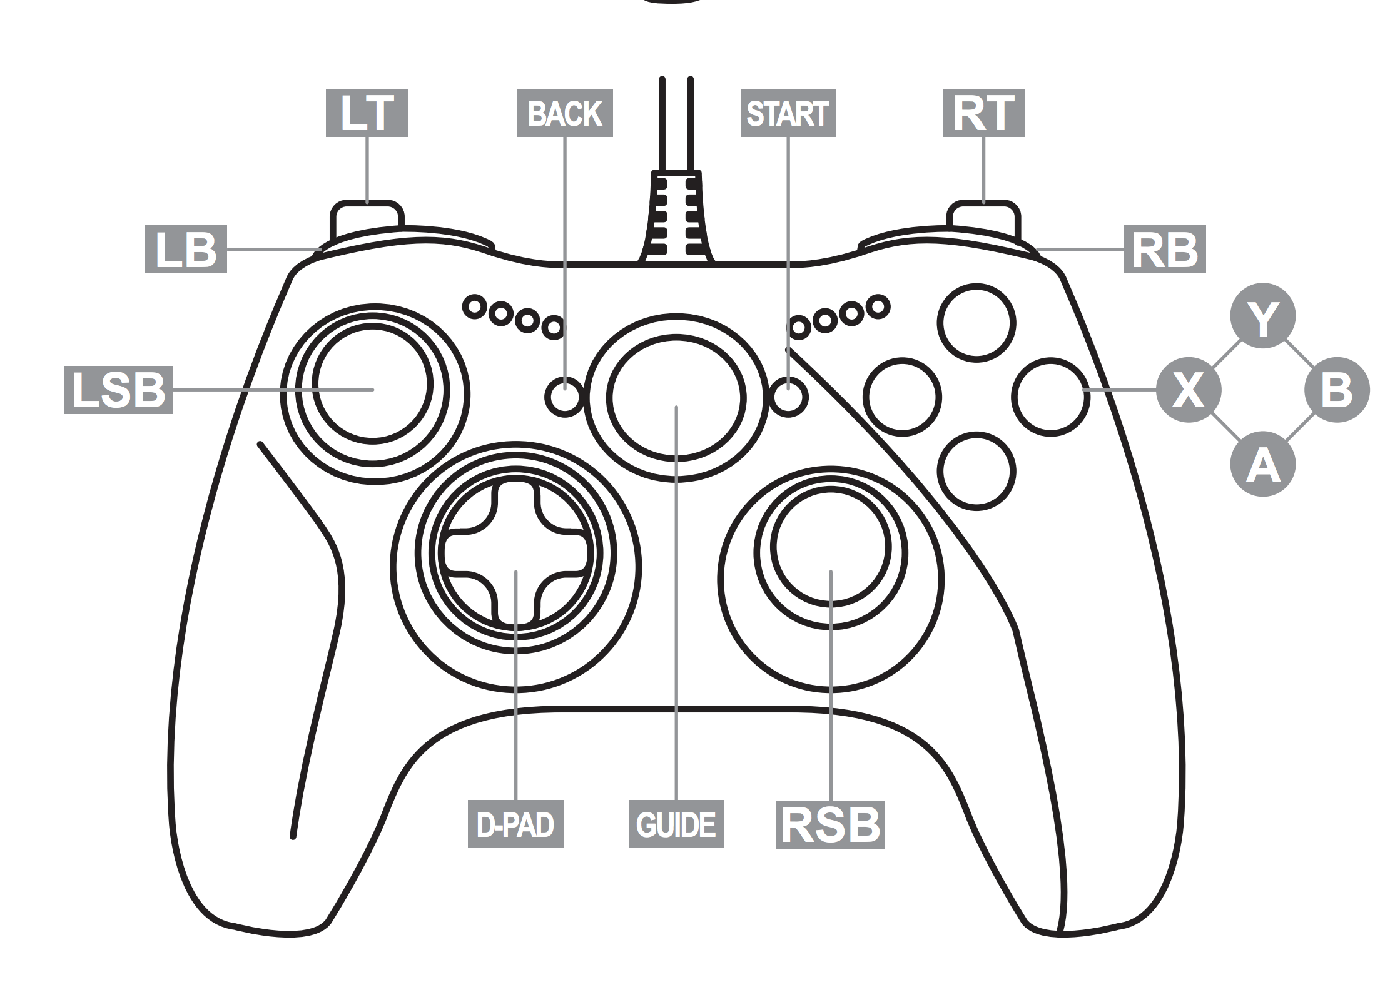
You should first connect your controller with the device on which you are using RoboDK. The add-in maps specific robot movements and settings to standard gamepad inputs. The default mapping was created for an Xbox One controller.
Movement Controls
Press the Launch Game Controller icon in the toolbar or go to Connect-Game Controller-Launch Game Controller. This will start the add-in and it will automatically try to detect the connected controller. Click again on the Launch Game Controller icon to stop the add-in.
To move the robot, you must select an axis and use the D-pad to apply movement.
1.Select X Axis: Press and hold X on your controller.
2.Select Y Axis: Press and hold Y on your controller.
3.Select Z Axis: Press and hold B on your controller.
4.Move: While holding an axis button, use the D-pad up or down to move the robot along the selected axis.
Toggles
The Game Controller Add-in offers some toggle buttons to customize the behavior.
Other options to manipulate the motion of your robot include:
1.Translation vs. Rotation: Press the Left Stick Button (LSB) to toggle between moving the robot linearly (mm) or rotating it (deg). We use translation (mm) by default.
2.MoveJ vs. MoveL: Press the Right Stick Button (RSB) to toggle between Joint movement (MoveJ) and Linear movement (MoveL). The default movement instruction is MoveJ.
3.Step Size: Use the D-pad left or right to decrease or increase the movement step increment.
4.Home Position: Press both Bumpers (LB + RB) simultaneously while engaging the safeguard to return the robot to its home position.
Safety Features
The add-in includes a mandatory safeguard mechanism to prevent accidental movements.
The accidental movements include the following:
1.Safeguard Trigger: You must press and hold the Right Trigger (RT) to allow any robot movement. If the trigger is released, the robot will not move and the app will show the following message:
Please press the safety trigger!
2.Configuration Warning: The script checks if the new movement causes a change in the robot's configuration (e.g., wrist flip). If a change is detected, the movement is blocked, and the following warning is displayed to prevent unexpected behavior:
Robot configuration changed. This can lead to unexpected movements! Please move the robot through RoboDK or try another command.
3.Reachability Check: The system validates the movement using Inverse Kinematics (IK). If the target is out of reach or near a singularity, the following messages will appear:
Target unreachable. Try using MoveJ or another command.
No robot solution! The new position is too far, out of reach or close to a singularity.
Device and Robot Handling
The add-in includes logic to manage multiple devices or robots within the station:
1.Multiple Controllers: If more than one controller is connected to the PC, the add-in will display a message indicating that multiple controllers were found and will default to using the first one detected.
2.Multiple Robots: If the station contains more than one robot, the add-in will prompt the user to "Select a robot" from a list. If only one robot is present, it will be selected automatically without asking the user.
Simulation vs. Real Robot
The add-in can be used for both offline simulation and live robot control:
1.Simulation Mode: The default mode for testing movements safely within the RoboDK station.
2.Real Robot Mode: To drive a physical robot, connect it via Connect-Connect Robot. The add-in will ask if you wish to run on the real robot instead of staying in simulation mode. When you click on Yes, it will then prompt you to enter the IP of the robot after which you can click on Connect.
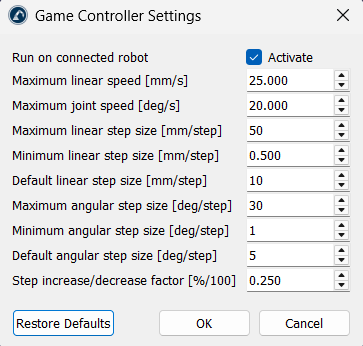
Settings
You can find additional settings for customization in Connect-Game Controller-Settings.