IsaacSim Bridge
The IsaacSim Bridge Add-in for RoboDK allows the user to connect their IsaacSim scene with RoboDK, simplifying connection to a real robot or generating robot programs based on their needs. The IsaacSim extension also implements the RRT Motion Planner to facilitate exporting a collision-free path from IsaacSim into a RoboDK program.
RoboDK adds post-processing capabilities to industrial robots in Isaac Sim, generating production-ready robot programs for 1200 industrial robots across 80 robot brands.
Install
You should install the Isaac Sim Bridge Add-in from the Add-in library. The IsaacSim Bridge Add-in is not enabled by default in RoboDK Software.
To install the extension in IsaacSim, you must first install the RoboDK python api modules. To do so, follow these steps:
1.Open the IsaacSim Selector.
2.Click on Open in terminal.
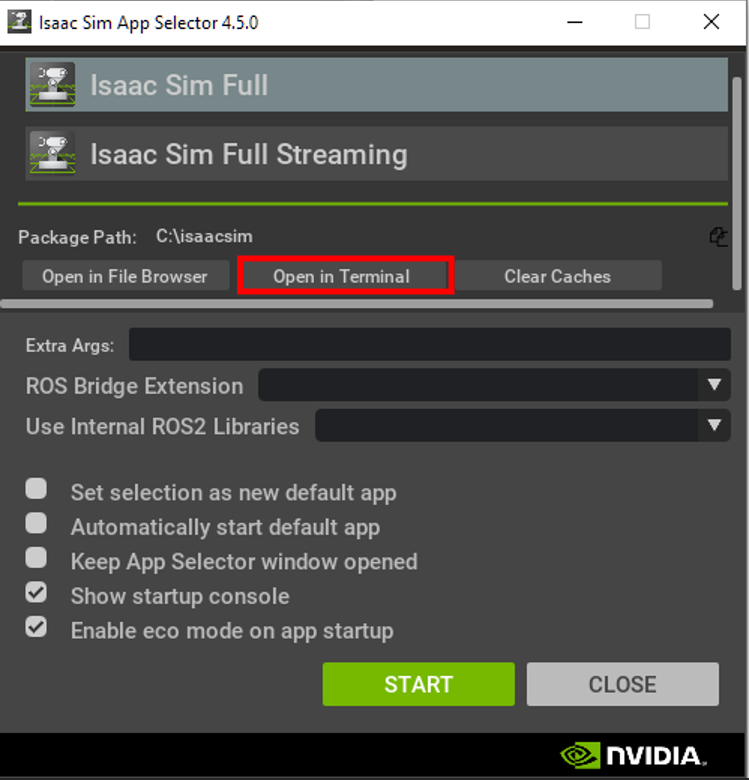
Run the following command: pip install robodk
After installing the RoboDK package, you can now install the extension in IsaacSim by following these steps.
1.Install the add-in in RoboDK.
2.Open the add-in location in your file manager.
3.Copy the RoboDK.Bridge folder. It contains the extension for IsaacSim.
4.Paste it inside the extsUser folder in your IsaacSim installation.
5.Start IsaacSim and open the extensions manager.
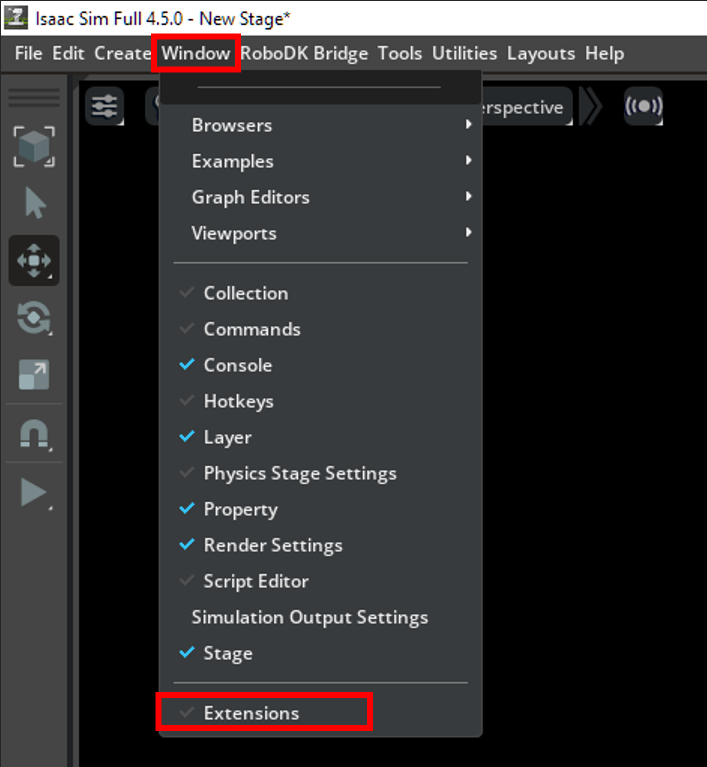
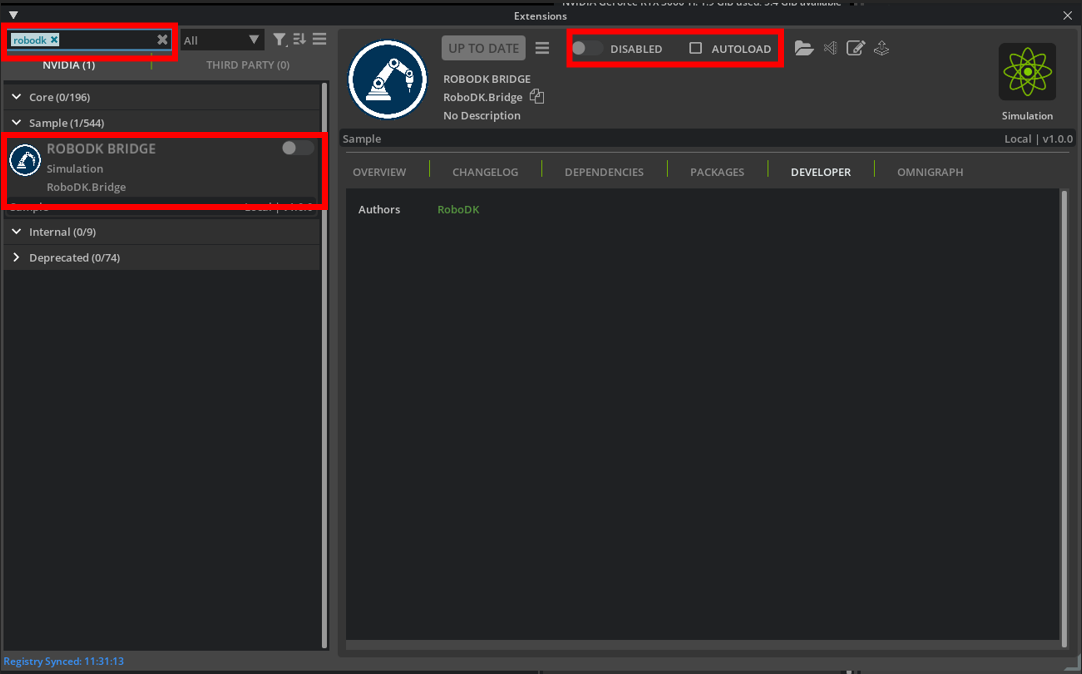
6.Search for RoboDK in the search bar.
7.Enable the extension and, optionally, activate autoload.
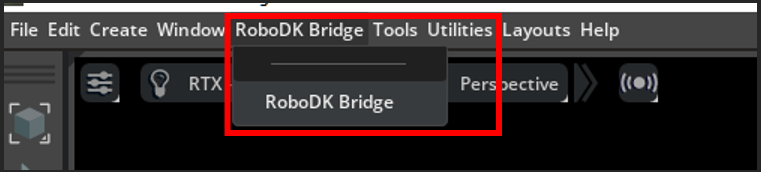
8.The RoboDK Bridge should now appear on your toolbar in IsaacSim and can be opened.
IsaacSim Bridge Functions
This section shows basic IsaacSim Bridge Add-In functions in IsaacSim.
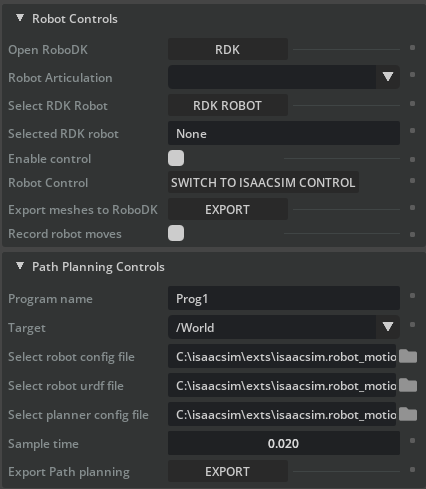
The IsaacSim Bridge Extension window contains following functional elements:
1.Robot Controls
a.Open RoboDK: Opens RoboDK if it is not open or connects to the currently running instance of RoboDK if it is. This is required for the extension to function.
b.Robot Articulation: Select the articulation within IsaacSim to be used.
c.Select RDK Robot: Select the robot within the RoboDK station to be used.
d.Selected RDK Robot: Prints out the name of the selected robot.
e.Enable Control: Enables robot communication between IsaacSim scene and RoboDK station.
f.Robot Control: Select the reference robot that should be used as the robot to be matched. If the option displays Switch to IsaacSim Control, then RoboDK acts as the master and the robot articulation within IsaacSim will follow the pose of the selected RoboDK robot.
g.Export meshes to RoboDK: Convert Mesh objects in the IsaacSim scene to 3D mesh files and load them in the RoboDK station. The converted object’s origin will be at base of the station but will be offset so that the current location matches its location in the IsaacSim scene. Each of the Mesh objects from IsaacSim will be its own object in the RoboDK station and can be moved around.
h.Record robot moves: Records all the moves done by the IsaacSim robot and adds them to a program within RoboDK. This is useful if you have a program within IsaacSim that you want to export to RoboDK.
2.Path Planning Controls
a.Program name: Program name to use when exporting to RDK.
b.Target: Drop down menu of XForms to be used as target for the RRT path planner.
c.Select robot config file: Select the robot config file to be used for the path planning. File format must be yaml.
d.Select robot urdf file: Select the robot definition file to be used for the path planning. File format must be urdf.
e.Select planner config file: Select the planner config file to be used for the path planning. File format must be yaml.
f.Sample time: Select the sample time to be used when generating the path. A shorter sample time will lead to more MoveJ instructions in the program with smaller steps in between them.
g.Export Path planning: Uses RRT to calculate a path between current robot pose and selected target and create a robot program with a list of instructions completing the path.