Record Image Sequence
For the Record Image Sequence feature, the Add-in automatically creates two virtual cameras behind the scenes: Snapshot Camera (Black) and Snapshot Camera (White).
By analyzing the difference between two snapshots taken at the exact same instant with contrasting backgrounds, the robot is cleanly separated from the environment without needing a traditional "green screen".
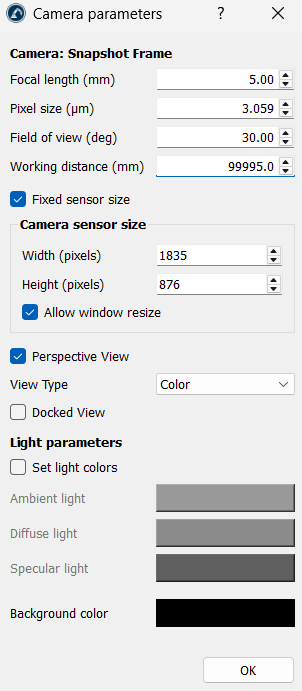
Double clicking on any of the two Snapshot Cameras opens a dialog box with additional parameters including:
1.Focal length (mm): Increase this value to narrow the view and create a telephoto effect, which is perfect for focusing closely on small details from a distance without moving the camera position. Lower this value to create a wide-angle effect to capture large production cells in a single shot.
2.Pixel size (μm): This value defines the physical size of the sensor's individual pixels and directly links to your resolution and field of view. Adjusting this value scales the sharpness and pixel density of the camera sensor to help capture fine object edges cleanly.
3.Field of view (deg): Increase this value to pull the camera back and capture a wide-angle shot of large robot setups; decrease it to zoom in closely on high-detail tasks like micromachining or picking small parts.
4.Working distance (mm): This setting sets the maximum view depth for the virtual camera. Setting this to an exceptionally large value (like the default 99995.0 mm) ensures that no matter how large your production floor is or how far the robot extends its arm into the background, components will never be clipped or cut off from the frame during recording.
5.Fixed sensor size: Keep this checked to lock the frame borders. This ensures that even if you resize the main window, the exported images maintain identical composition for smooth animation compilation.
6.Camera sensor size (Width and Height in pixels): Manually type higher values here if you need high-resolution, sharp images.
7.Allow window resize: Keep this checked if you want the virtual camera to dynamically adapt its baseline to match adjustments made to the main window layout panel.
8.Perspective View: Keep this checked for natural-looking snaps. Uncheck it if you need an Orthographic View (isometric or flat top-down view).
9.View Type: Leave this on "Color" for final presentations. You can toggle it to options like "Grayscale" or "Depth" if you need specialized technical visuals (e.g., mapping sensor distance views).
10.Docked View: Locks the virtual camera's live preview window directly inside the RoboDK user interface layout panel instead of letting it float as a separate pop-up window.
11.Light Parameters (Ambient, Diffuse, Specular): These three parameters change how light bounces off the robot's physical 3D surfaces. Lower the "Specular" light if your robot model has shiny surfaces. Reducing reflections minimizes background color bleeding on the glossy edges, giving you a cleaner, sharper alpha-channel cut-out.
12.Background color: While this is ignored during automated transparent image sequence exports (which force black and white backgrounds), you can change this to a high-contrast color (like solid blue or green) when saving standard, non-transparent snapshots to make the station components pop out clearly from the background sheet.
The two-step snapshot mechanism works in the following way:
1.Snapshot Camera (Black) takes a picture with a black background, and Snapshot Camera (White) immediately takes a matching picture with a white background.
2.The Add-in compares them pixel-by-pixel. If a pixel looks identical in both photos (like a yellow robot arm link), the software recognizes it as a solid object and keeps it. If a pixel changes completely from black to white, it is identified as empty space and converted into 100% transparent space, saving a clean alpha-channel RGBA image sequence (.png).


