Simulation event
You can create specific events meant for simulation by using a simulation event instruction. Simulation events have no impact on the real robot or the generated robot program.
Select Program➔Simulation Event Instruction to add a custom simulation event. This type of instruction will provoke a specific event only for simulation purposes, such as attaching one object to a gripper, dropping it to a table or creating objects to simulate a feeder.
You can use the user interface to trigger the actions as simulation events:
1.Attach an object to a tool.
2.Detach an object from a tool and drop it to a coordinate system.
3.Show one or more objects or tools.
4.Hide one or more objects or tools.
5.Set the absolute position of one or more objects or reference frames.
6.Set the relative position of one or more objects or reference frames.
7.Set the robot joints to home.
8.Move conveyor.
9.Create object.
10.Delete objects.
11.Wait for object.

By combining the right simulation events you can create simulations with the user interface for material handling or move objects through conveyors in the simulation as desired.
Attach object
The attach object simulation event allows you to attach one object to a tool to simulate a pick action.
When the action to attach an object to a tool is triggered, the closest object to the selected tool will be attached. A default tolerance of 200 mm is used to ignore any objects farther than this distance.
If you don’t specify a distance tolerance, the global default value will be used (you can change the global default in Tools➔Options➔Maximum distance to attach an object to a robot tool). Also, by default, the distance is checked from the TCP location to the object reference. Alternatively, it is possible to use the distance between the TCP and the object geometry by selecting Check shortest distance between TCP and the object shape.
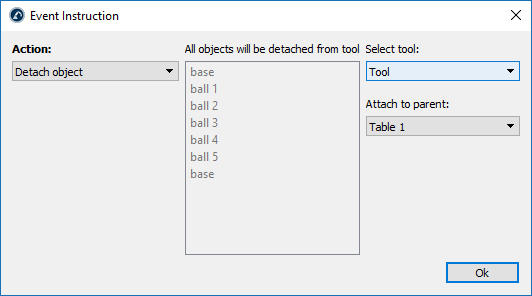
Detach object
The detach object simulation event allows you to detach an object from a tool to another object or coordinate system.
You should choose the tool where the objects should be detached from and the coordinate system or object where the objects should be attached to afterwards.
The detach object simulation event allows you to simulate a place/drop operation in a plick and place application (performing the opposite action of the attach event).
For example, if the robot moves to a specific location to grab an object, we can set up an Attach object event to move that object together with the robot. Then, after the robot has moved and it is ready to drop the grabbed objects, you can trigger a Detach object event to leave any objects the robot tool has grabbed.

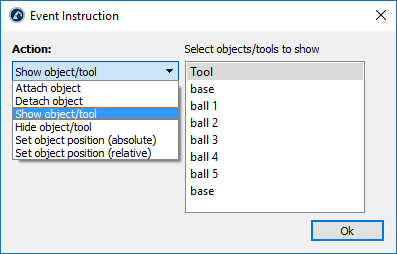
Show objects or tools
The show objects or tools event allows you to make one or more objects, tools or robots visible within the simulation environment.
You can select one or more items by holding the Ctrl key.
Hide objects or tools
The Hide objects or tools event allows you to make one or more objects or tools invisible within the simulation.
You can select one or more items by holding the Ctrl key.

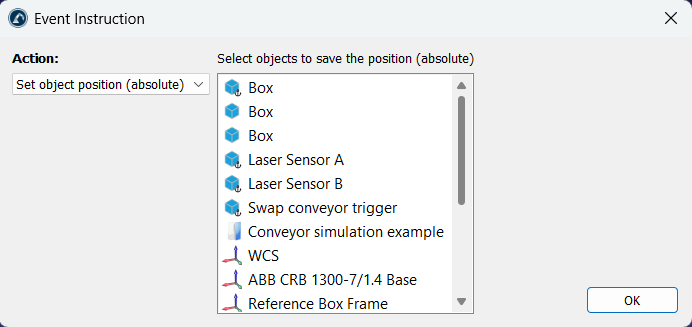
Set the absolute position
The Set object position (absolute) allows you to update the position of every object you selected when this action is triggered. The parent reference that each item is attached to is not modified. Only the position of each object is updated.
You can select one or more items by holding the Ctrl key. The current position of the item is recorded when you press OK.
Set the relative position
The Set object position (relative) allows you to update the position and parent of every object you selected when this action is triggered. The parent reference that each item is attached to is also modified and the position of each object is also updated.
You can select one or more items by holding the Ctrl key. The current position of the item and the parent item it is attached to is recorded when you press OK.
The difference between this instruction and the absolute position instruction is that this instruction also updates the parent item that each object is attached to.
Set the robot to home
The set joints to home event triggers the selected robot or mechanisms to move to its defined "home" joint positions immediately (the movement is not simulated over time).
This is useful when you need to reset a simulation and place the conveyors at the start position.
You can select one or more items by holding the Ctrl key.
Move conveyor event
The move conveyor event simulates moving the conveyor by a specific distance, simulating the effect of the movement over time.
This is useful when you need to simulate a specific increment for processing an object on the conveyor once it moves a specific distance.
Create object
The Create object instruction allows you to simulate a feeder by creating a new object in the simulation environment.
You should select the model object to create and the parent reference where the items should be attached to.
This action is useful to create new objects in a conveyor.
Delete objects
The Delete objects instruction removes objects from the simulation environment.
You should select a model object that you would like to delete. Any object that matches the name and geometry of the same object is deleted when this action is triggered. The model object selected and any locked objects are not removed.
This instruction helps clean up a simulation that has finished and you have many objects that were created by the Create object instruction.
Wait for object
The Wait for object instruction waits for an object to be in contact with another object to trigger a specific action.
This event is useful when you want to trigger. It is common to place this instruction by itself in a program running in a loop that performs a specific action when an object is in contact with a sensor.
The actions you can perform when an object is in contact with the sensor are the following:
1.Stop a robot: you should select the robot or mechanism that should stop.
2.Delete an object: the object should be removed from the station.
3.Wait for the object only (for example, you can trigger a robot to pick an object).
4.Move an object to another coordinate system. For example, to attach an object from one conveyor to another.