FAIRINO robots
RoboDK provides comprehensive offline programming (OLP) and simulation software support for FAIRINO collaborative robots (cobots), covering models across the FR series such as the FR3, FR5, FR10, and FR20. By combining 3D simulation with automated toolpath generation, RoboDK allows you to simulate complex robotic operations like machining, dispensing, surface finishing, and pick-and-place, without taking production cells offline.
When deploying trajectories to a physical or virtual FAIRINO controller, RoboDK converts simulated robot paths into native FAIRINO-compatible Lua script files (.lua) and SQLite point database files (.db). These files can be loaded directly into the FAIRINO Collaborative Robot Console.
Utilizing point tables alongside script execution prevents runtime coordinate resolution issues and allows manual step-by-step verification as well as high-speed automated cycle execution.
This documentation provides detailed instructions on how to import point tables, manage Lua programs, and execute motion routines on the Collaborative Robot Console interface.
Post Processor for FAIRINO
Follow these steps to generate appropriate code for FAIRINO collaborative robots in RoboDK.
1.Right-click your robot in the station tree and choose Select Post Processor.
2.Select the Fairino_db post-processor.
3.When you generate a program (press F6), RoboDK outputs two synchronized files:
a.A Lua script (<program_name>.lua) containing the motion logic, logic commands, and sequential function calls (Lin, MoveJ, Wait, etc.).
b.A Point Table Database (point_table_<program_name>.db) containing the Cartesian coordinates, orientations, and joint configurations for all programmed waypoints (p1 through pN).
Transfer and Load a Program
To run programs created in RoboDK, both the Lua script and the corresponding point table database file must be imported into the FAIRINO Collaborative Robot Console.
Import the Program Script
The first step to run RoboDK programs on a FAIRINO robot includes importing the Lua script. Follow these steps to import the .lua file into the console.
1.From the top toolbar in the Program Teaching screen, click the Import icon.
2.In the Import File dialog, click Browse....
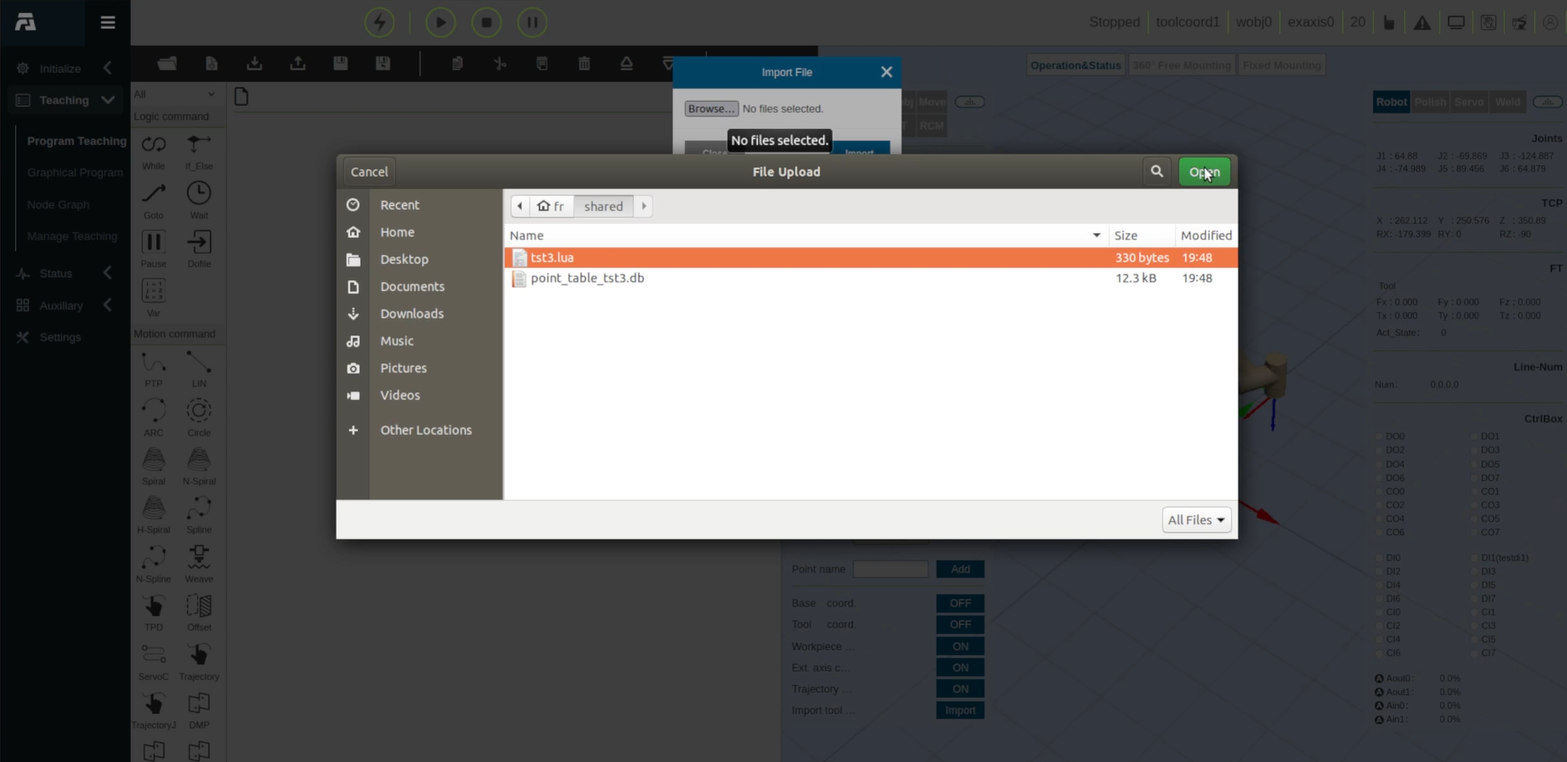
3.In the file browser dialog, navigate to the target folder and select the script file (e.g., tst3.lua in the screenshot that follows).
4.Click Open, then click Import to upload the file to the console.
Import the Point Table
The second step is to load the point table .db file into the console. Follow these steps to import the point table.
1.On the left-hand navigation sidebar, click on Manage Teaching.
2.Under the Teaching Management view, select the Point table mode radio button at the top.
3.Click the green Import button located next to the point addition controls.
4.In the Import File popup, click Browse....
5.Select the point table database file (e.g., point_table_tst3.db) and click Open.
6.Click Import in the dialog box to finish uploading.
7.In the upper-right corner of the Teaching Management panel, locate the Select point table dropdown menu.
8.Select the imported table (e.g., point_table_tst3.db).
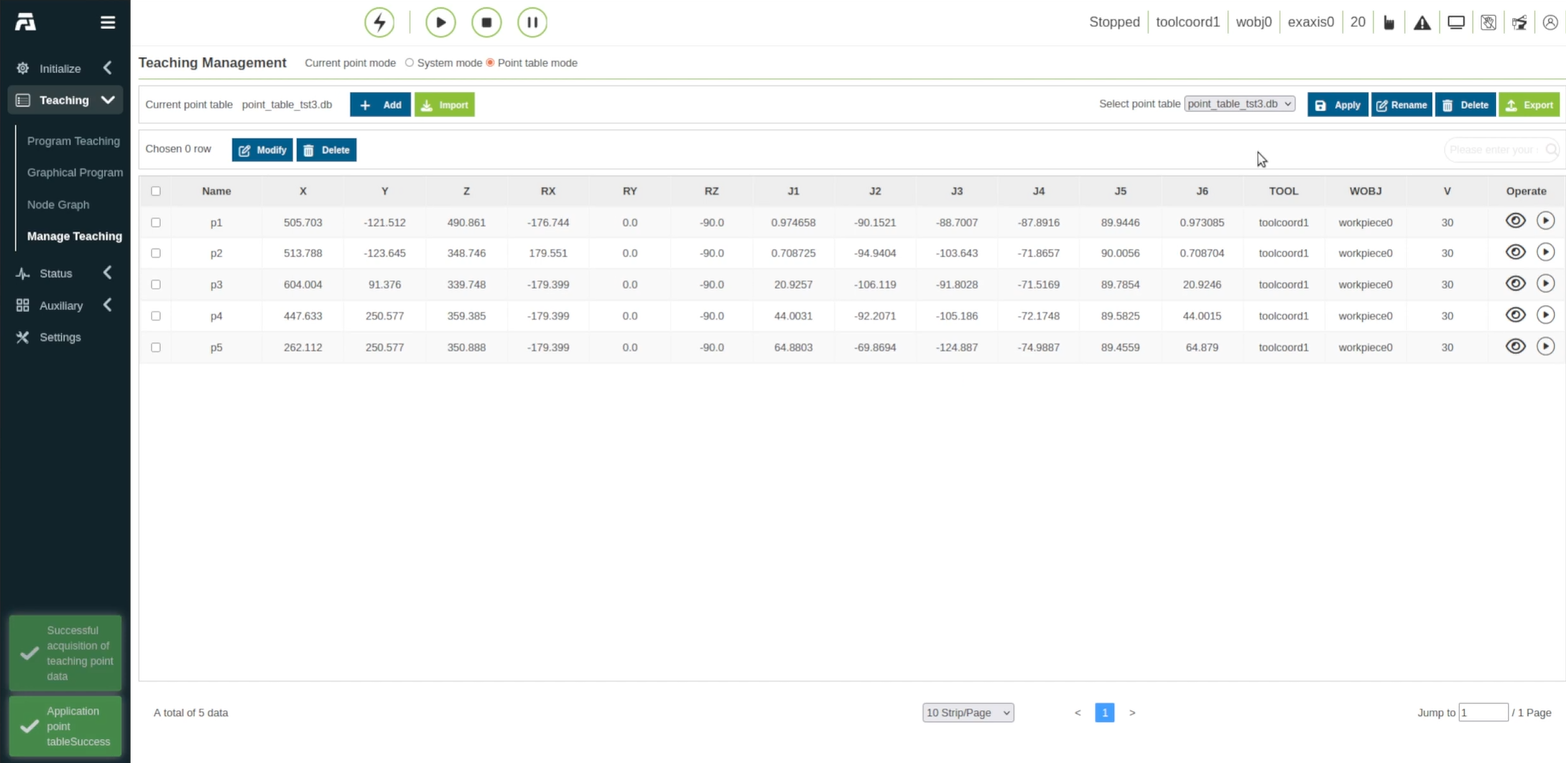
9.Click the blue Apply button. The point list table will populate with the imported coordinate points (p1 to p5) including their Cartesian parameters (X, Y, Z, RX, RY, RZ), joint values (J1–J6), Tool index, and Workpiece frame as shown below.
Prepare the Program
The final step before you run the imported program for the FAIRINO robot is to clean it up and remove unnecessary program lines. Follow these steps to clean up and make the program executable.
1.Return to the Program Teaching screen by selecting it from the left sidebar.
2.Click the Open File icon on the top program toolbar.
3.In the Open File dialog, select the program file (e.g., tst3.lua) from the list.
4.Click Open to load the program blocks into the editor.
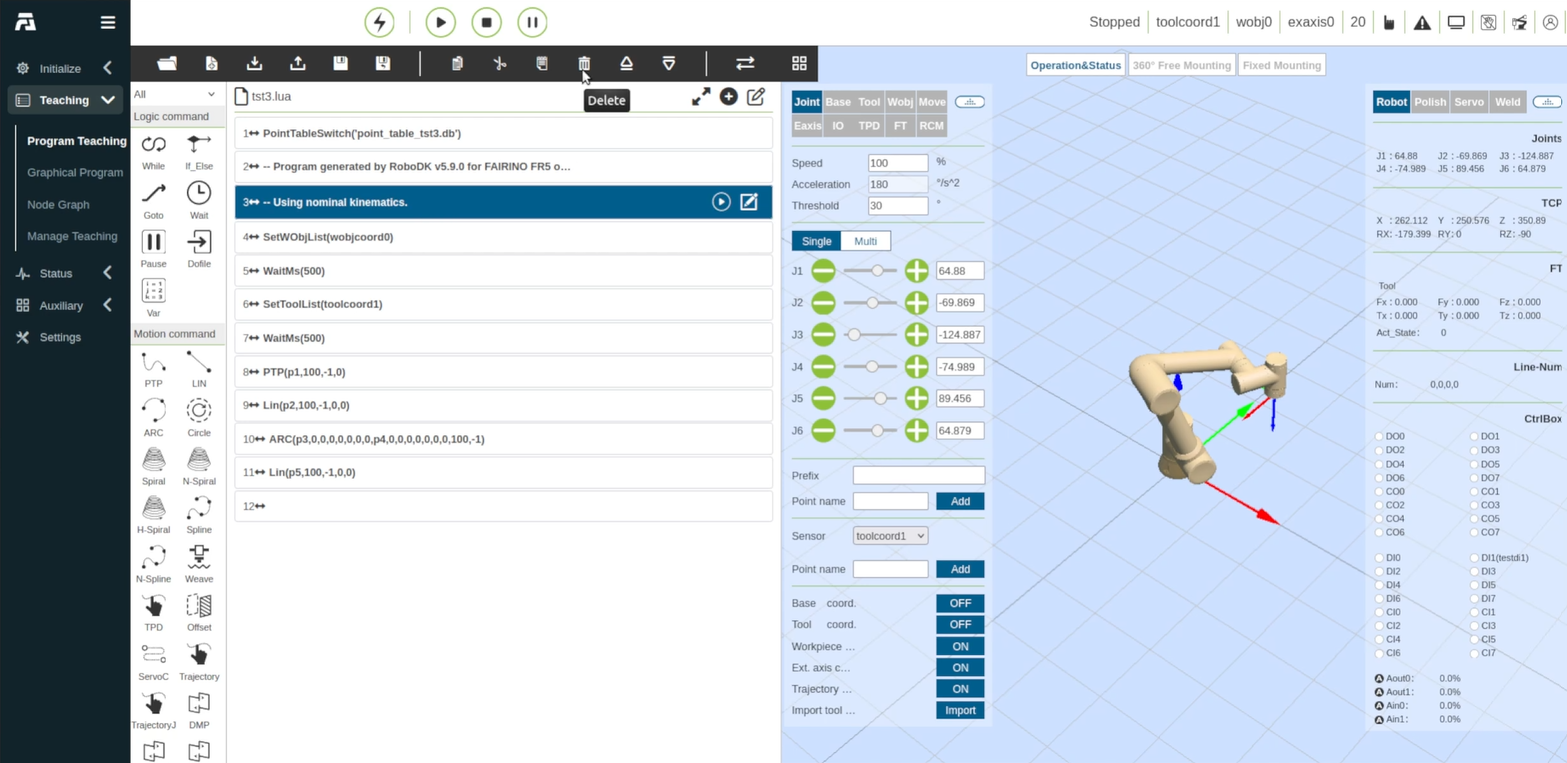
5.Review the loaded program blocks.
6.Select any line you do not need on the controller, such as the comment blocks RoboDK writes at the top of the program (for example, -- Program generated by RoboDK and -- Using nominal kinematics.).
7.Click the Delete (trash can) icon in the editing toolbar to remove the block.
Start a Robot Program
Follow these steps to configure the execution mode and run the FAIRINO robot program.
1.In the top-right header, toggle the operational mode switch from Manual Mode to Auto Mode by clicking "Click to switch modes".
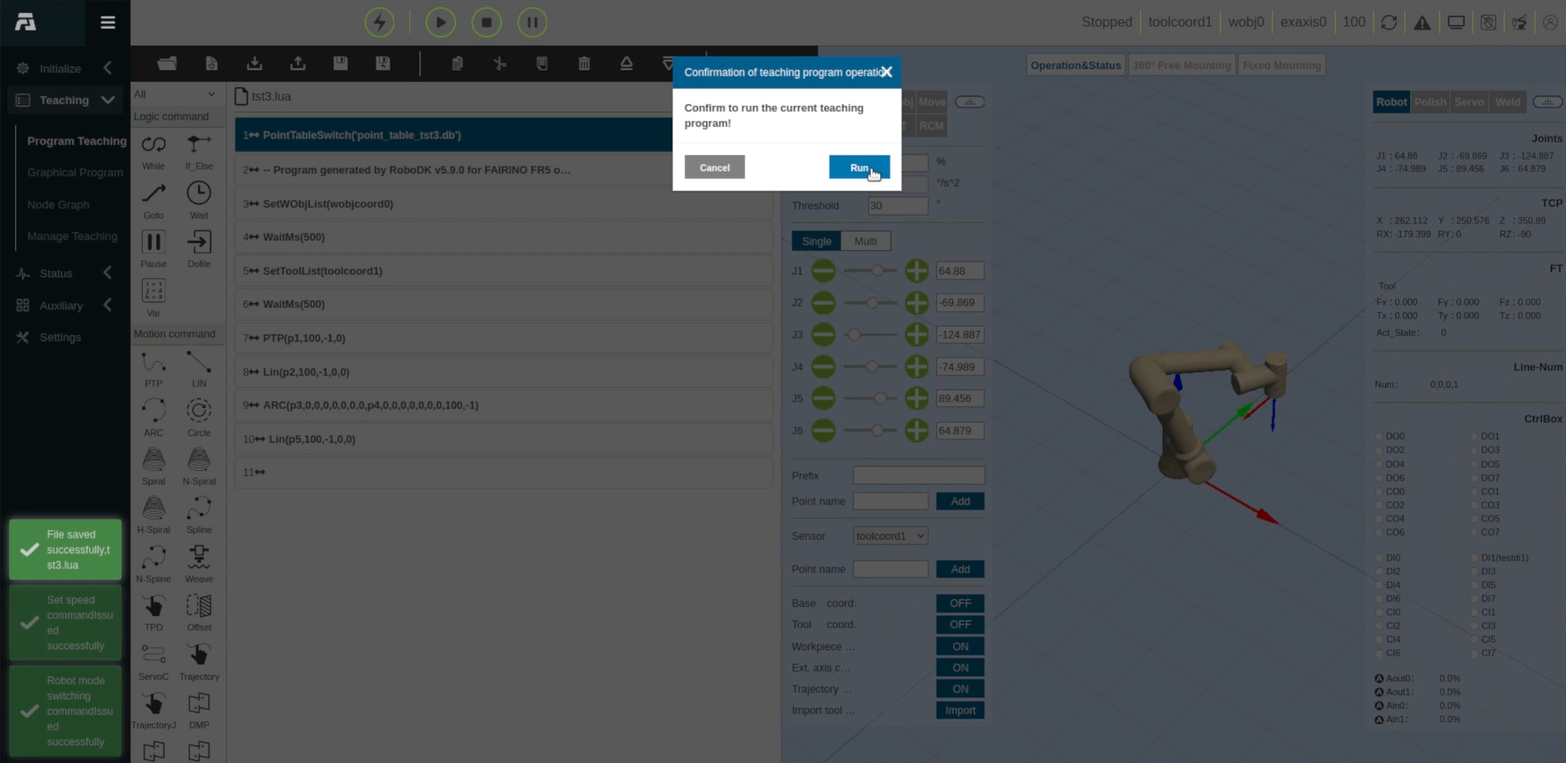
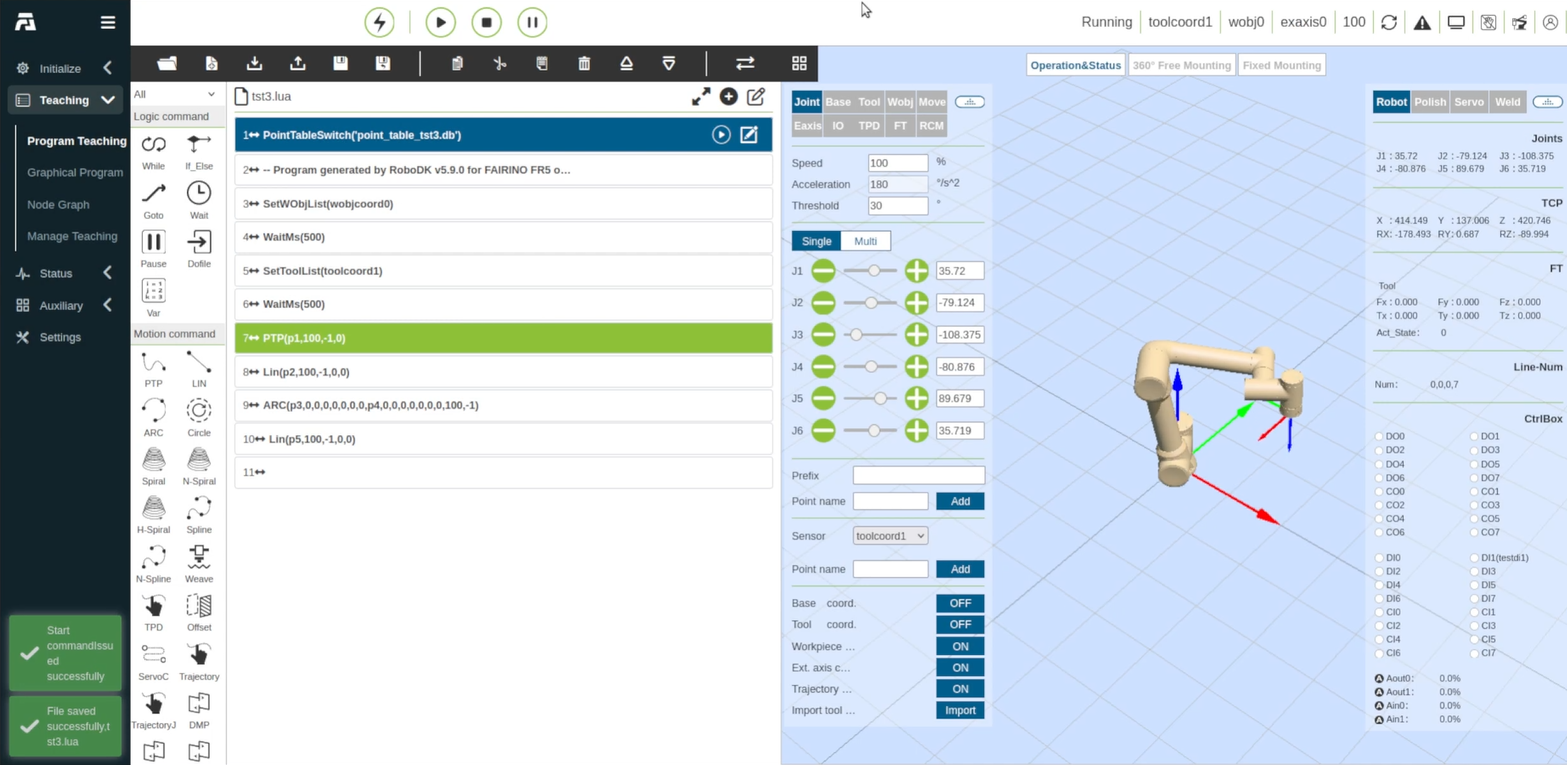
2.Click the Play/Run button on the top execution bar.
3.When the Confirmation of teaching program operation prompt appears ("Confirm to run the current teaching program!"), click Run.
4.The 3D robot model will update and execute the trajectory points sequentially according to the loaded script and point table.
Robot Kinematics Verification
It is necessary to ensure that the robot dimensions (e.g., link lengths and offsets) accurately match those of the actual robot, as they may vary depending on the robot version. Follow these steps to verify whether the DH parameters of your RoboDK robot match your actual FAIRINO robot.
1.In RoboDK, open the robot panel and click Parameters.
2.Inspect the DH parameter table (link lengths a, offsets d, and joint angular offsets theta).
3.Compare these values with the official mechanical drawings and parameters reported in the FAIRINO controller settings to avoid positional inaccuracies between the offline simulation and the real cell.
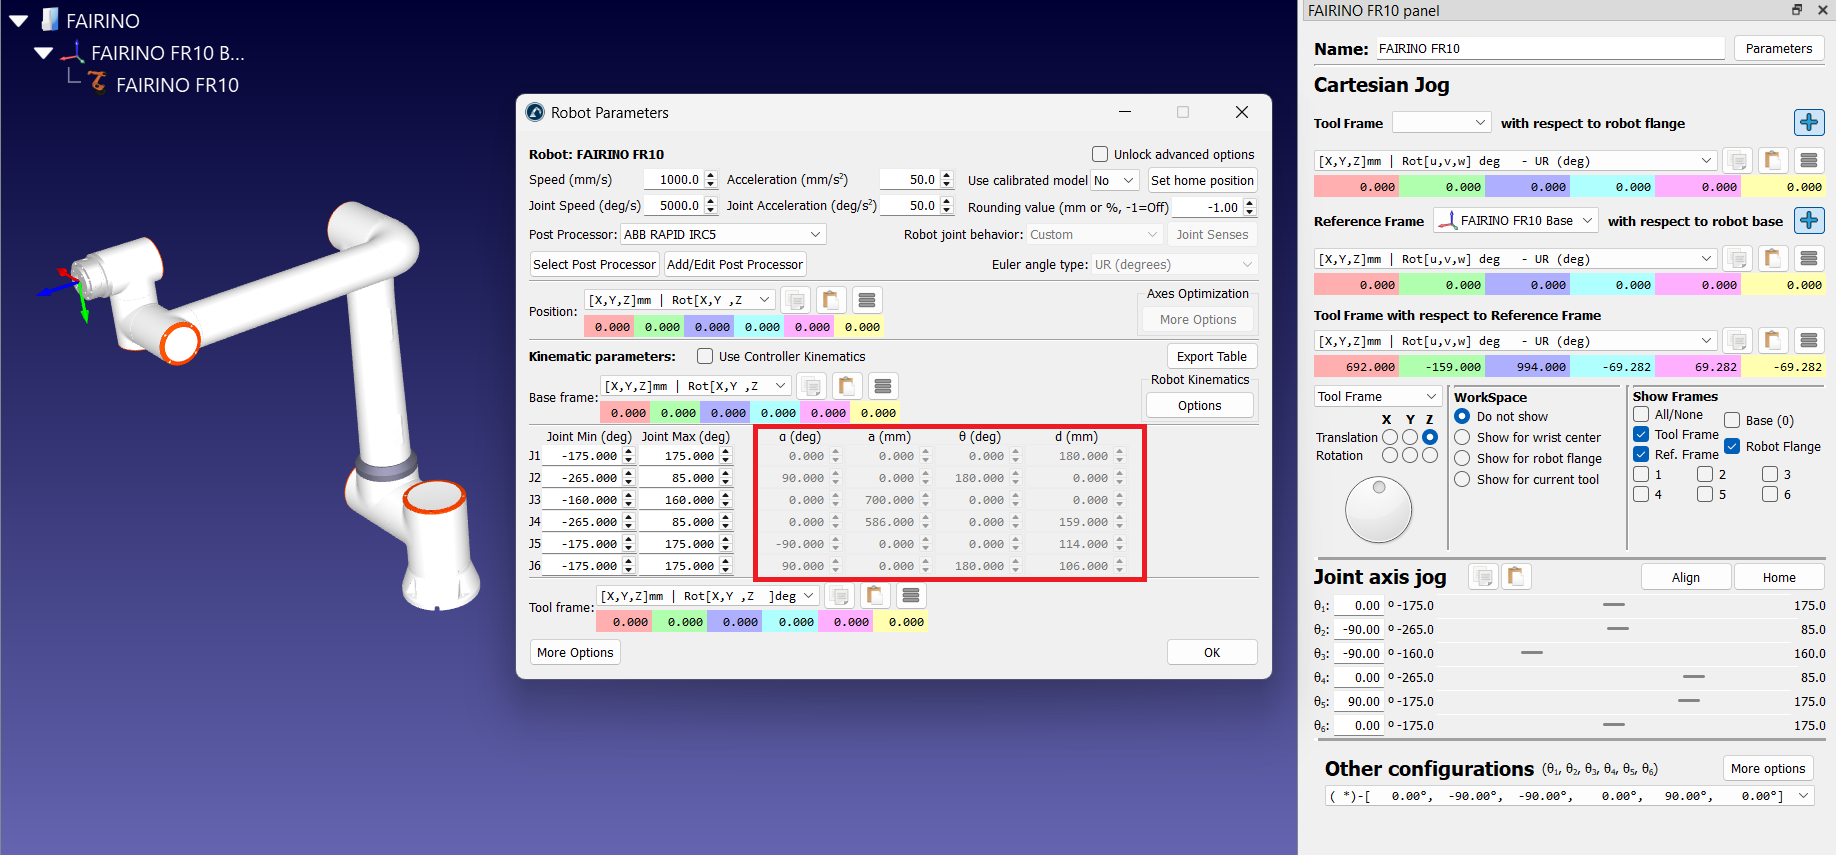
You can also compare the Cartesian coordinates of the flange zero point (also known as the null tool) for similar joint values. This is a good starting point for comparison.


