Smart Motion
The Smart Motion Add-in is a motion planner that helps you automatically create safe paths for your robot to move from one point to another without collisions. It uses a collision avoidance algorithm to ensure that a collision-free solution can be found quickly.
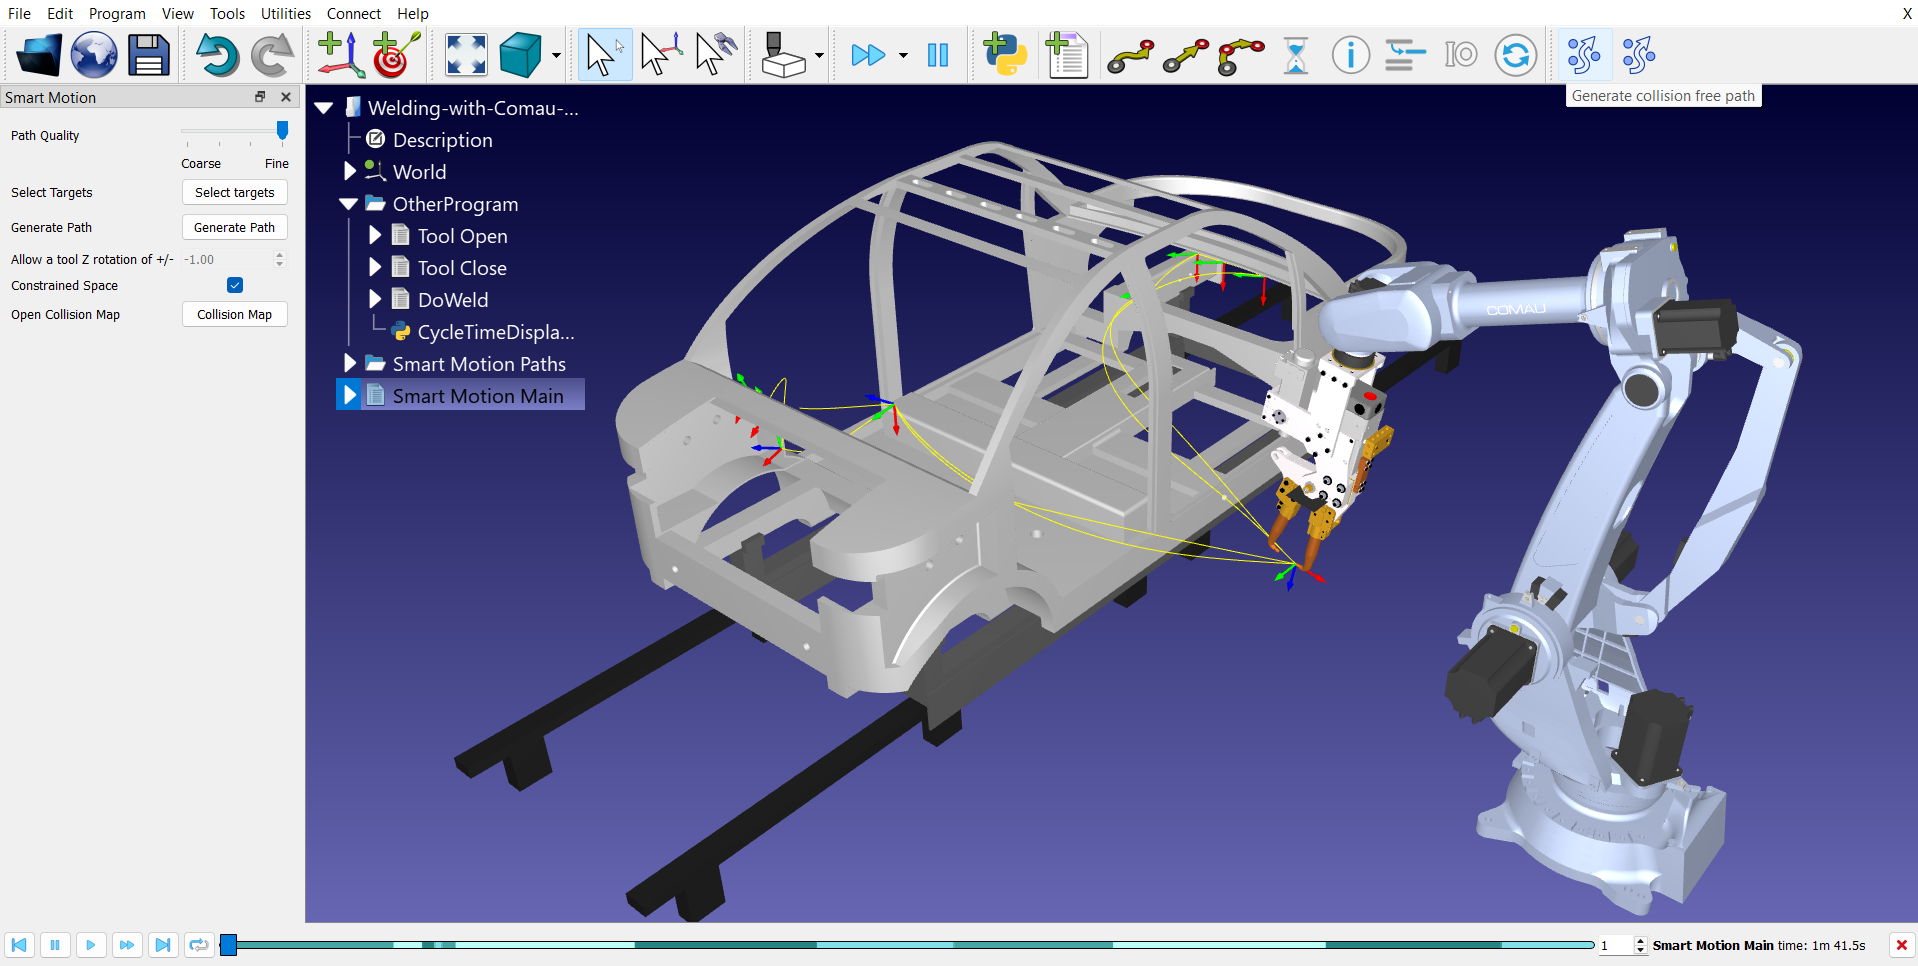
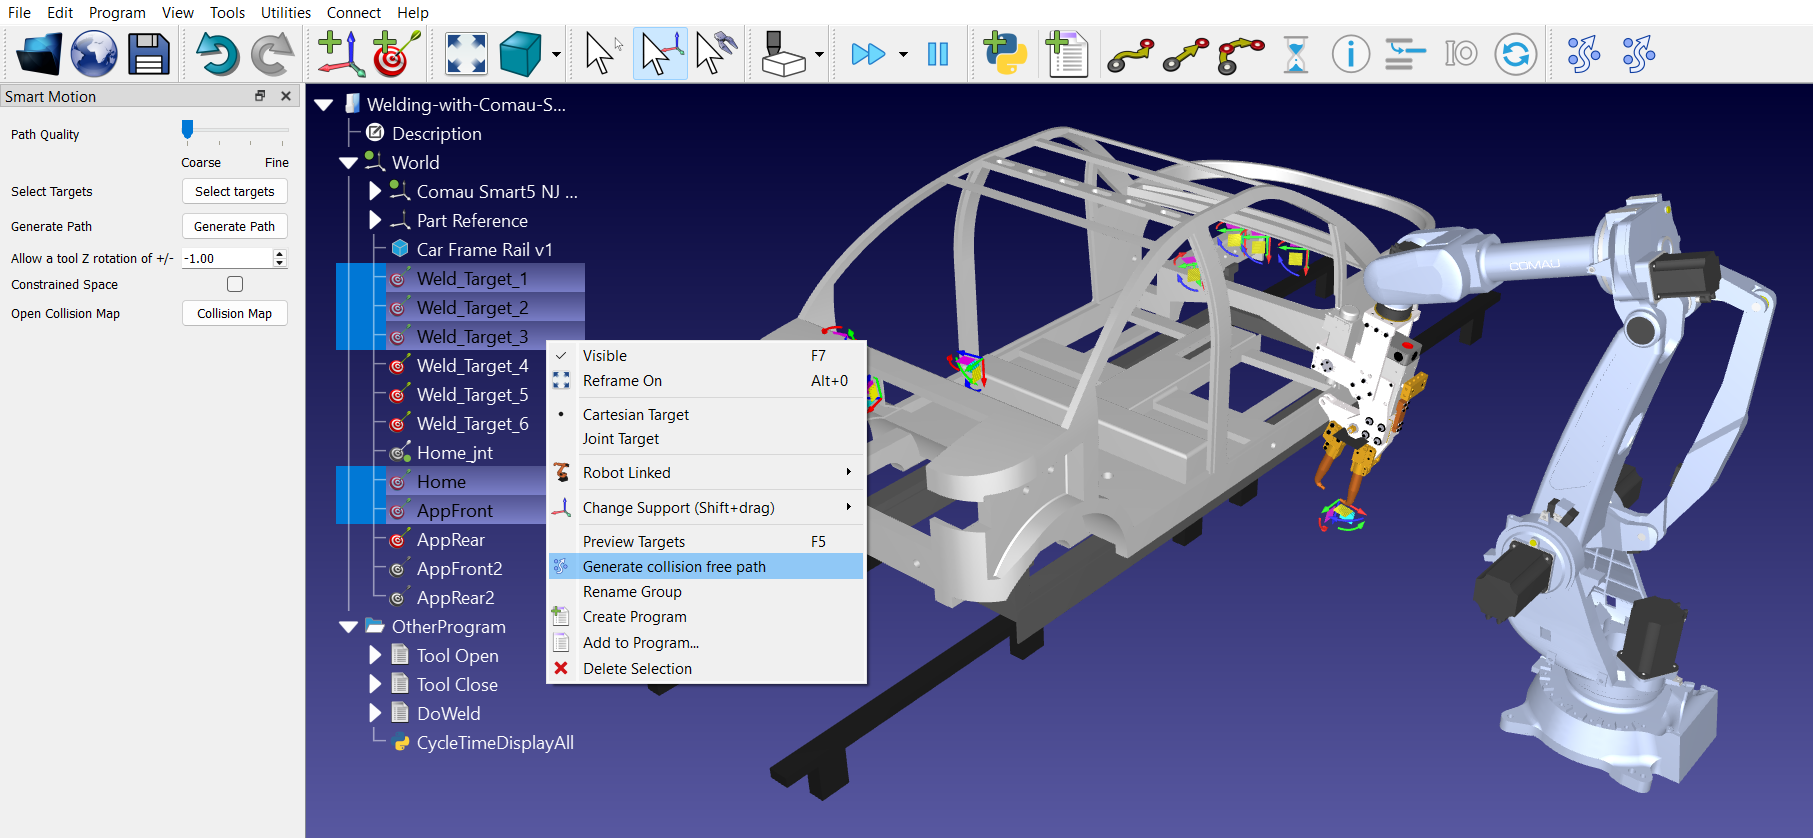
You can open Smart Motion Menu visible by going to Utilities ➔ Smart Motion and clicking on Generate collision free path.
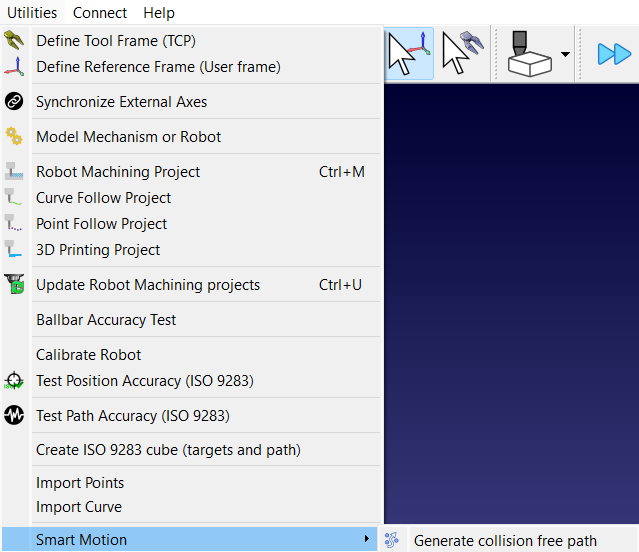
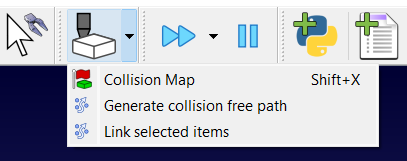
Another way to open the Menu is by clicking the first (leftmost) Smart Motion icon in the toolbar.

You can also access it through the Collision Checking dropdown in the toolbar.
Setup for Smart Motion
You should make sure your RoboDK project is properly configured to effectively use the Smart Motion planner.
Your project should include the following:
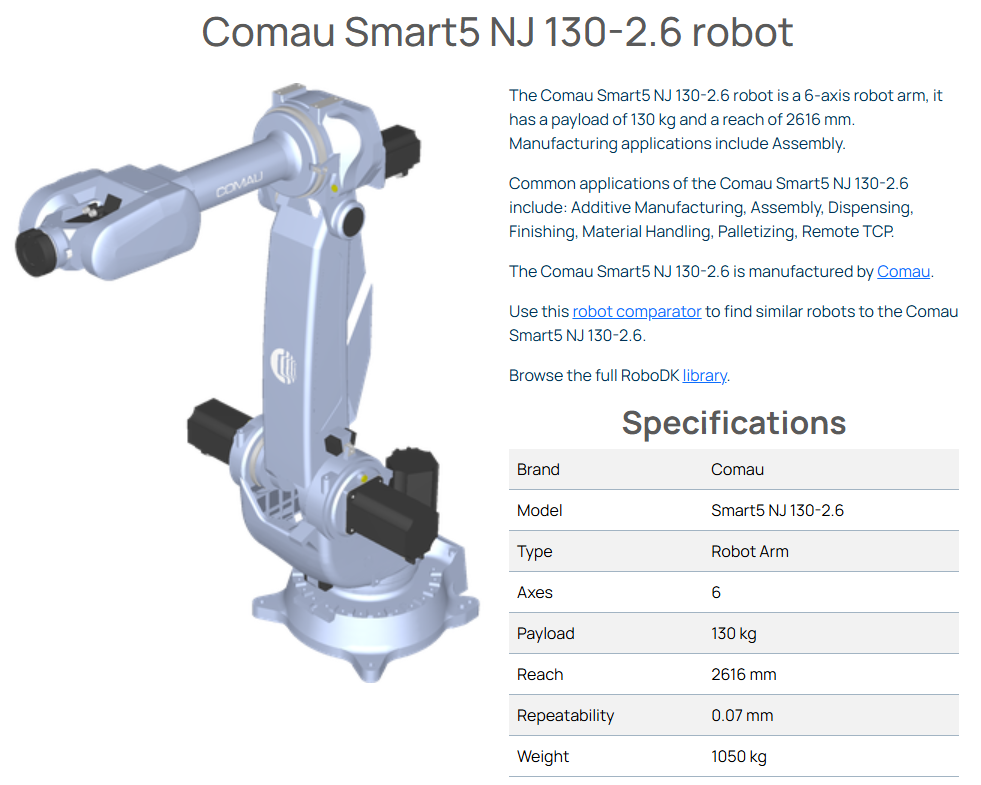
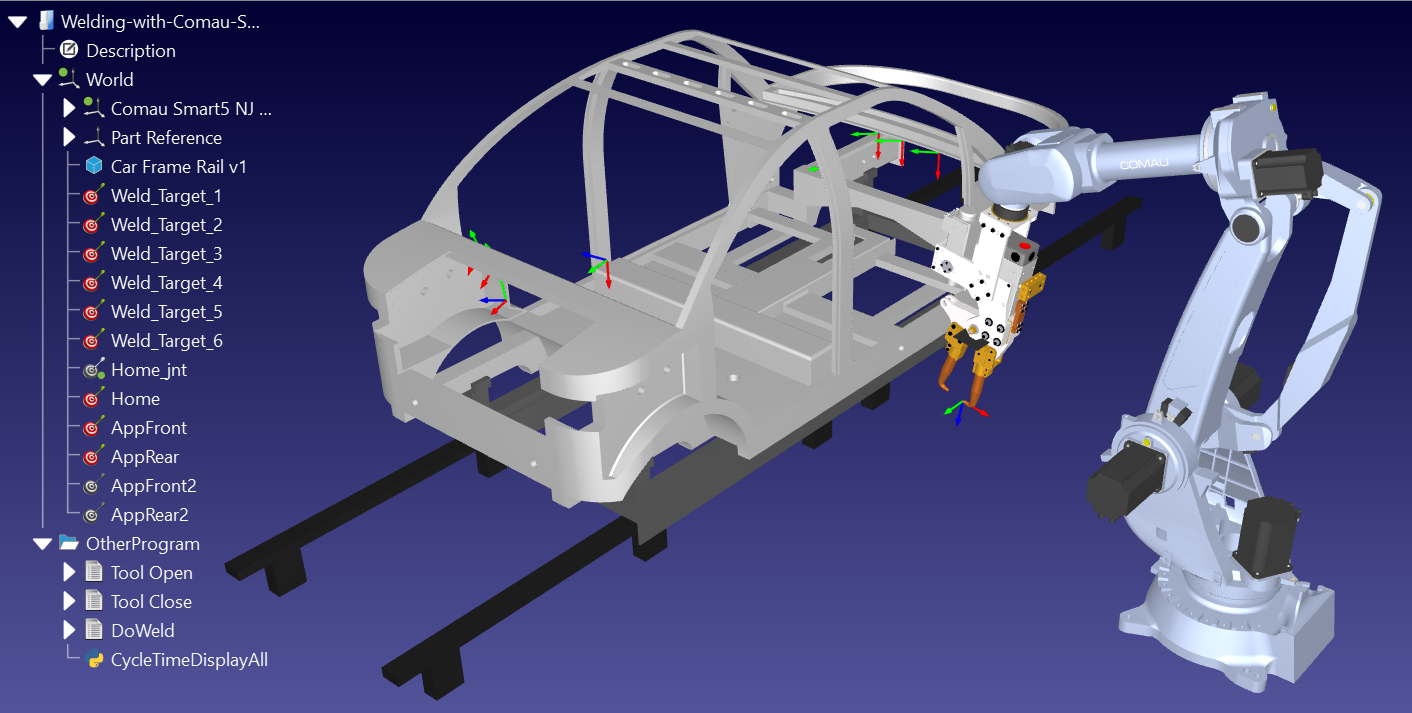
1.Robot: One robot arm. For our example, we are using the Comau Smart5 NJ 130-2.6 robot.
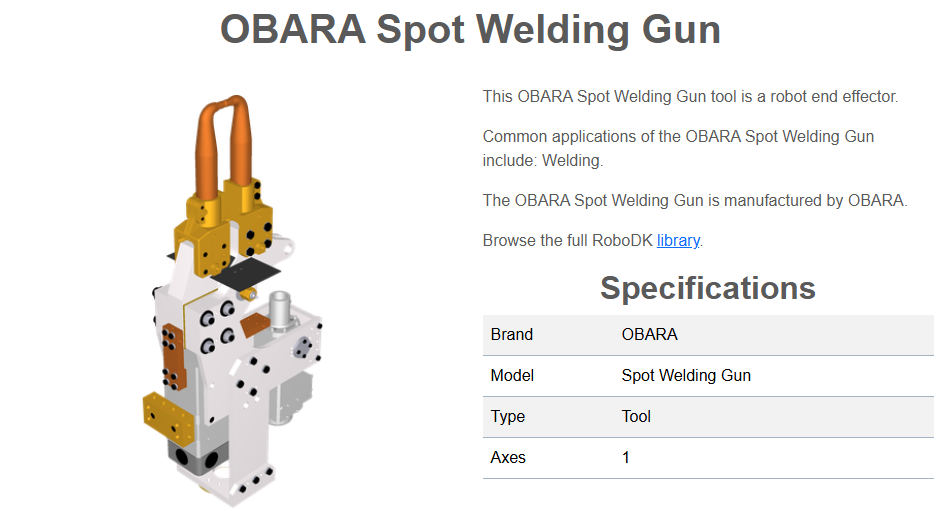
2.Tool: One or more tools (TCP). The spot-welding example will use the OBARA Spot Welding Gun.
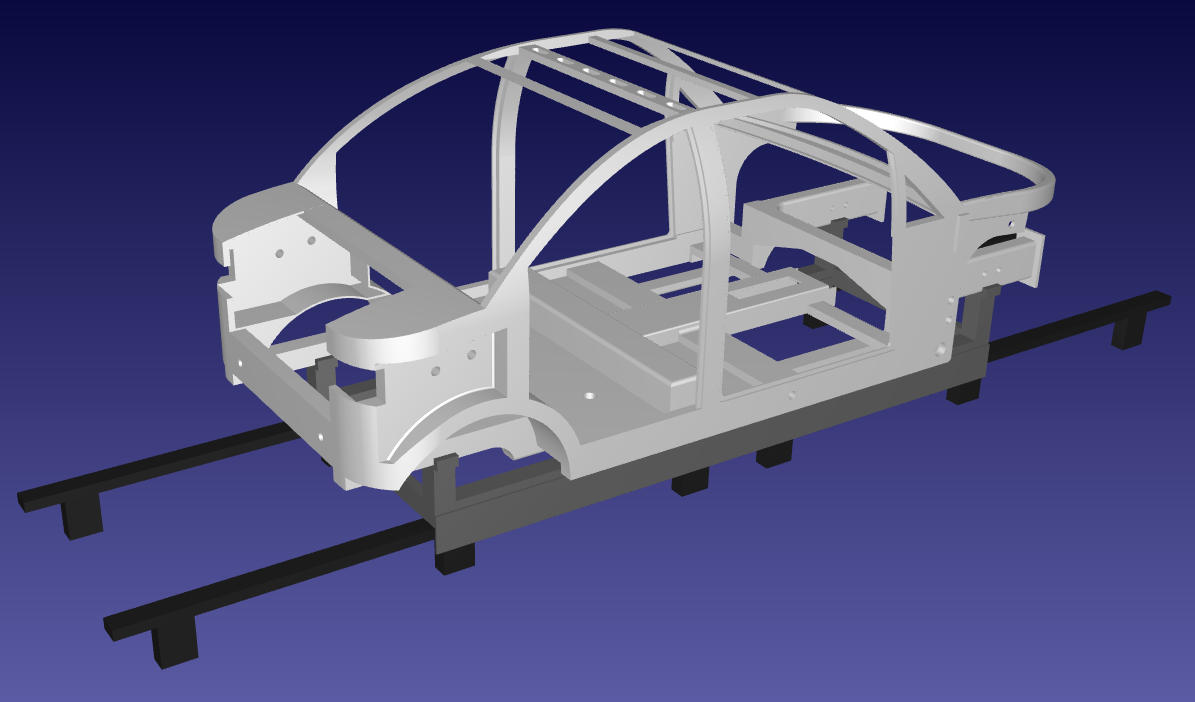
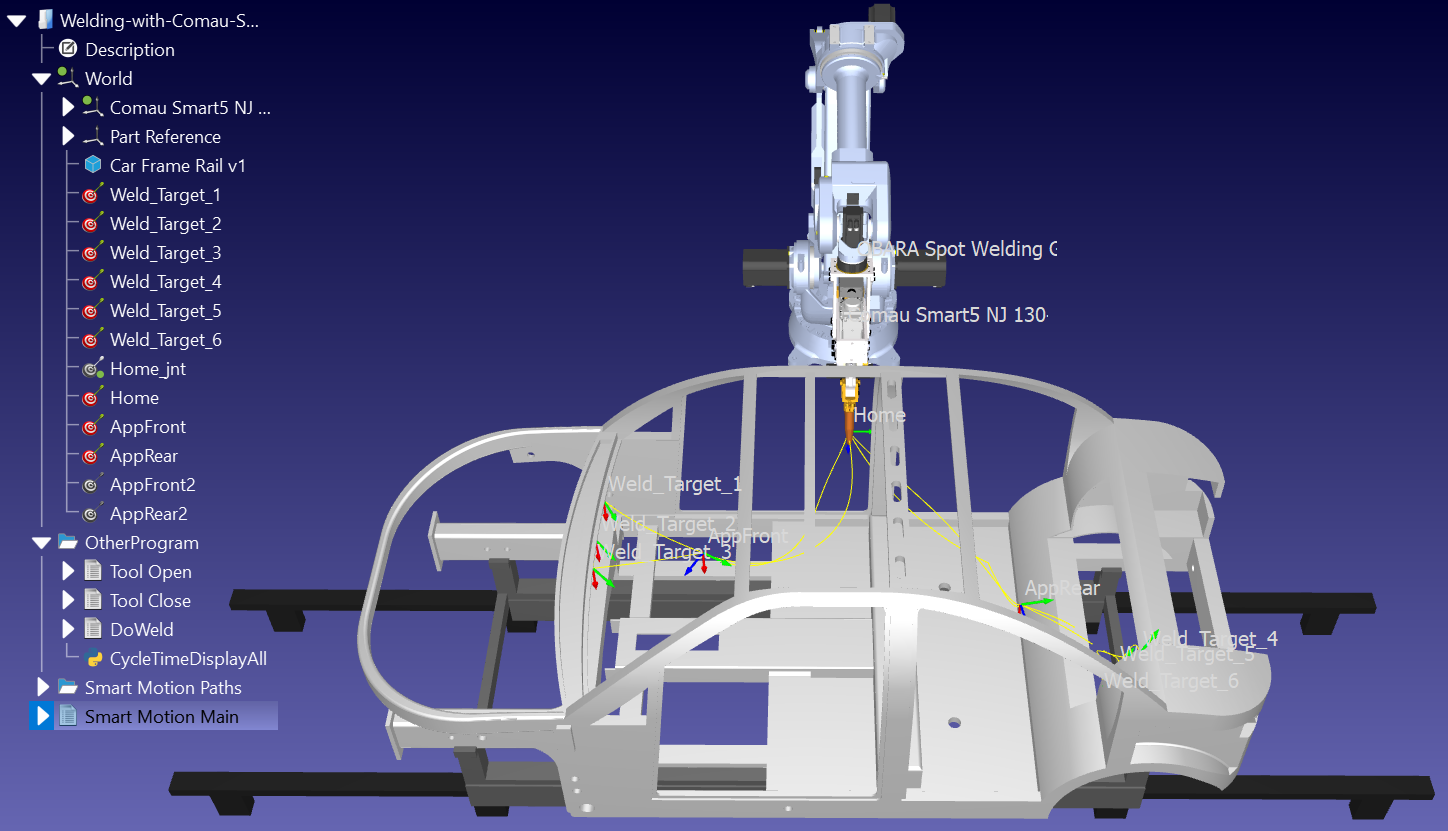
3.Objects: At least one object (obstacle) must be available in the workspace to make use of collision avoidance. In this case, we have used a custom Car Frame along with a Car Frame Rack and a Car Frame Rail.
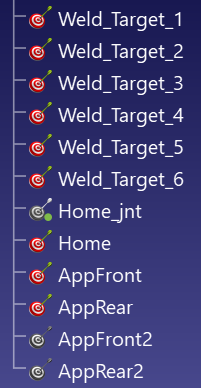
4.Targets: Start and end locations for the generated path should be defined using targets. So, at least two targets should be present in the station. The example contains approach/retract targets at the front and the rear, and also a few targets inside the Car Frame where spot-welding should take place.
Using the Smart Motion Add-in
To create a safe path using Smart Motion, select the targets where the robot needs to go and click Generate Path. The Add-in does the calculation for you.
We’ll be using the following spot-welding example to demonstrate the Smart Motion Add-in: Spot-welding with Comau. This example includes the 4 components we described earlier.
This project also includes collision-free paths in the form of scripts created using the PRM Plug-in. For the purpose of demonstrating the Smart Motion Add-in, we are removing these programs that were created automatically using the PRM Plug-in:
●AppFrontPg
●AppRearPg
●HomePg
●HomeToAppFront
●AppRearToHome
●AppFrontToAppRear
●AppRearToAppFront
●Main
General steps
To use the Add-in, follow these steps:
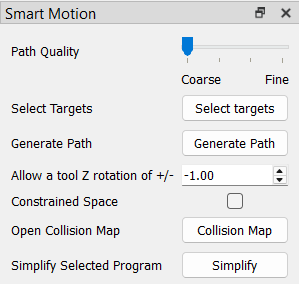
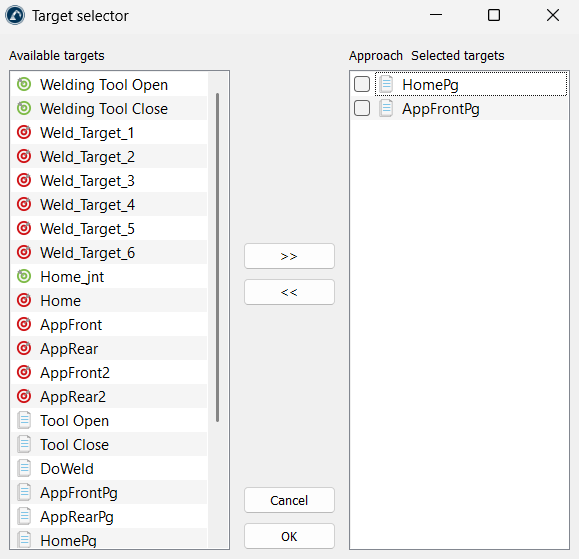
1.Open the Target selector: Click the Select Targets button in the Smart Motion menu to open the selection window. These targets define the path you want to generate.

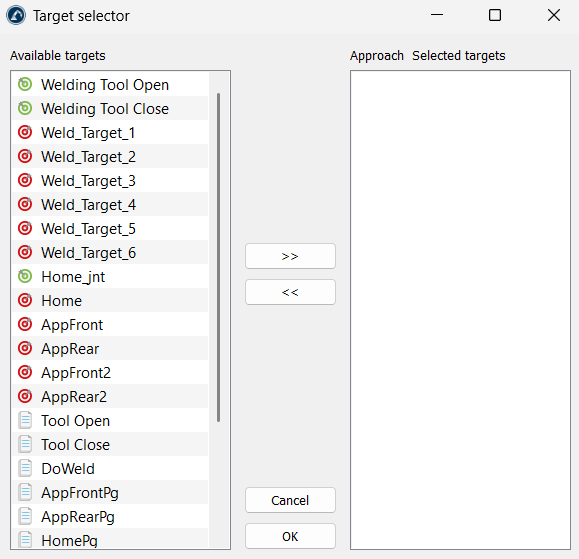
2.Choose and order the points: Select the points you want to use from the Available targets section on the left side and click the >> button to move them to the Selected targets section on the right side. You can change their order on the right side (by using drag-and-drop) to decide where the robot goes first. Once the targets are selected, you can confirm the selection with the OK button.

3.Pick the path quality: Move the Path Quality slider. Use Coarse for quick checks, or move it toward Fine to make sure the robot checks close spaces safely.
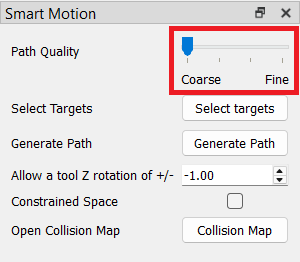
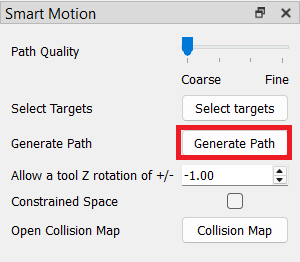
4.Create the path: Click the Generate Path button. The tool will create a safe movement between every pair of points in your list.
You can also "link items" by selecting multiple targets in the station tree (in required order) and clicking on the Link selected items icon in the toolbar (the second or rightmost icon of Smart Motion).
Checkboxes in target selector
When setting up a movement path through the target selector menu, a list of available points is moved over to the Selected Targets list. Next to some of these selected items, a checkbox labelled Approach can be toggled.
These checkboxes act as smart hints for the path-planning solver.
●When Unchecked (Standard Stop): The robot treats the target as a strict destination. It will plan a complete path from Point A to Point B, and then plan a brand-new path from Point B to Point C. The robot will fully commit to arriving exactly at Point B before thinking about the next step.
●When Checked (Pass-By or Approach Point): Checking the box tells the solver that this point is just a temporary "stepping stone" or an entry gate on the way to the real destination. Instead of splitting the movement into separate, rigid chunks (A to B, then B to C), the solver evaluates the entire chain (A ➔ B ➔ C) as a single fluid sequence.
Marking an approach target completely changes how the Simplify Program tool optimizes the path:
●Fluid Cornering: Because the solver knows the robot does not need to stop completely at the approach point, it smoothly blends the motion. The robot travels toward the approach point and gracefully swings into the final destination without "stuttering" or jerking to a sudden halt.
●Aggressive Cleaning: When the simplification tool runs over a multi-point path, it can trim away unnecessary, bulky movements much better if it can look ahead across the entire sequence rather than stopping its calculations at every single intermediate target. This results in fewer lines of code, constant robot velocity, and faster overall production times.
Smart Motion extra options
The Smart Motion Add-in also features extra options in order to fine tune the solution as per our requirements. These options allow us to customize few parameters which affect the final results or the generated path.
Limiting tool rotation
The TCP rotation can be limited by using the Allow a tool Z rotation of +/- option in the menu. If the option is active, the X and Y rotations are locked while the Z rotation is limited to the value selected (e.g., +/- 45°).
This feature functions as the opposite of the Constrained Space, forcing the solver to operate in cartesian space to restrict the tool's orientation. It locks the X and Y rotations, while the Z-axis rotation can be limited to a specific degree range (plus or minus a set value). If the value of this field is set to "0", the Z rotation is also locked along with the X and Y rotations. To keep the rotations of all three axes (X, Y, and Z) unlocked, use a value of "-1" in this option.
Working in a constrained space
If Constrained Space is enabled, the robot will try to reach through a narrow opening or work in a cluttered environment. This setting forces to use the algorithm in joint space (rather than cartesian space) which ensures that the configuration tested is the configuration used. This is critical for robot morphologies where cartesian poses might result in multiple potential joint configurations, causing issues during path generation. By forcing joint space, the system ensures that the identified path is unique and collision-free.
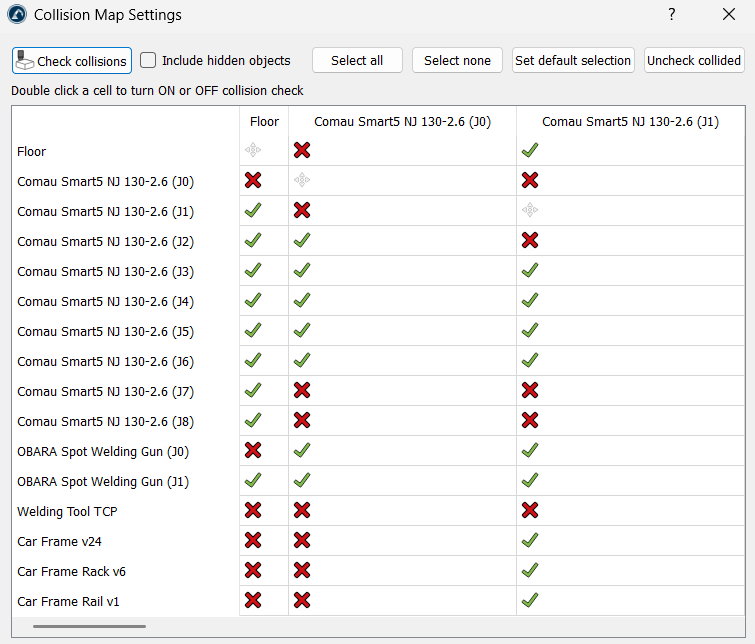
Opening the collision map
You can also open RoboDK’s Collision Map Settings by clicking on the Collision Map button in Smart Motion’s menu. A properly configured collision map ensures that the Add-in calculates a trajectory that maintains a collision-free path by referencing the collision matrix.
Simplify a generated program
The Simplify Selected Program option allows the user to reduce the number of instructions in a program while avoiding collisions. In other words, it simplifies an already created program to reduce the number of targets in the path while ensuring the path remains collision-free.
This is helpful in the following aspects:
1.Reduces Program Size: It analyses the path and removes unnecessary targets. This is vital for older robot controllers that have limited memory and can only store a certain number of lines of code.
2.Smoother Motion: By removing redundant points, you prevent the robot from "stuttering". Controllers can sometimes jerk or slow down if they receive too many commands for the same small area; simplifying the path helps the robot maintain a more constant, fluid speed.
3.Faster Execution: A simplified program often results in shorter cycle times because the robot's controller doesn't have to process as many points, allowing it to focus on maintaining the programmed velocity.
4.Cleans Up "Messy" Paths: If the program is created by recording movements or importing a dense CAD path, it might have hundreds of unnecessary points. This tool "cleans" that data while ensuring the new, shorter path still avoids all collisions.
5.Maintains Configuration Safety: Like the rest of the Smart Motion, the simplification process respects the robot's configuration. It ensures that while points are being removed, the robot doesn't accidentally try to switch its configuration (like an elbow flip) in a way that would cause a collision.
Creating movements between programs
Smart Motion is not restricted to linking targets; it can also bridge distinct standalone programs. This feature is highly useful for linking complex operations such as moving from a pick-up sequence to a machining path without manual intervention.
To use this feature, select separate program items within the Target Selector interface to calculate safe transition paths from the ending state of the first program to the entry state of the second.
The Add-in links two programs by identifying the last move of the first program and the first move of the subsequent program, effectively generating a connecting path between them.
Smart Motion vs Collision-Free Motion Planner
In RoboDK, both Smart Motion and the Collision-Free Motion Planner (PRM) are designed to help a robot move without hitting obstacles. However, they use different math and workflows to get the job done.
The motion planning feature in the Collision-Free Motion Planner automatically creates collision-free paths within the robot's workspace by using a motion planning algorithm called "probabilistic roadmaps" (PRM).
How to connect targets
The biggest difference between both the motion planners is how much preparation work has to be done before the robot moves.
The PRM planner is a tool that works like building a permanent road network. It first runs a "construction phase", where several minutes are spent in randomly placing points and trying to connect them into a giant roadmap. Once that map is finished, finding a path is instant because the "roads" are already built. However, if you move even one table or box or any other object in the station, the entire map is useless and you have to rebuild it from scratch.
Smart Motion is built to be much more flexible. There is no slow map-building step. It looks at exactly where the robot is and where it needs to go, then finds a safe "tunnel" through the obstacles. It is a one-step process: pick the points (targets), click generate, and it moves. If you move an object in your cell, just click Generate Path again without waiting for a new map.
Calculation time
Speed in motion planning isn’t just about how fast the robot moves, but how long the planner takes to calculate.
The "query phase" in the PRM planner (finding the path on the map) is very fast, but it also comes with a very long "construction phase". It is great if the station is always static, but takes time if there are frequent changes being made.
Smart Motion uses an algorithm which is incredibly fast at solving a single "A to B" problem. It starts searching from both ends of the path at the same time and meets in the middle. This makes the "thinking time" almost unnoticeable for most common tasks.
Navigating tight spaces
The focus of any motion planner is collision detection and avoidance. Hence, the precision of the generated safe paths is a very important factor.
The PRM planner relies on the random points it placed during the mapping phase. If the random points do not land inside a narrow space, the robot will think it is blocked, even if there is plenty of room. A larger Number of samples and more Edges per sample will produce a finer-grained roadmap which will take longer to generate, but will lead to a more precise solution.
Smart Motion includes a Constrained Space option for such tricky spots. When this is on, the solver is forced to operate in joint space rather than cartesian space. By doing so, it ensures that when a pose is tested, the system identifies a unique joint configuration, which prevents issues related to multiple possible solutions for a single cartesian pose. In short, this helps the planner remember the robot's position and configuration to ensure the found path is preserved.
Smoothness and safety
Both the motion planners allow us to control how much the robot "worries" about its surroundings.
To get a smoother or safer path using the PRM planner, the Number of Samples and Edges per sample need to be increased accordingly. This makes the map better but makes the wait time longer.
Smart Motion uses a simple Path Quality slider with the following limits:
1.Coarse: This is used for wide-open spaces to get an answer immediately.
2.Fine: This is used for complex jobs. It forces the robot to take "tiny steps" to check for collisions and generate an overall smooth path.