로봇
3D 프린팅또는적층제조는디지털파일에서3차원솔리드객체를만드는프로세스입니다. 산업용로봇암은3축 3D 프린터또는 RoboDK와함께5축 3D 프린터로사용할수있습니다. 다음영상은 RoboDK를오프라인으로사용하여 3D 프린팅을설정하는방법에대한개요입니다. 영상 보기.
로봇을사용한 3D 프린팅은다음방법중하나로가능합니다.
●로봇 가공 프로젝트와같이 RoboDK를사용하여 G 코드프로그램(NC 파일)을로봇프로그램으로직접변환합니다. 재료흐름속도(압출기지침 E)는각움직임에대해적절히고려되며생성된프로그램에프로그램 이벤트로통합될수있습니다. G 코드는 RoboDK에서지원하는 NC 파일유형이며많은 3D 프린터에서지원되는형식이기도합니다. 대부분의슬라이서소프트웨어는 STL 파일이주어지면 G 코드를생성할수있습니다.
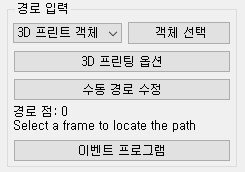
●유틸리티➔3D 프린트 프로젝트를선택하여 3D 프린팅설정을여십시오. 이설정은로봇 가공 프로젝트와동일하지만경로입력이3D 프린트 개체로사전설정되어있다는점만다릅니다. 메인화면에서객체를선택하고공구경로를자동으로얻으려면객체 선택을선택하십시오. 3D 프린팅옵션을선택하여 Slic3r을여십시오.
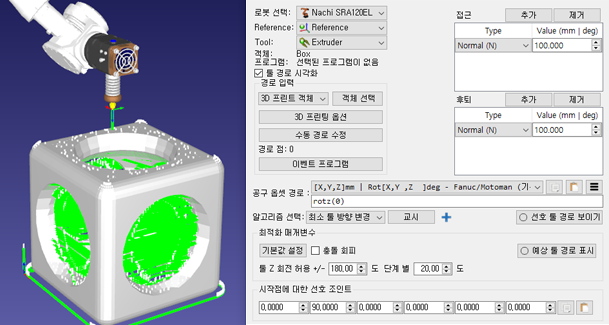
기본적으로 RoboDK는 E 지시문을Extruder라는프로그램에대한프로그램호출로변환하고 E 값을매개변수로전달합니다. 이동작을변경하려면프로그램이벤트를선택하십시오.
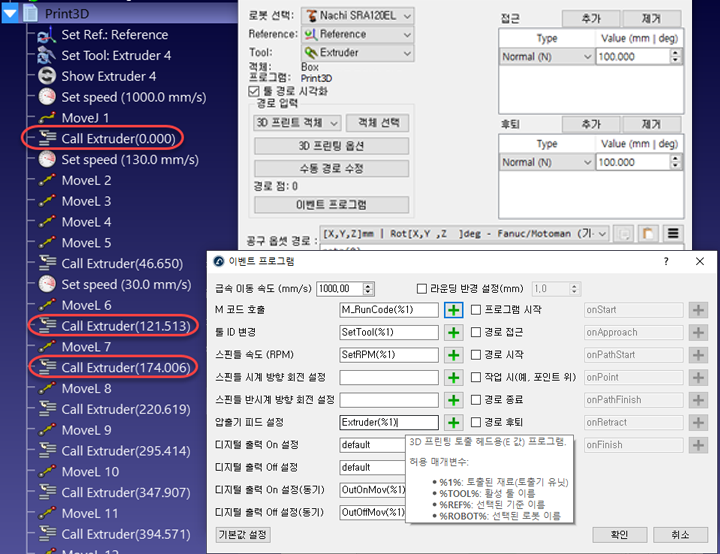
압출기값(E)은각이동전에압출해야하는재료의양을나타냅니다. 이값은로봇속도와포인트사이의거리를고려하여로봇에서압출기피드를구동하는데사용할수있습니다.
또는포스트프로세서를사용하여압출기공급을계산하고그에따라적절한코드를생성할수있습니다. 다음섹션에서이에대한예제를제공합니다.
로봇 3D 프린팅 포스트 프로세서
이섹션에서는로봇포스트 프로세서를수정하여 3D 프린팅을위한이동명령을실행하기전에압출기속도를계산하는방법을보여줍니다. 또는압출기프로그램호출(압출기를구동하기위한기본명령)을사용하여로봇컨트롤러에서이러한작업을수행할수있습니다.
로봇포스트프로세서를개별화함으로써프로그램을로봇으로보내기전에 3D 프린팅을위한압출기의통합을더욱쉽게할수있습니다. 이러한작업을수행하려면로봇포스트프로세서에서프로그램이생성될때일부계산을수행하고맞춤형코드를출력해야합니다.
Note: ABB RAPID IRC5, KUKA KRC2 및 Comau 포스트와같은일부포스트프로세서는기본적으로이러한권장수정사항을구현합니다.
첫번째단계는압출기호출대신포스트프로세서의 RunCode 섹션내에서새로운압출기값(E 값)을읽는것입니다. 다음섹션은프로그램에대해생성된모든프로그램호출을처리합니다.
def RunCode(self, code, is_function_call = False):
if is_function_call:
if code.startswith("Extruder("):
# Intercept the extruder command.
# if the program call is Extruder(123.56)
# we extract the number as a string
# and convert it to a number
self.PRINT_E_NEW = float(code[9:-1])
# Skip the program call generation
return
else:
self.addline(code + "()")
else:
# Output program code
self.addline(code)
압출기값(길이 / E)은로봇포스트프로세서에서 PRINT_E_NEW 변수로저장됩니다.
각각의새로운선형이동명령으로 new_move라는함수호출을실행해야합니다. MoveL 명령을시작할때이호출을추가할수있습니다.
def MoveL(self, pose, joints, conf_RLF=None):
"""Add a linear movement"""
# Handle 3D printing Extruder integration
self.new_move(pose)
...
또한, 압출기증분을계산하려면포스트프로세서의헤더에다음변수를추가해야합니다.
# 3D Printing Extruder Setup Parameters:
PRINT_E_AO = 5 # Analog Output ID to command the extruder flow
PRINT_SPEED_2_SIGNAL = 0.10 # Ratio to convert the speed/flow to an analog output signal
PRINT_FLOW_MAX_SIGNAL = 24 # Maximum signal to provide to the Extruder
PRINT_ACCEL_MMSS = -1 # Acceleration, -1 assumes constant speed if we use rounding/blending
# Internal 3D Printing Parameters
PRINT_POSE_LAST = None # Last pose printed
PRINT_E_LAST = 0 # Last Extruder length
PRINT_E_NEW = None # New Extruder Length
PRINT_LAST_SIGNAL = None # Last extruder signal
마지막으로, 이동거리, 로봇속도및로봇가속에따라적절한압출기이송명령을생성하는새로운절차를정의해야합니다. 이는압출기공급이특정아날로그출력또는맞춤형프로그램호출에의해구동된다고가정합니다.
def MoveL 프로그램정의전에다음코드를추가해야합니다.
def calculate_time(self, distance, Vmax, Amax=-1):
"""Calculate the time to move a distance with Amax acceleration and Vmax speed"""
if Amax < 0:
# Assume constant speed (appropriate smoothing/rounding parameter must be set)
Ttot = distance/Vmax
else:
# Assume we accelerate and decelerate
tacc = Vmax/Amax;
Xacc = 0.5*Amax*tacc*tacc;
if distance <= 2*Xacc:
# Vmax is not reached
tacc = sqrt(distance/Amax)
Ttot = tacc*2
else:
# Vmax is reached
Xvmax = distance - 2*Xacc
Tvmax = Xvmax/Vmax
Ttot = 2*tacc + Tvmax
return Ttot
def new_move(self, new_pose):
"""Implement the action on the extruder for 3D printing, if applicable"""
if self.PRINT_E_NEW isNone or new_pose is None:
return
# Skip the first move and remember the pose
if self.PRINT_POSE_LAST isNone:
self.PRINT_POSE_LAST = new_pose
return
# Calculate the increase of material for the next movement
add_material = self.PRINT_E_NEW - self.PRINT_E_LAST
self.PRINT_E_LAST = self.PRINT_E_NEW
# Calculate the robot speed and Extruder signal
extruder_signal = 0
if add_material > 0:
distance_mm = norm(subs3(self.PRINT_POSE_LAST.Pos(), new_pose.Pos()))
# Calculate movement time in seconds
time_s = self.calculate_time(distance_mm, self.SPEED_MMS, self.PRINT_ACCEL_MMSS)
# Avoid division by 0
if time_s > 0:
# This may look redundant but it allows you to account for accelerations and we can apply small speed adjustments
speed_mms = distance_mm / time_s
# Calculate the extruder speed in RPM*Ratio (PRINT_SPEED_2_SIGNAL)
extruder_signal = speed_mms * self.PRINT_SPEED_2_SIGNAL
# Make sure the signal is within the accepted values
extruder_signal = max(0,min(self.PRINT_FLOW_MAX_SIGNAL, extruder_signal))
# Update the extruder speed when required
if self.PRINT_LAST_SIGNAL isNone or abs(extruder_signal - self.PRINT_LAST_SIGNAL) > 1e-6:
self.PRINT_LAST_SIGNAL = extruder_signal
# Use the built-in setDO function to set an analog output
self.setDO(self.PRINT_E_AO, "%.3f" % extruder_signal)
# Alternatively, provoke a program call and handle the integration with the robot controller
#self.addline('ExtruderSpeed(%.3f)' % extruder_signal)
# Remember the last pose
self.PRINT_POSE_LAST = new_pose