การใช้ API
นอกจากนี้ยังสามารถควบคุมการเคลื่อนไหวของหุ่นยนต์ผ่าน RoboDK API ดังตัวอย่าง, โปรแกรมหุ่นยนต์จากโปรแกรม Python หรือแอพพลิเคชั่น C#
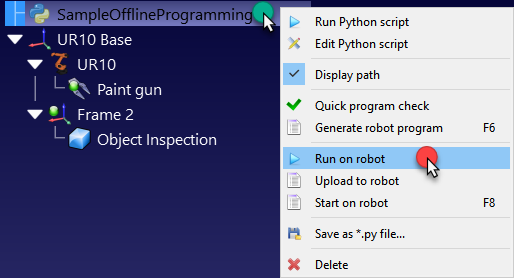
การดำเนินการบนหุ่นยนต์ถูกจัดการอย่างอัตโนมัติเมื่อโปรแกรมPython ถูกดำเนินการจาก RoboDK ทำตามขั้นตอนเหล่านี้เพื่อดำเนินการผ่านโปรแกรม Python program บนหุ่นยนต์:
1.คลิกขวาที่โปรแกรม
2.เลือก
โปรแกรมควรจะเริ่มต้นการดำเนินการบนหุ่นยนต์และสถานการณ์เชื่อมต่อหุ่นยนต์จะถูกอัพเดทตามลำดับ
ถ้าโปรแกรมถูกดำเนินการภายนอก RoboDK’s GUI (เพื่อการแก้ปัญหา, หรืถ้าพวกเราใช้ RoboDK API สำหรับ C# ดังตัวอย่าง), พวกเราสามารถตั้งค่าRunModeโดยใช้RDK.setRunMode กับ RUNMODE_RUN_ROBOT. เป็นการบังคับให้โปรแกรมดำเนินการบนหุ่นยนต์ อีกทั้งยังสร้างการเชื่อมต่อโดยใช้robot.Connect()
โค้ดดังต่อไปนี้แสดงตัวอย่างสั้นๆเพื่อสร้างการเชื่อมต่อระหว่างหุ่นยนต์โดยตรงจาก API:
# Start the RoboDK API
RDK = Robolink()
robot = RDK.Item('',ITEM_TYPE_ROBOT)
# Connect to the robot using default connetion parameters
success = robot.Connect()
status, status_msg = robot.ConnectedState()
if status != ROBOTCOM_READY:
# Stop if the connection did not succeed
raise Exception("Failed to connect: " + status_msg)
# Set to run the robot commands on the robot
RDK.setRunMode(RUNMODE_RUN_ROBOT)
# Note: This is set automatically if we use
# robot.Connect() through the API
# Move the robot:
robot.MoveJ([10,20,30,40,50,60])
prog = RDK.Item('MainProgram', ITEM_TYPE_PROGRAM)
prog.setRunType(PROGRAM_RUN_ON_ROBOT) # Set the run on robot option
# Set to PROGRAM_RUN_ON_SIMULATOR to run on the simulator only
prog.RunProgram()
while prog.Busy() == 1:
pause(0.1)
print("Program done")