Palletizing
Palletizing Add-in
You can accomplish automated palletizing using the palletizing plugin. The palletizing plugin will help you create a palletizing program quickly using a visual and intuitive interface.
This example will guide you through the steps required to go from an empty RoboDK project to a palletizing simulation that you can export to a real robot program that can be loaded and executed on a robot controller.
Download and activate the palletizing Add-In
You can find the latest version of the Palletizing Add-In in the Add-in Marketplace. For more information on how to install and activate Add-ins, visit the Add-in Manager section.
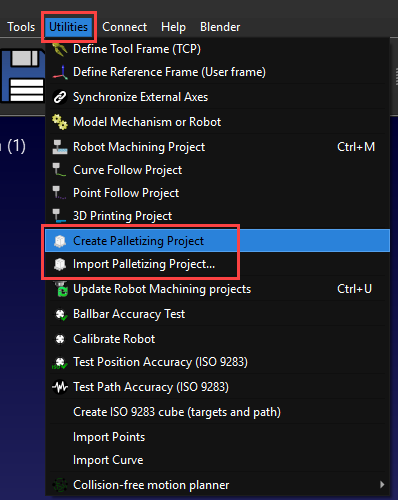
To make sure the installation and activation was successful, navigate to Utilities, and you should see the new following options: “Create Palletizing Project” and “Import Palletizing Project…”
Preparing Your Station
To create a palletizing project, you first need to properly set up your station in RoboDK.
Follow these steps to properly set up your station:
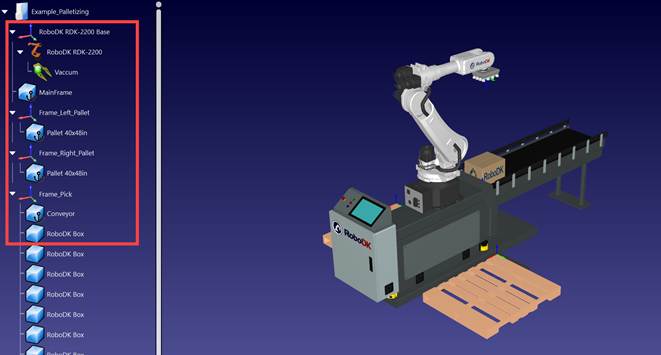
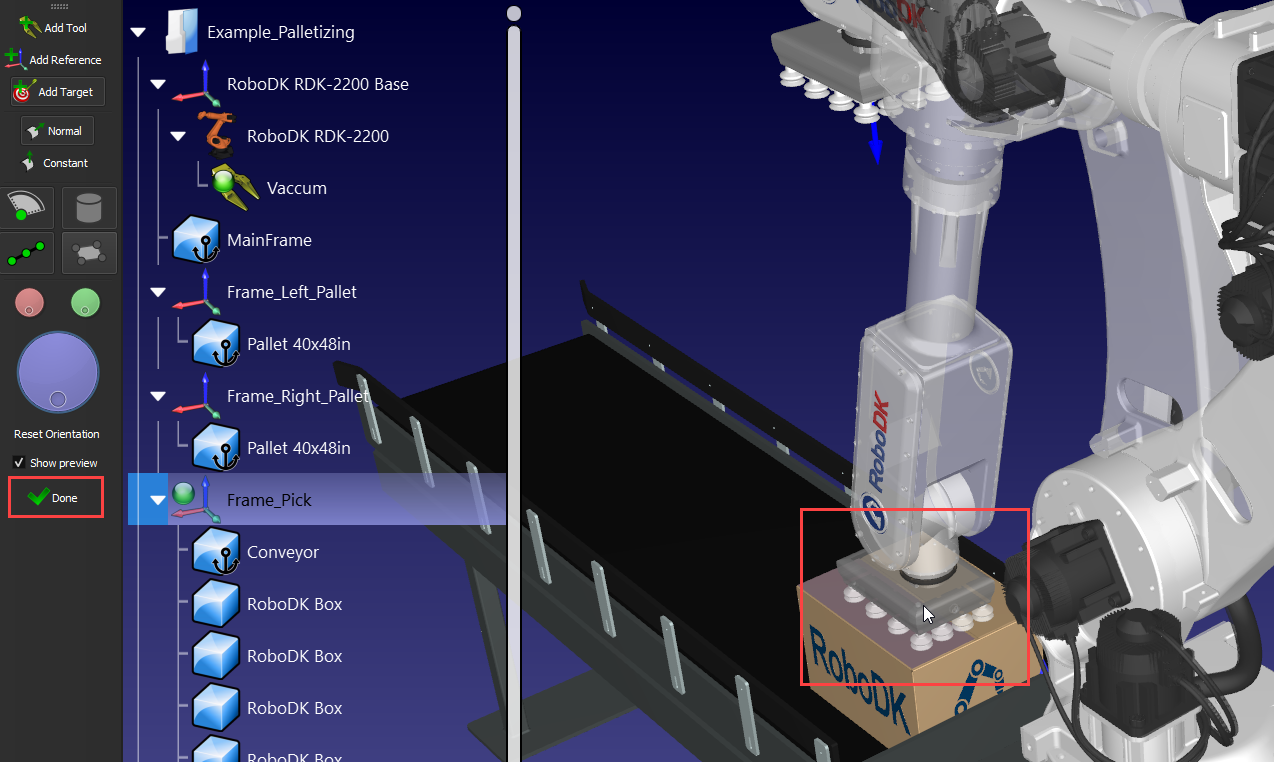
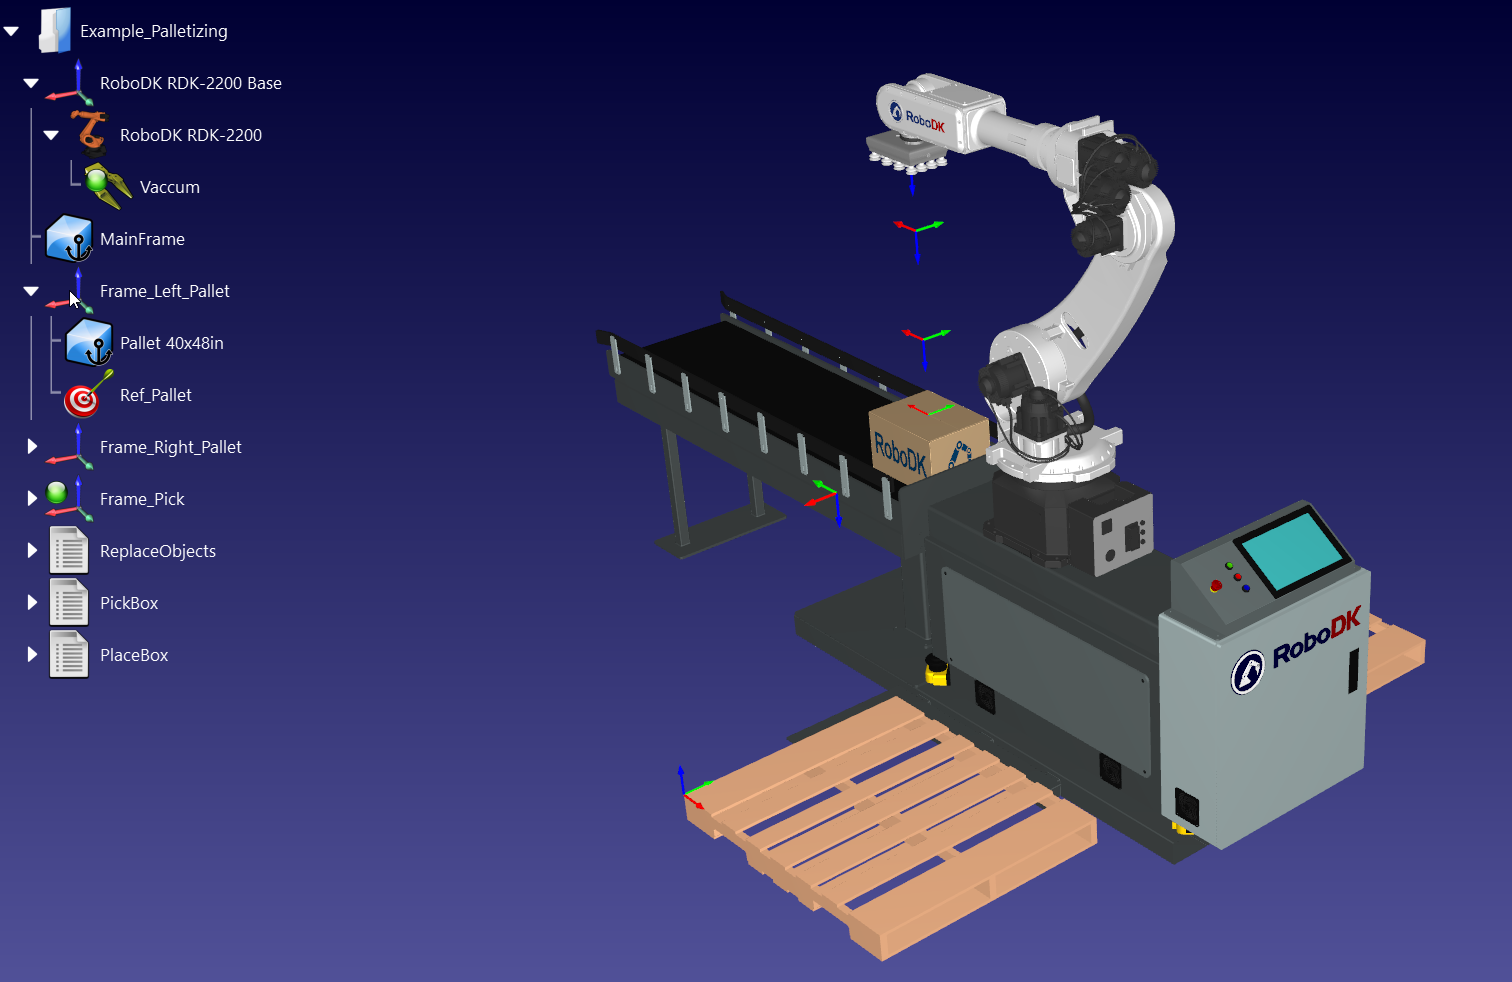
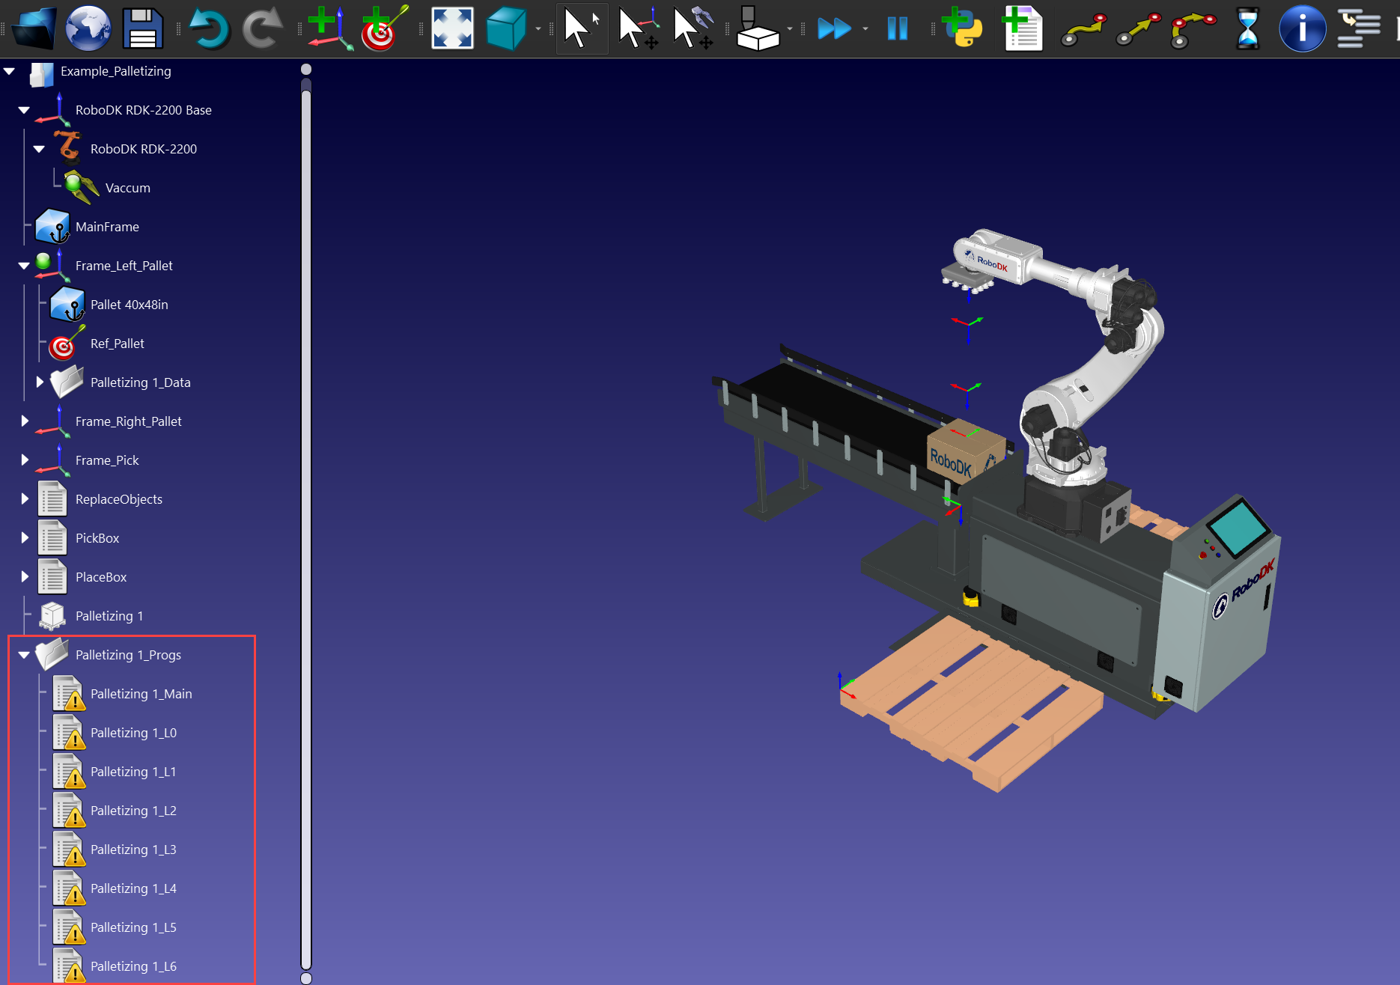
1.You should load a robot, a tool, a box, a reference frame where you’re going to teach your targets to pick the box (ex.: Frame_Pick), a pallet, and a reference frame on the corner of your pallet (ex.: Frame_Pallet). You can also load a conveyor if you have one.
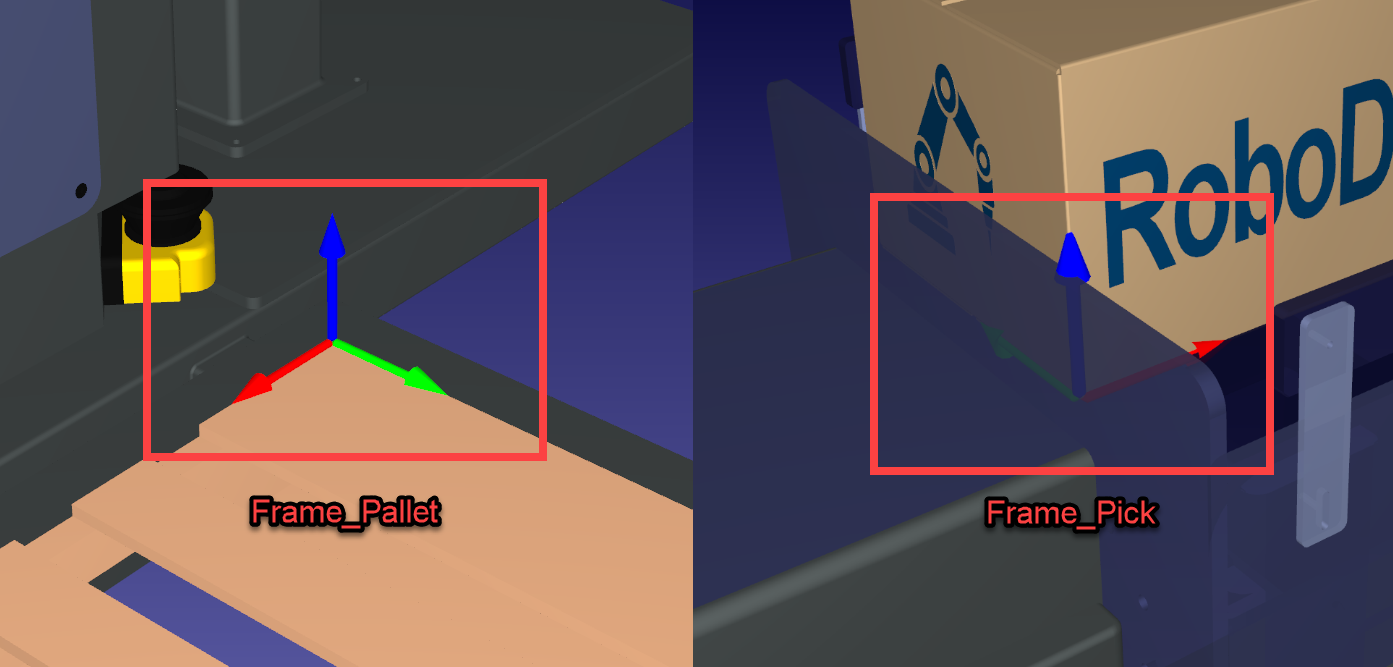
2.The pallet reference frames must be oriented with their X+ axis pointing in the direction of the pallet length.
3.The pallet reference frames must be oriented with their Z+ axis normal to the pallet (pointing upwards).
4.Make sure to associate the pallet and box with their respective reference frames. This is to make sure that if you need to move them, the robot targets will automatically update their position in real time.
5.Reposition the different objects/frames as needed.
6.Clone the box multiple times by copying and pasting it in the “Frame_Pick” so you can do multiple picks.
7.Make sure to lock your 3D objects, but not the boxes, into their frame by right-clicking then “Lock”.

Create Pick and Drop
The palletizing wizard requires you to provide a subprogram to pick a new box and a subprogram to place the box. The “PlaceBox” program is only to detach the box from the gripper and to transfer it to your pallet frame; the actual place targets will be created automatically by the Palletizing Add-In later.
Follow these steps to create a pick program “PickBox” and a drop program “PlaceBox”:
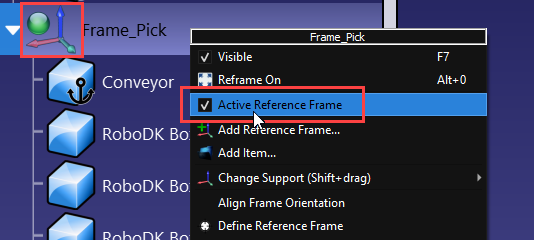
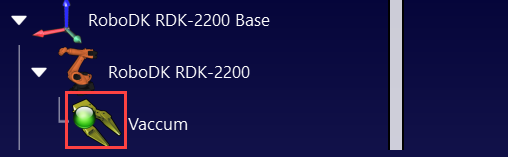
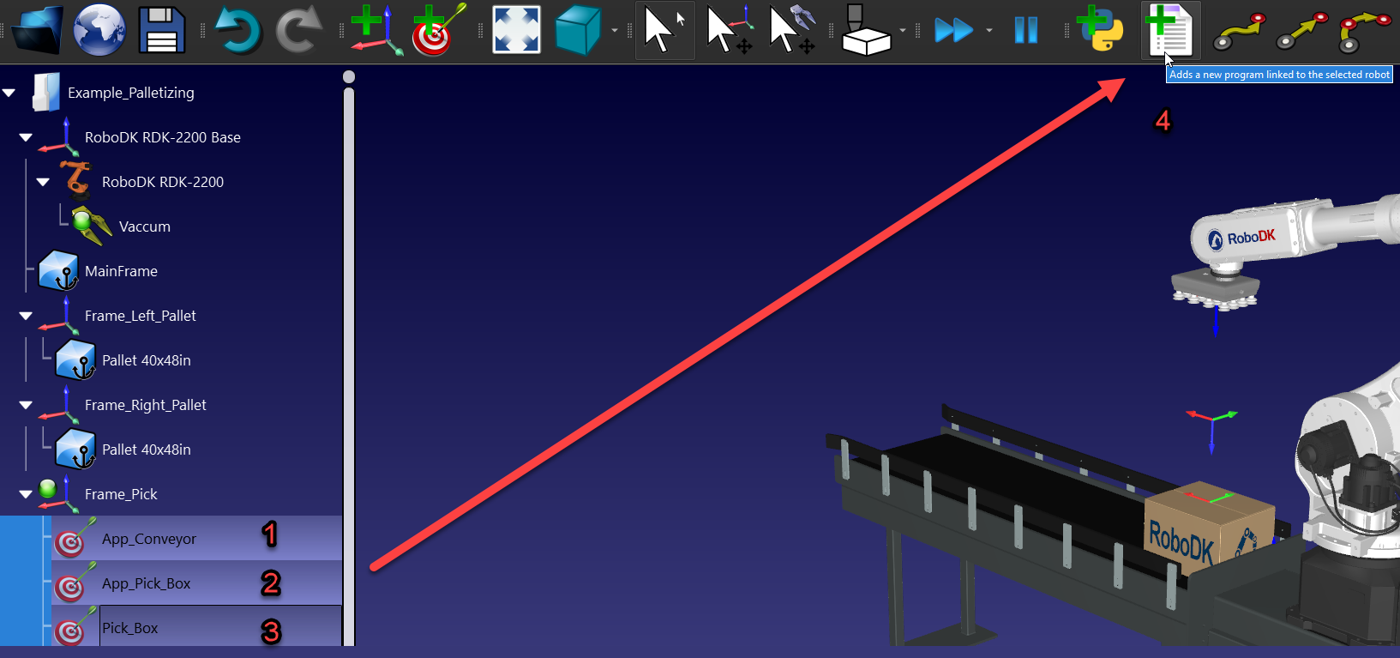
1.First, make sure to activate the “Frame_Pick” and to have your tool active before creating new targets. They should have a green circle if they’re active.
2.In the “Program” tab, select “Teach Target(s) on Surface”. Click on top of the box and then click on “Done”.
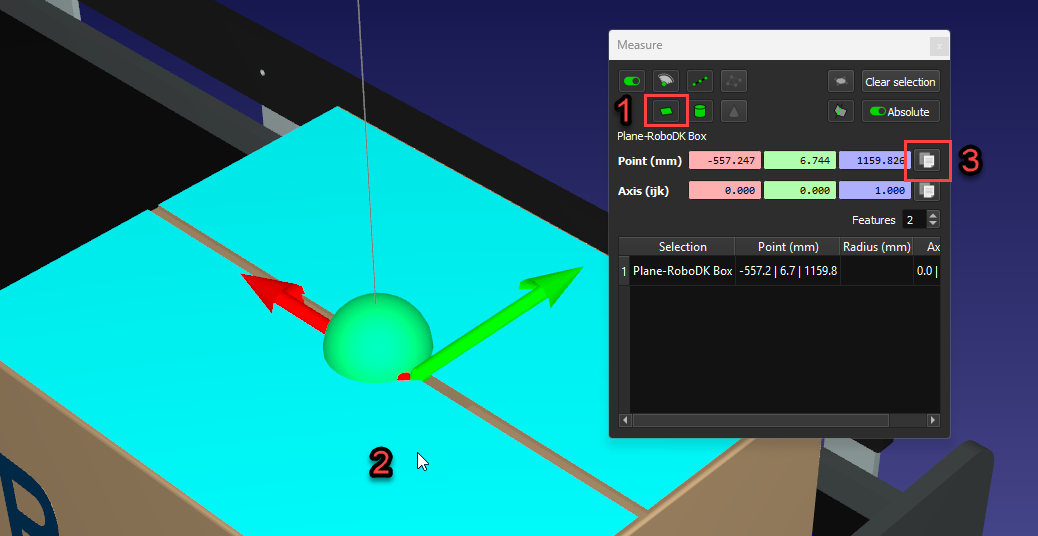
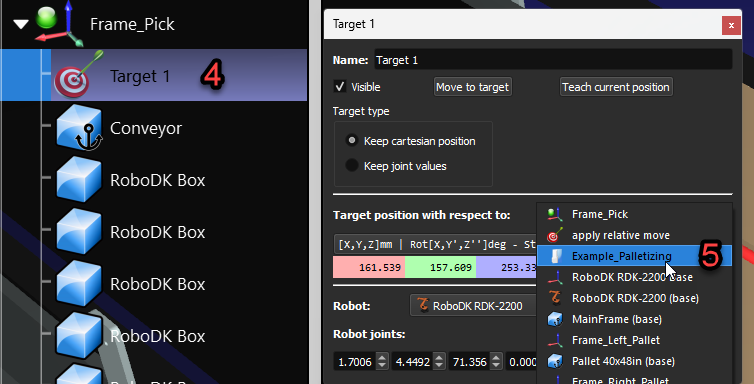
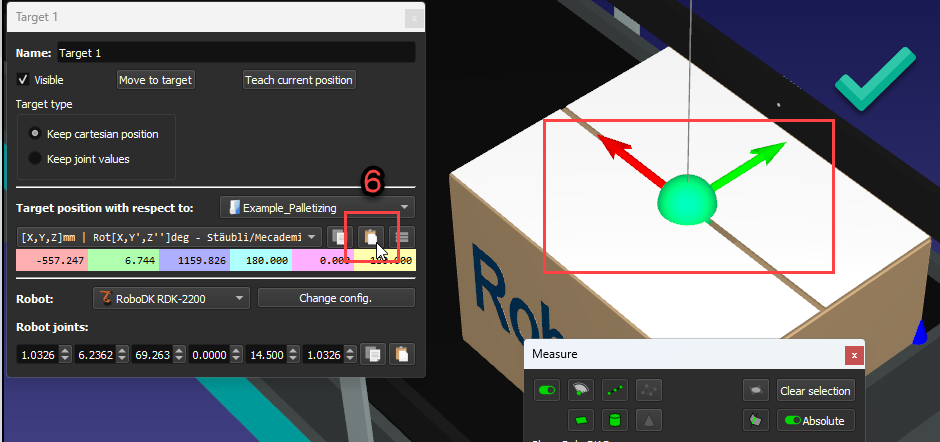
3.You should now have your first target at the bottom of the “Frame_Pick”. To make sure it is centered to the box’s top, hold SHIFT+M to open the measuring tool and then click on top of the box and copy the values. Then, click on your target, press F3 to edit the target parameters. Choose the station origin as the reference and paste the values. The target should now be in the center of the box.
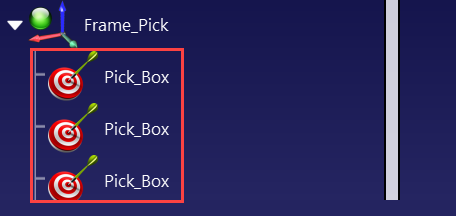
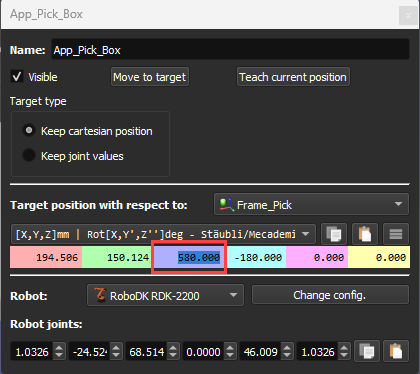
4.Rename your target “Pick_Box” and then copy/paste it two times in the “Frame_Pick”. Rename them “App_Pick_Box” and “App_Conveyor”. Then, edit the target parameters and add some distance on the Z values using your scroll wheel until you are satisfied with the target positions.

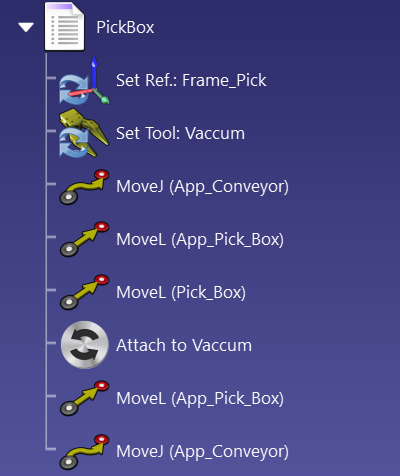
5.While holding CTRL, click on all 3 targets in the order you want the program to execute them and click on “Create Program”. That should automatically add your targets, the tool, and the reference frame to the program. Rename the program “PickBox”.
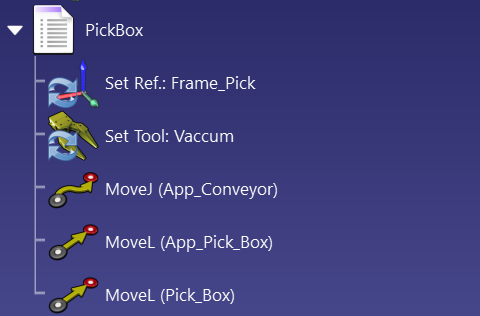
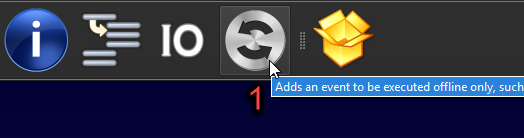
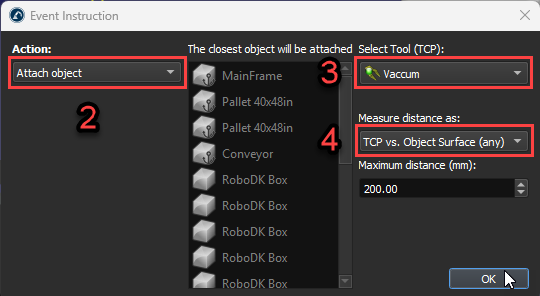
6.Add an “Event”, select “Attach object”, make sure that it is the right tool selected, and then choose “TCP vs. Object Surface (any)” in the measure distance options. That will attach the box to the tool. Copy and paste the “App_Pick_Box” and “App_Conveyor” targets following the attached event. You should now have a working picking program.
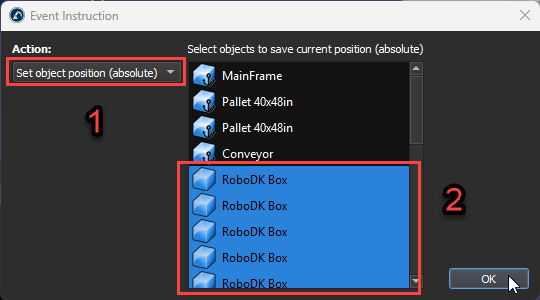
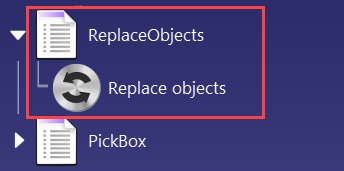
7.Create an empty program, add an event, select “Set object position (absolute)” and select all your boxes. This program will move the boxes back to their original position so you can reset your station in one click. Rename the program “ReplaceObjects”.
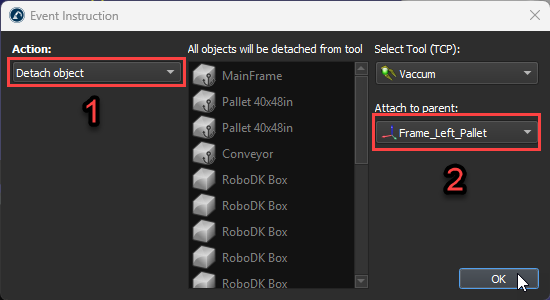
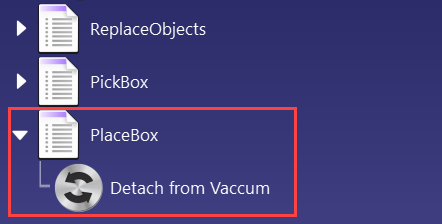
8.Create another empty project, add an event, select “Detach object” and select the reference frame you want to box to be attached to after being placed; in our case, it will be “Frame_Left_Pallet”. Rename the program “PlaceBox”.
9.Finally, the last requirement missing is a target that will be used as a configuration reference. Activate your pallet’s reference frame, move your robot on top of it, make sure the robot configuration makes sense, and then create a target. Rename it “Ref_Pallet”.
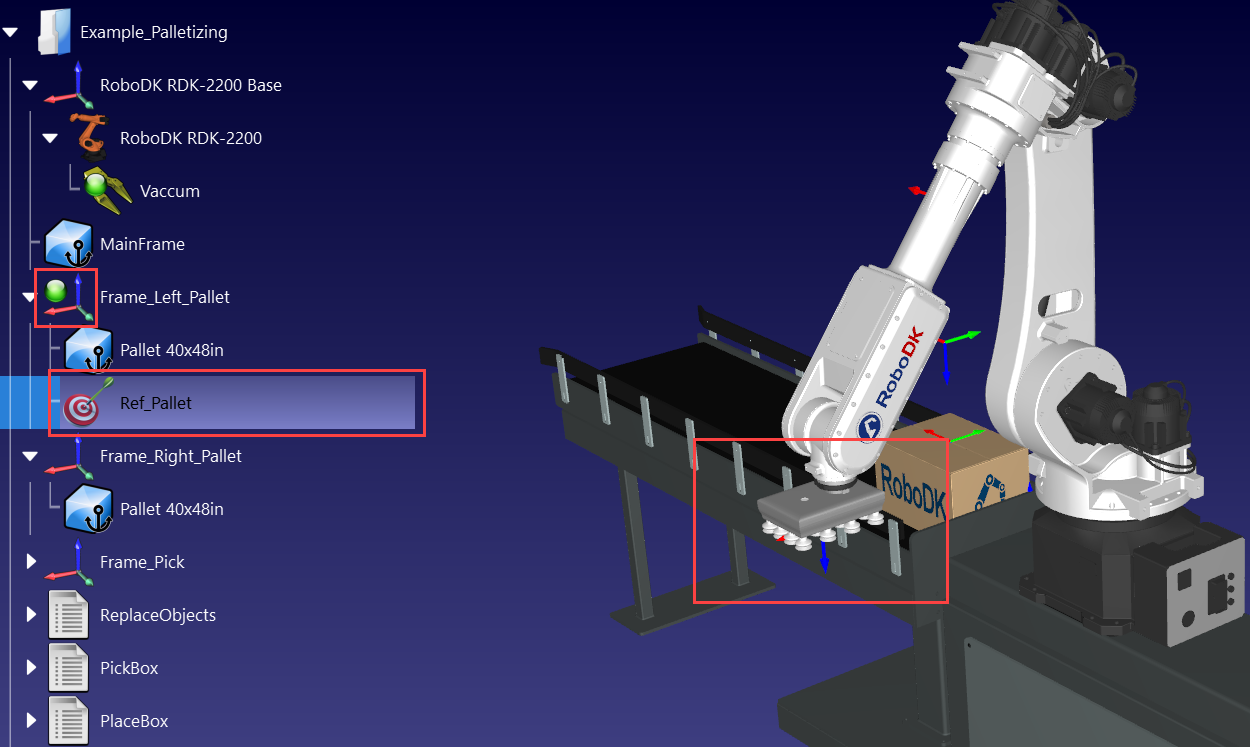
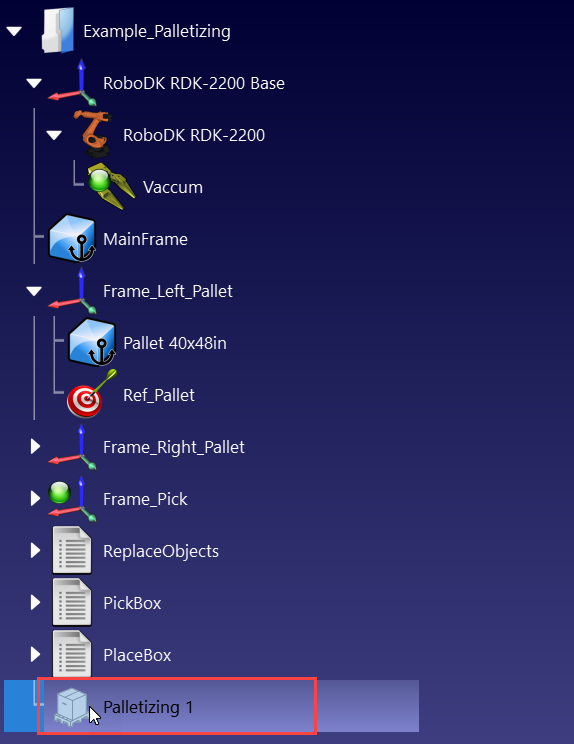
You now have everything set up to create your palletizing project. Your station should look like this:
Create a palletizing project
The palletizing project will help you automate the robot palletizing process. This section describes the main features of the palletizing settings you can customize.
Follow these steps to create a palletizing project:
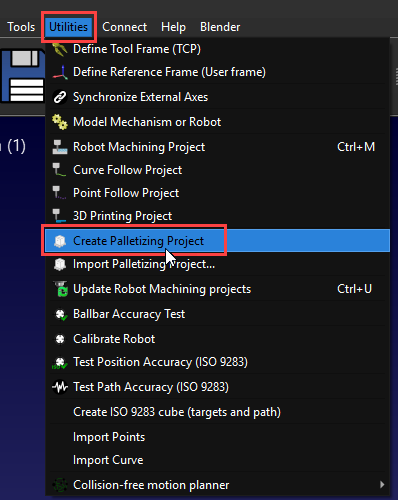
1.Navigate to Utilities and select “Create Palletizing Project”.
2.Double-click the “Palletizing 1” in your station tree.
Setup your palletizing project
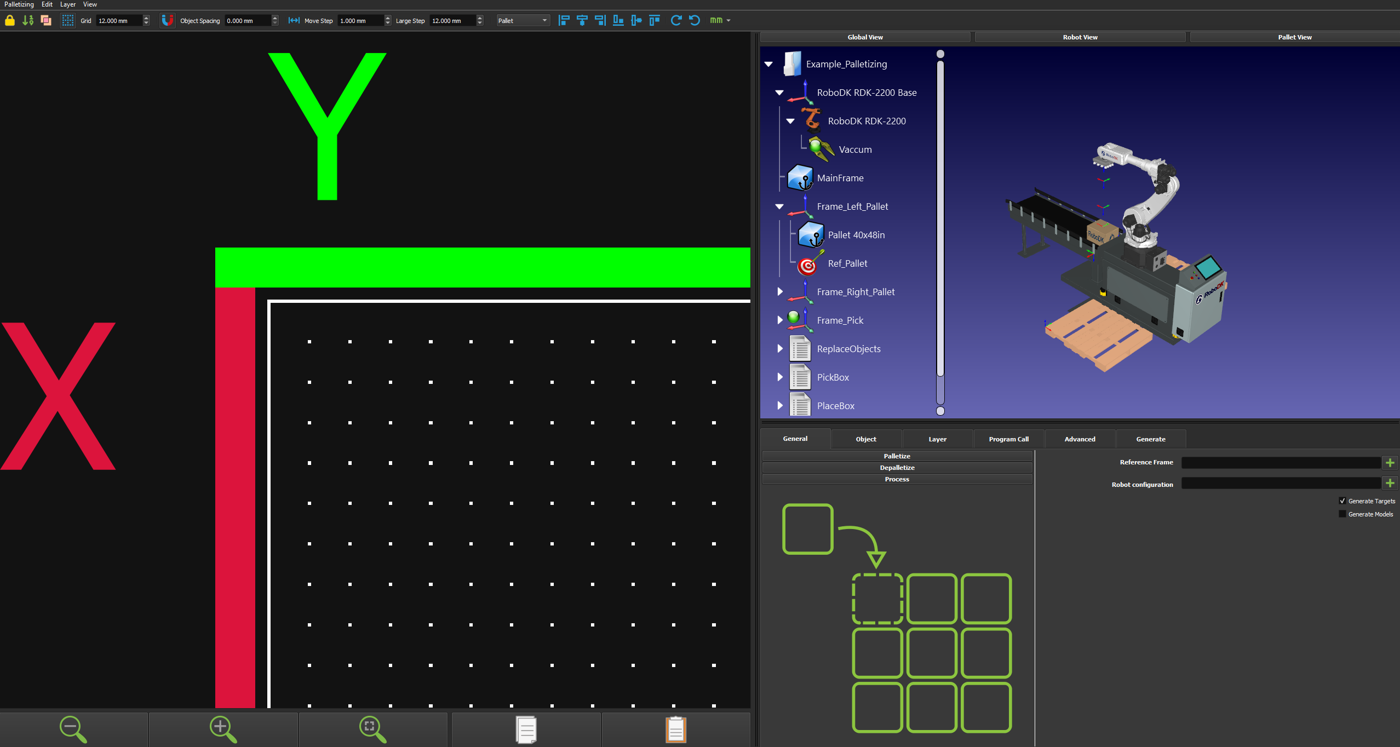
When you open the main interface of the palletizing menu, you can choose between palletize, depalletize, or process setup (which includes both).
Follow these steps to set up your palletizing project:
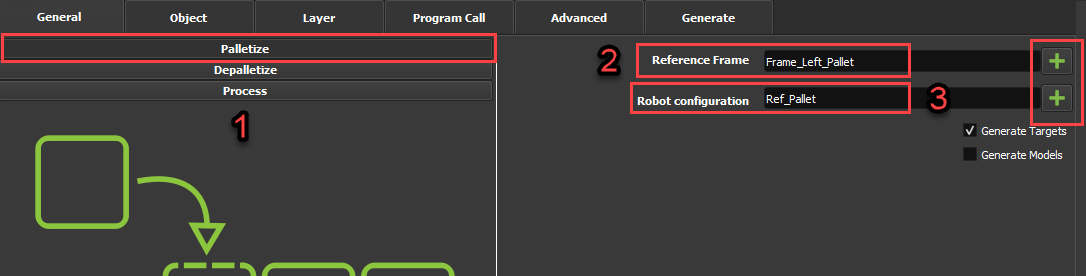
1.Select the "Palletize” option, click on the “+” button of “Reference Frame” and select your pallet reference frame. Then, click on the “+” button of “Robot Configuration” and choose the “Ref_Pallet” target we created earlier.
2.Select the Object tab to set up your pallet and box dimensions.
3.Select one of the presets for your pallet dimensions or enter its dimensions manually. Then click on the “Zoom to fit” icon so the 2D pallet can be properly shown in its entirety.
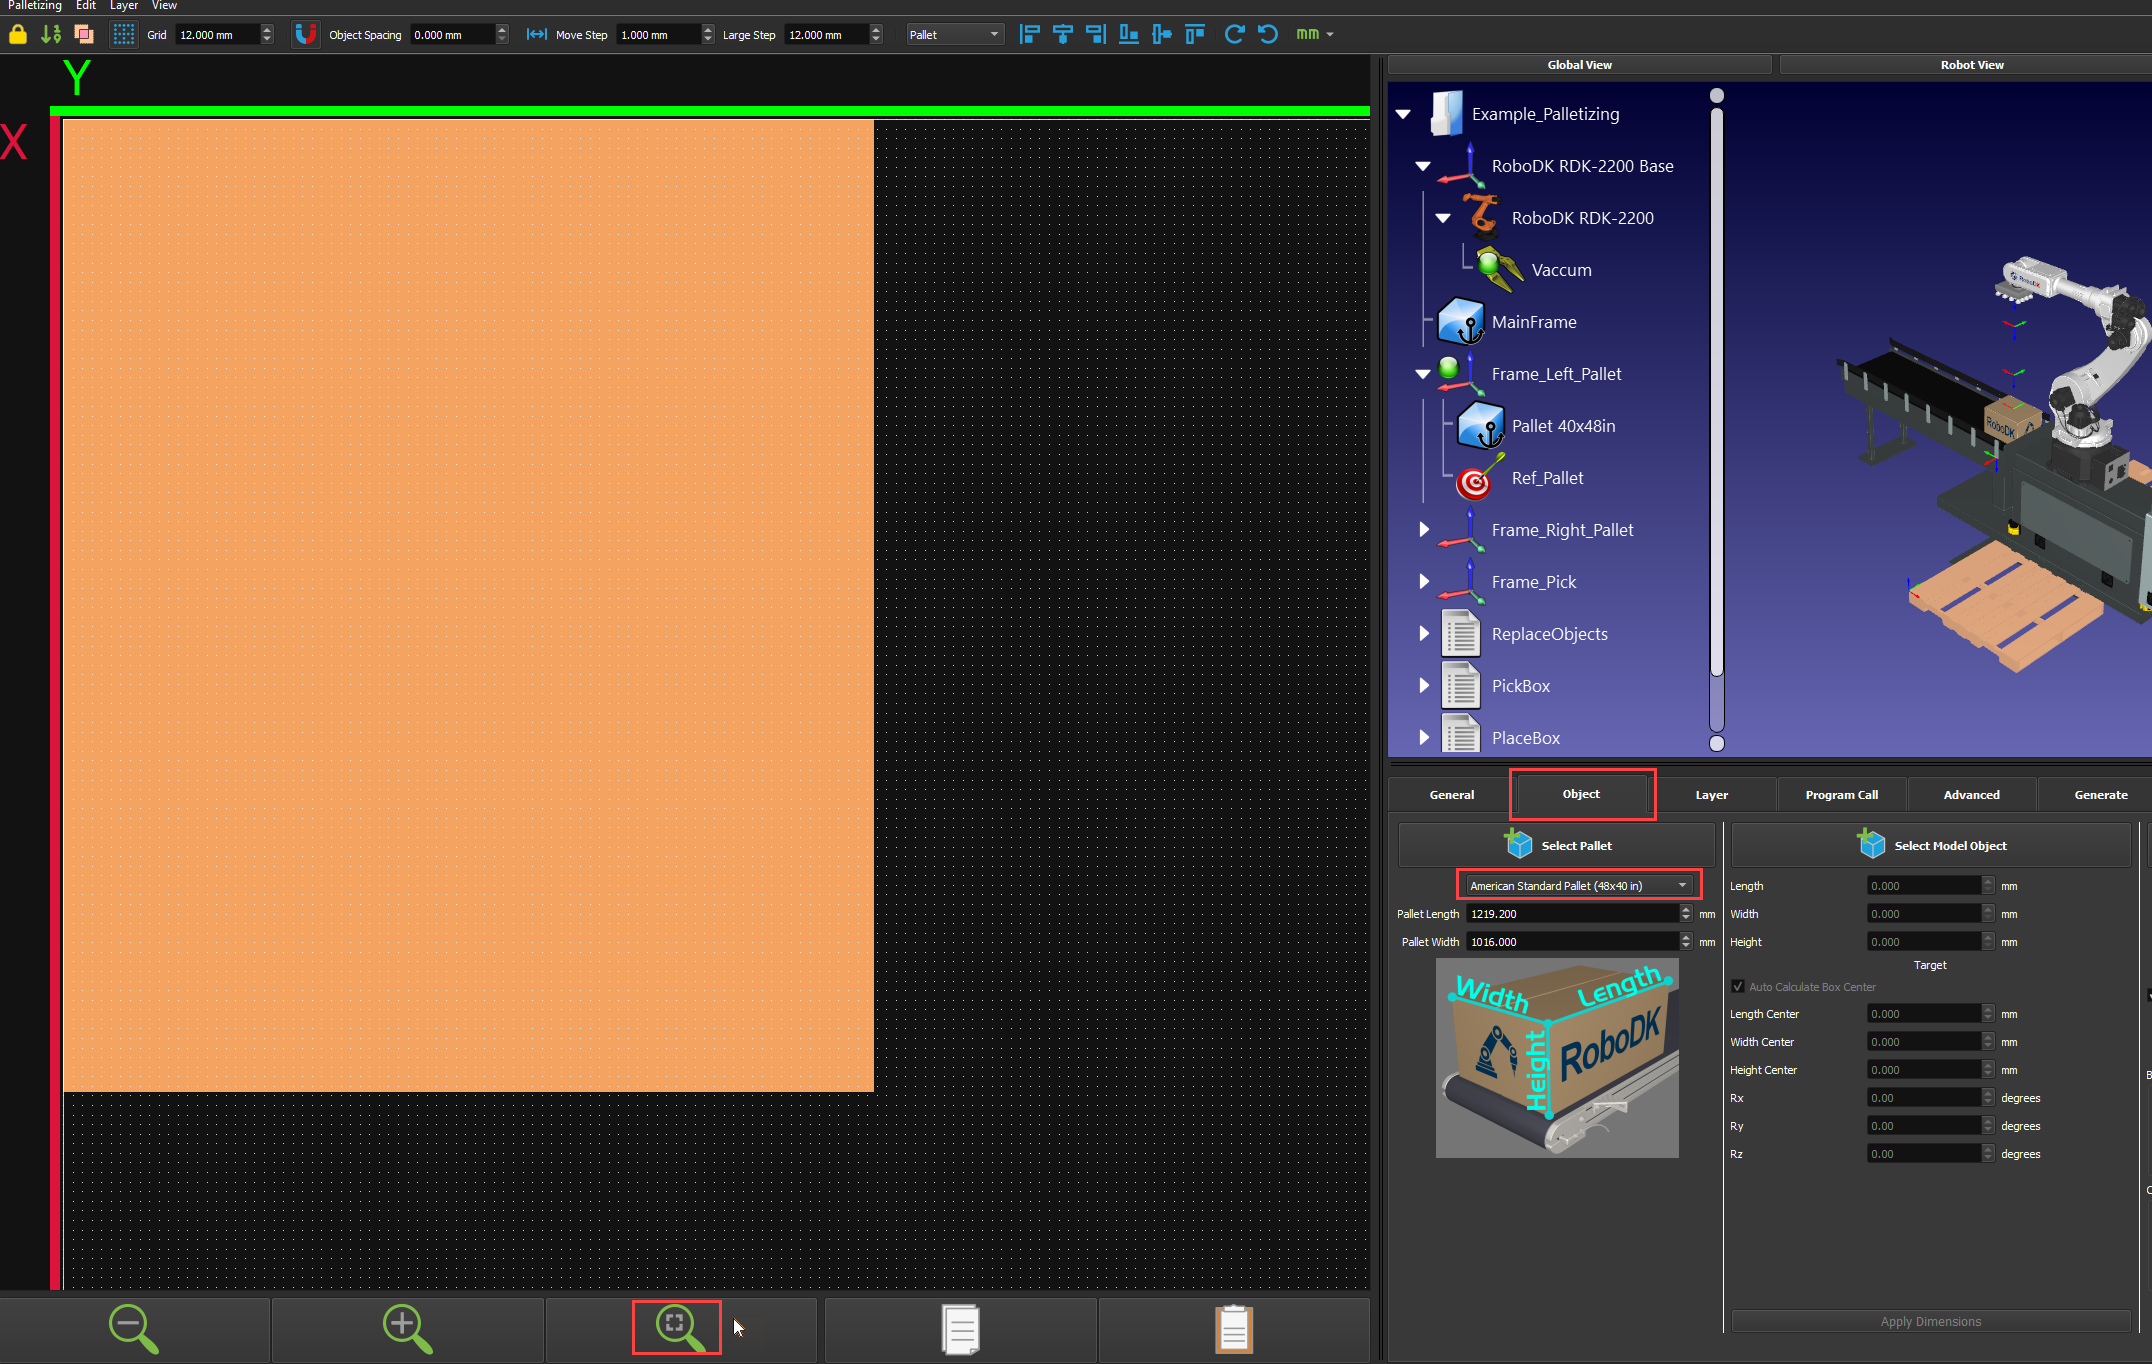
4.Select one of the presets for your box or enter its dimensions manually and click on “Create object”.
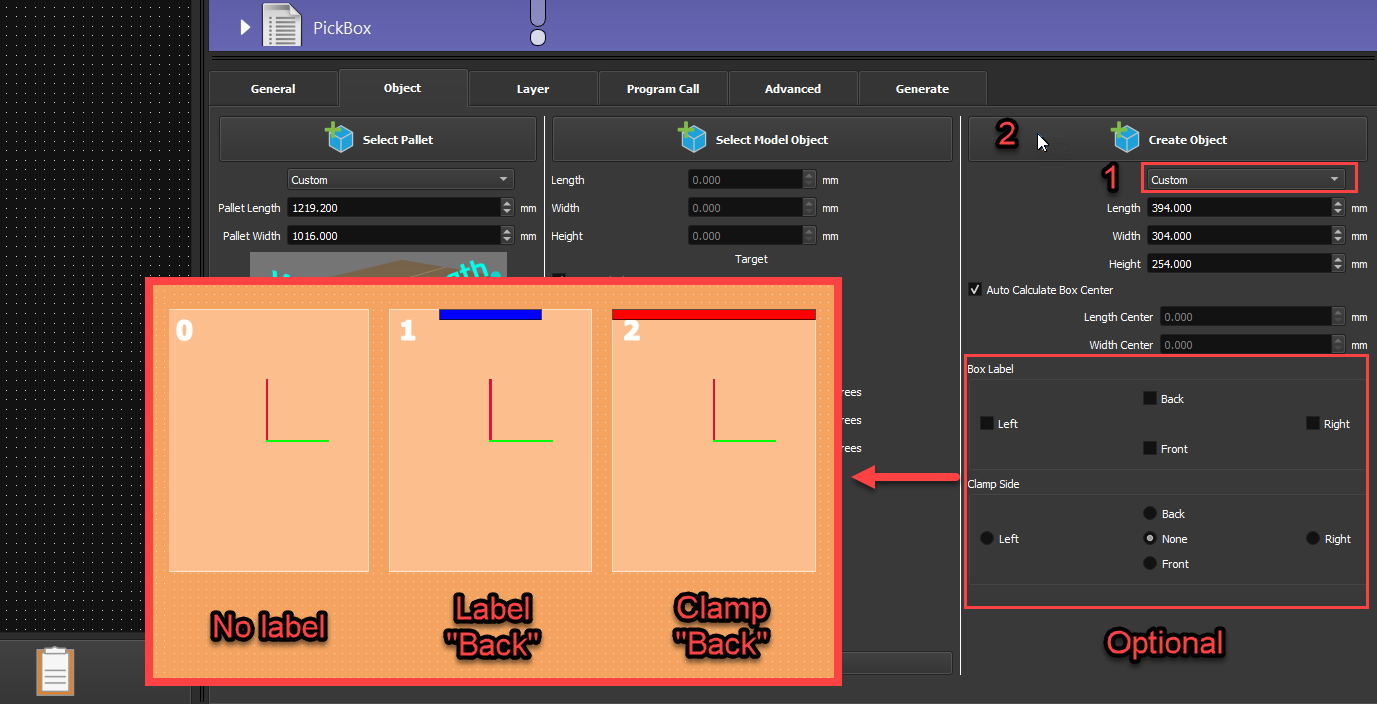
5.Once you’ve clicked on Create object, 4 boxes will appear on the left side of your screen. One box per possible 90-degree rotation. A red and a green line will show the rotation of the TCP around the Z axis.

Create Layer Design
The palletizing layers allow you to design how you want to place the objects on each layer of your pallet and properly define your preferred layout.
Follow these steps to create the layout of your layer:
1.Move to the Layer tab to create your layer design.
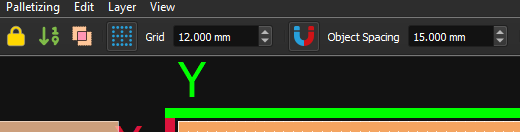
2.Make sure your layout grid is set according to your need. In this case, we will be using 12mm. You can also change the value in “Object Spacing” to have a constant gap between your boxes; we will be using 15mm.
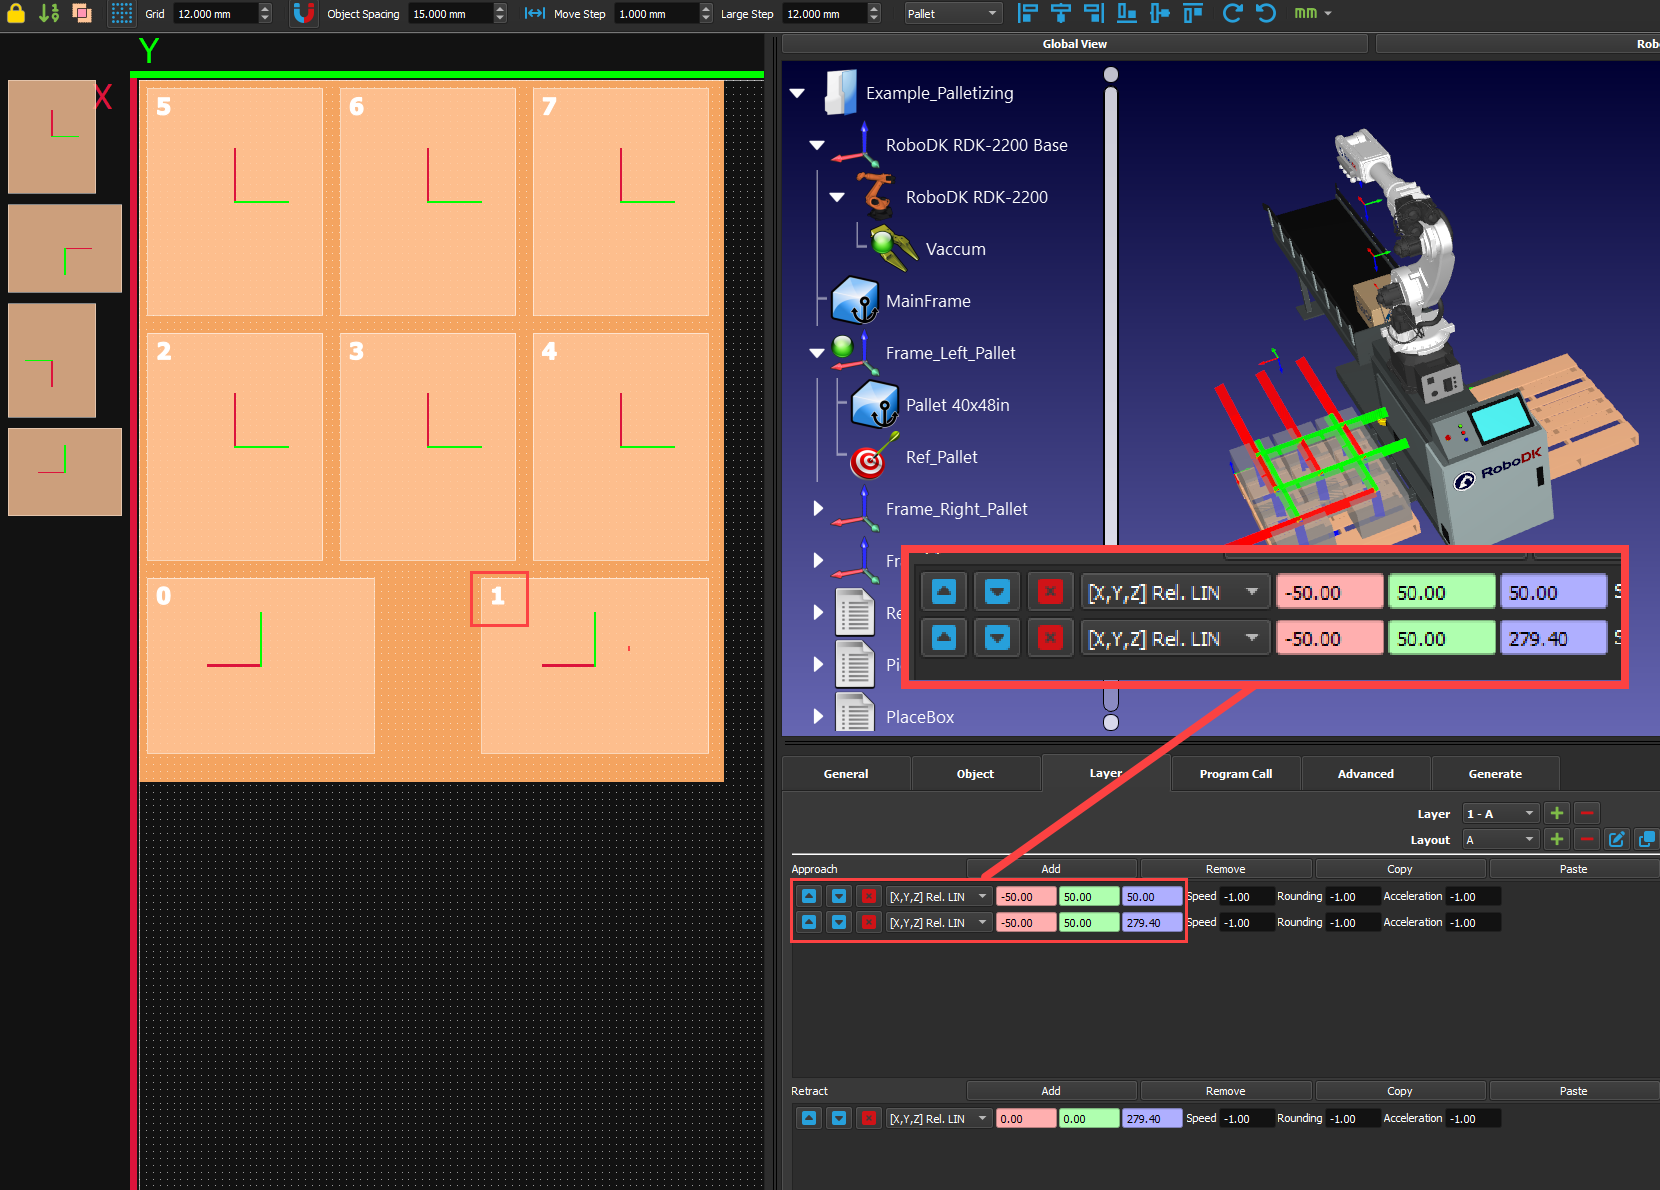
3.Select a box from the left and drag and drop it onto the pallet.
4.While moving the box on the 2D interface, it will appear in the 3D environment. If the box in the 3D environment turns red, it means that this is out of the robot's reach.

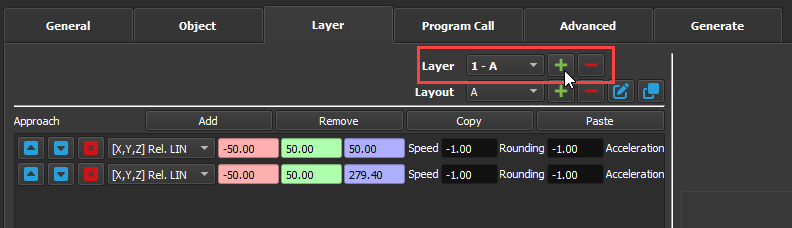
5.Create your first layer layout. The number on the top left of the boxes represents the order in which the box will be placed. You can right-click the boxes to modify their order. You can also add lines to have a custom approach or retract relative to your boxes. You can take the values in this example, but it is not mandatory. Play with them to see what it does to your program.
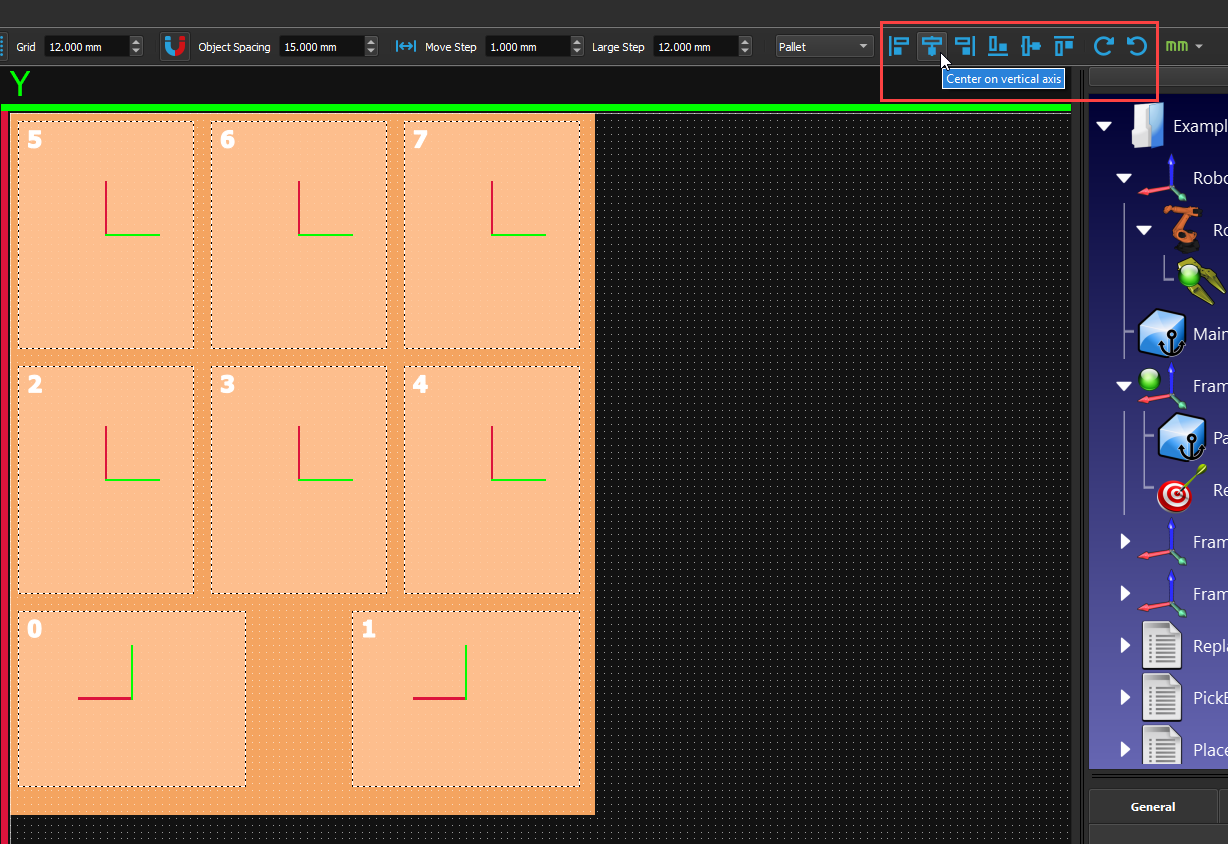
6.You can realign your boxes easily with the different align buttons on the top right. Select all your boxes and click on the different options until you are satisfied. You can also rotate your boxes instead of spawning new ones in the right orientation.
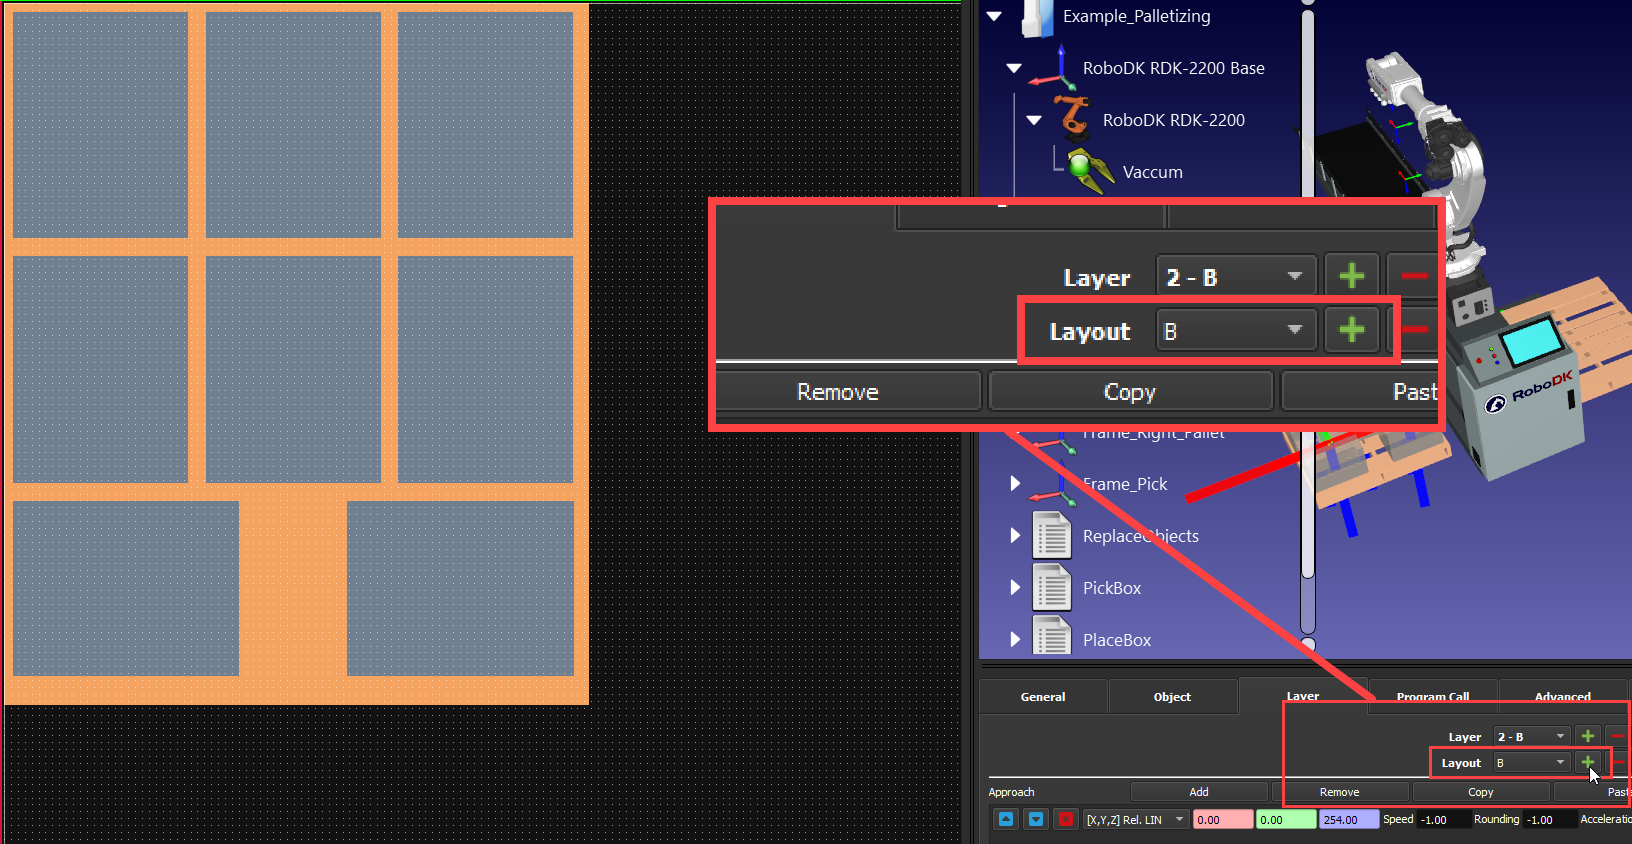
7.Add a new layer to the stack by pressing the “+” button beside “Layer”. Adding a new layer will copy the same pattern as the layer under it.
8.You can create a new layout (pattern) by pressing the “+” button beside “Layout”. You will still see the previous layer layout greyed out so you can position the new boxes properly on top of them.
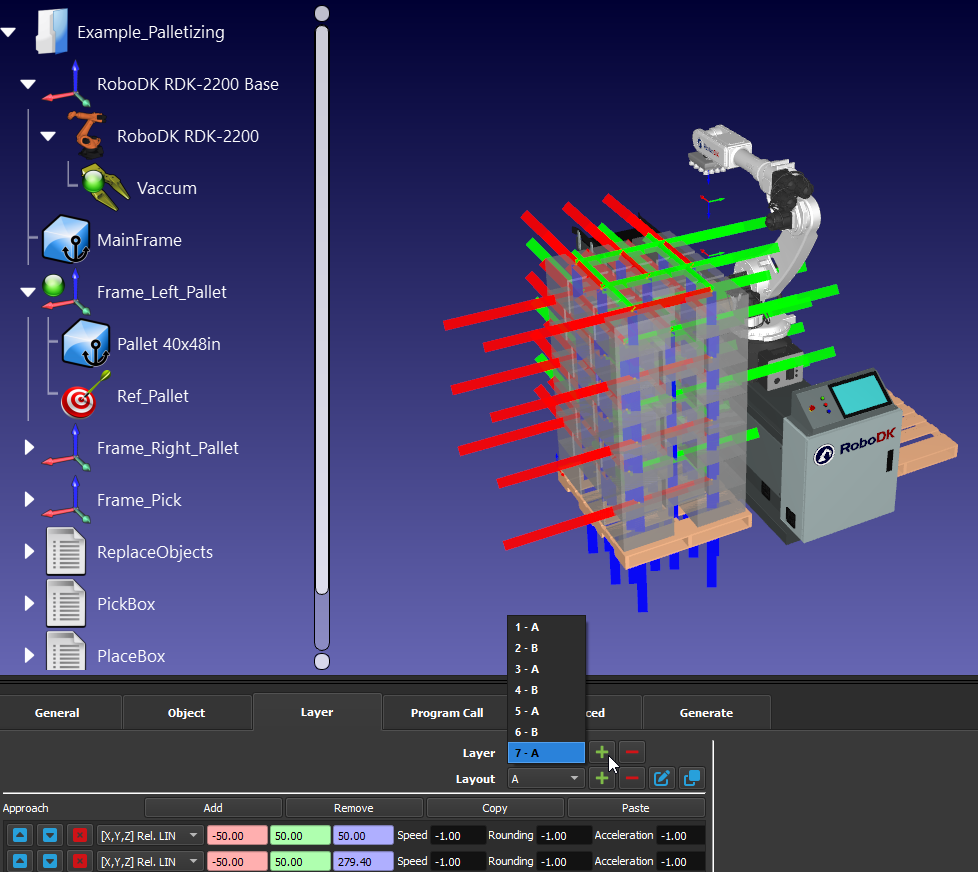
9.Create your alternative layout. You can fine-tune the boxes’ position by holding CTRL and using your keyboard arrows. You can change the size of this increment in “Move Step” on the top of the window.

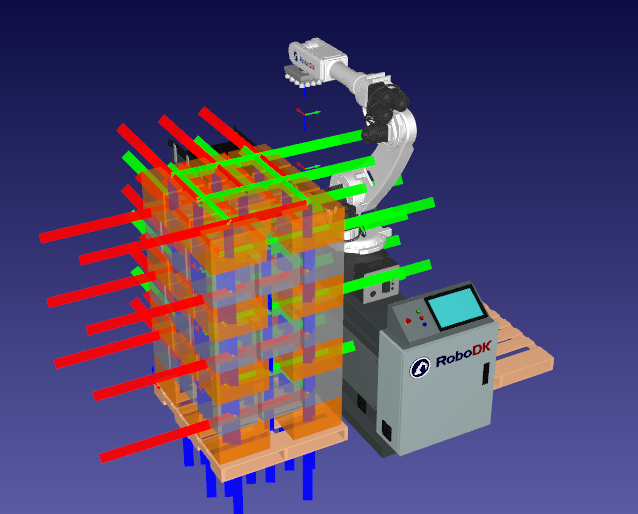
10.You can then add the number of layers you want and can choose to alternate between them. Just look at the boxes' colors in the 3D view to make sure the boxes are still all within the robot’s reach.
11.In the “Program Call” tab, you can select programs for different events by clicking on the “+” button and then “check” the box accordingly. For instance, you need to at least choose a “Pick Box” and a “Place Box” program, otherwise, you won’t have a working project. In this example, we will also use a “Program Start” program, but you could create a “Go Home” program and select it in “Program Finish” so the robot goes back home once the pallet is done.

Generate Robot Program
Once you have completed all of the preparation steps, you can generate the robot program. You’ll then be able to generate the robot program with the right post processor for your robot brand.
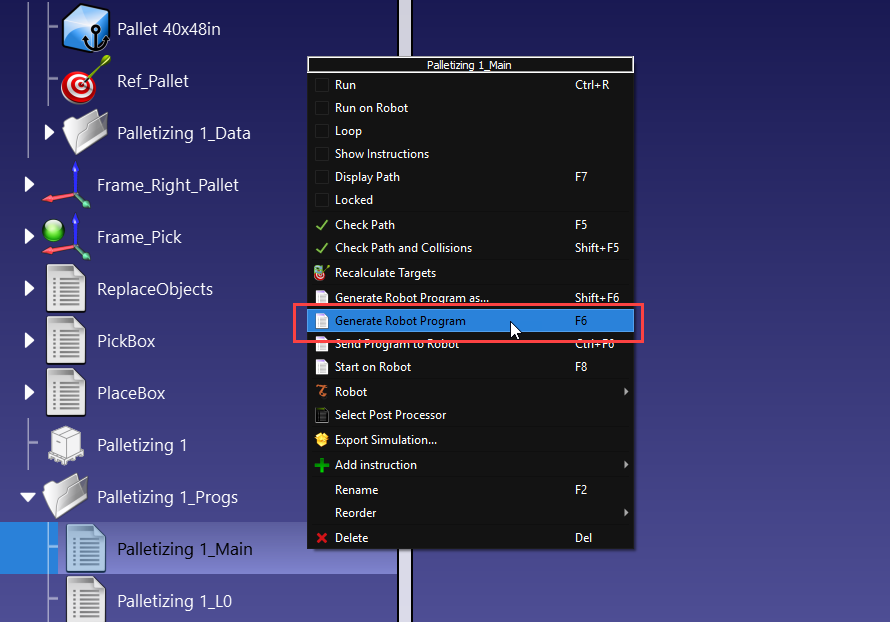
1.In the “Generate” tab, click on “Generate Project”. You can now close the window to return to your project. You should now have a main program and individual programs for each layer.
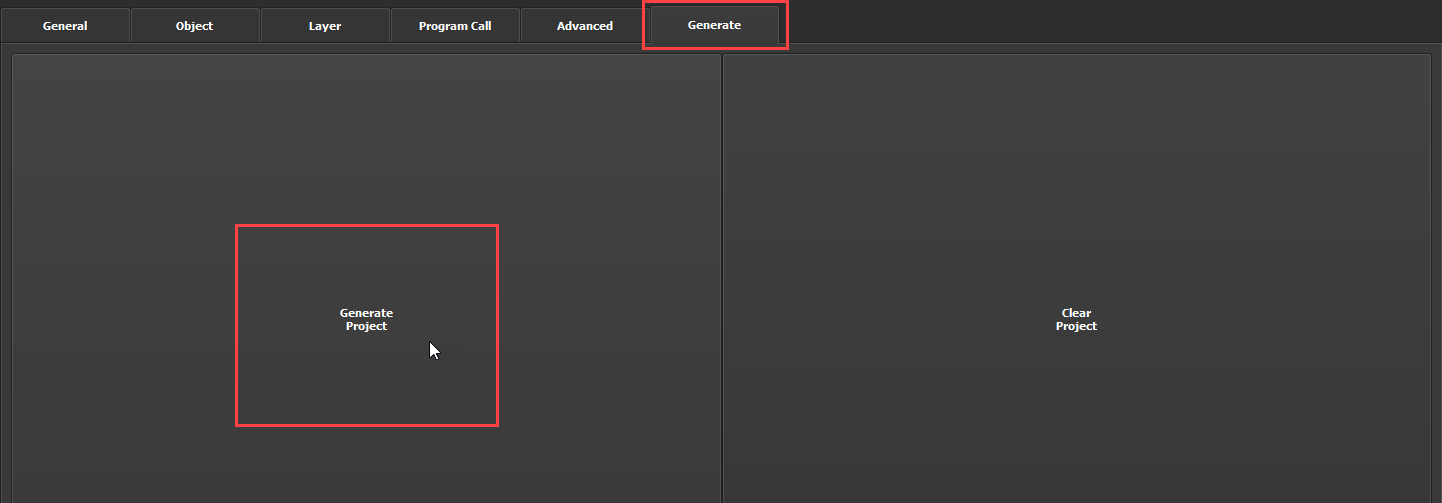
2.Double-click the “Palletizing 1_Main” to run the main program. If you are satisfied with the results, right-click the main program and select “Generate robot program” to create the program your robot controller can execute.