RoboDK Plugin for FeatureCAM
Introduction
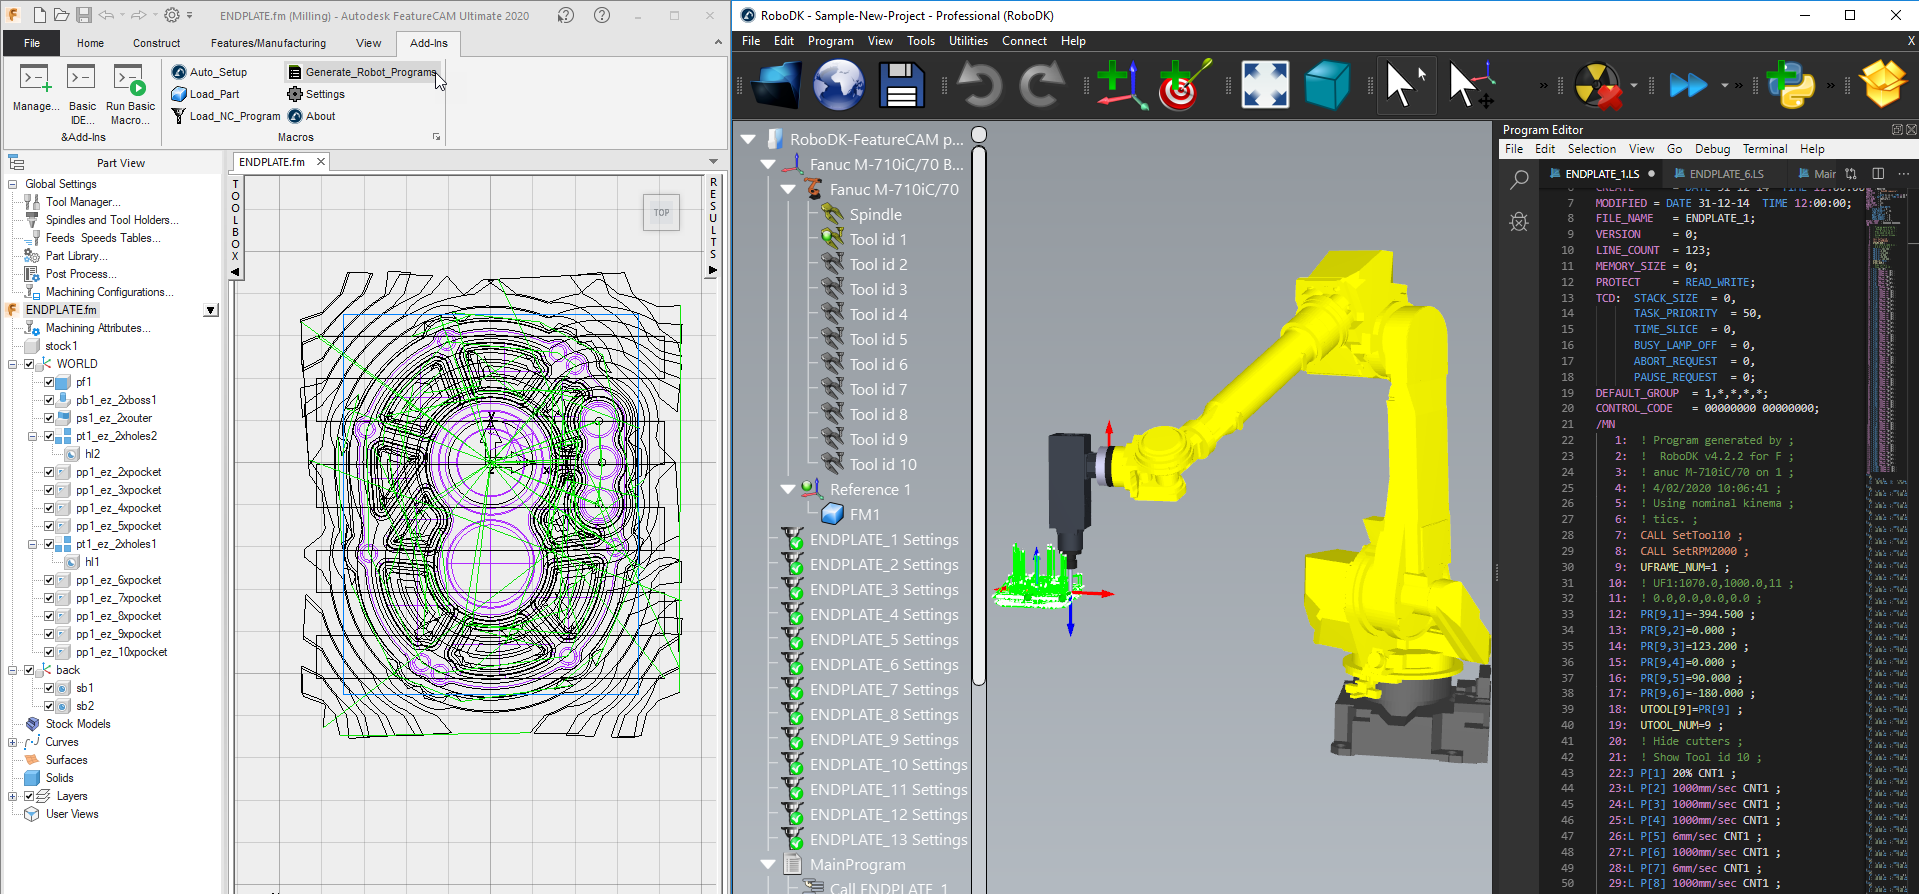
The RoboDK add-in for Autodesk FeatureCAM allows you to quickly set up robot machining projects directly from FeatureCAM. With the RoboDK add-in for FeatureCAM you can easily combine FeatureCAM software for machining and RoboDK to simulate and program industrial robot arms for robot machining.
More information about RoboDK for robot machining is available in the Robot Machining Section.
This document describes how to set up the plugin for FeatureCAM and how to use the FeatureCAM toolbar to set up robot machining projects in RoboDK.
Add-In set up
If you installed RoboDK after installing FeatureCAM you should have the RoboDK plugin for FeatureCAM already in the Add-Ins library.
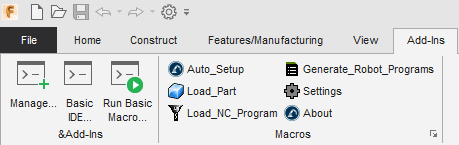
Once you activate the RoboDK Add-In you should see the macros shown in the following image.
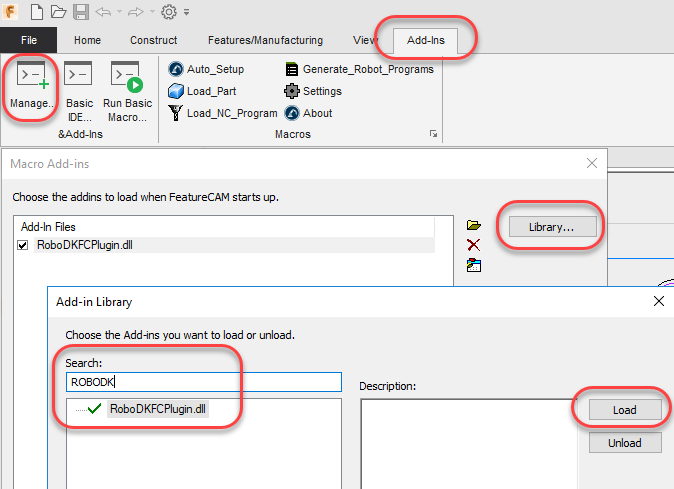
If you don’t see the RoboDK macros, follow these steps to set up the RoboDK add-in for FeatureCAM:
1.Start FeatureCAM.
2.Select Add-Ins➔Manage
3.Select Library…
4.Look for RoboDKFCPlugin.dll library (you can type RoboDK to quickly locate it)
5.Select Load
6.Select OK.
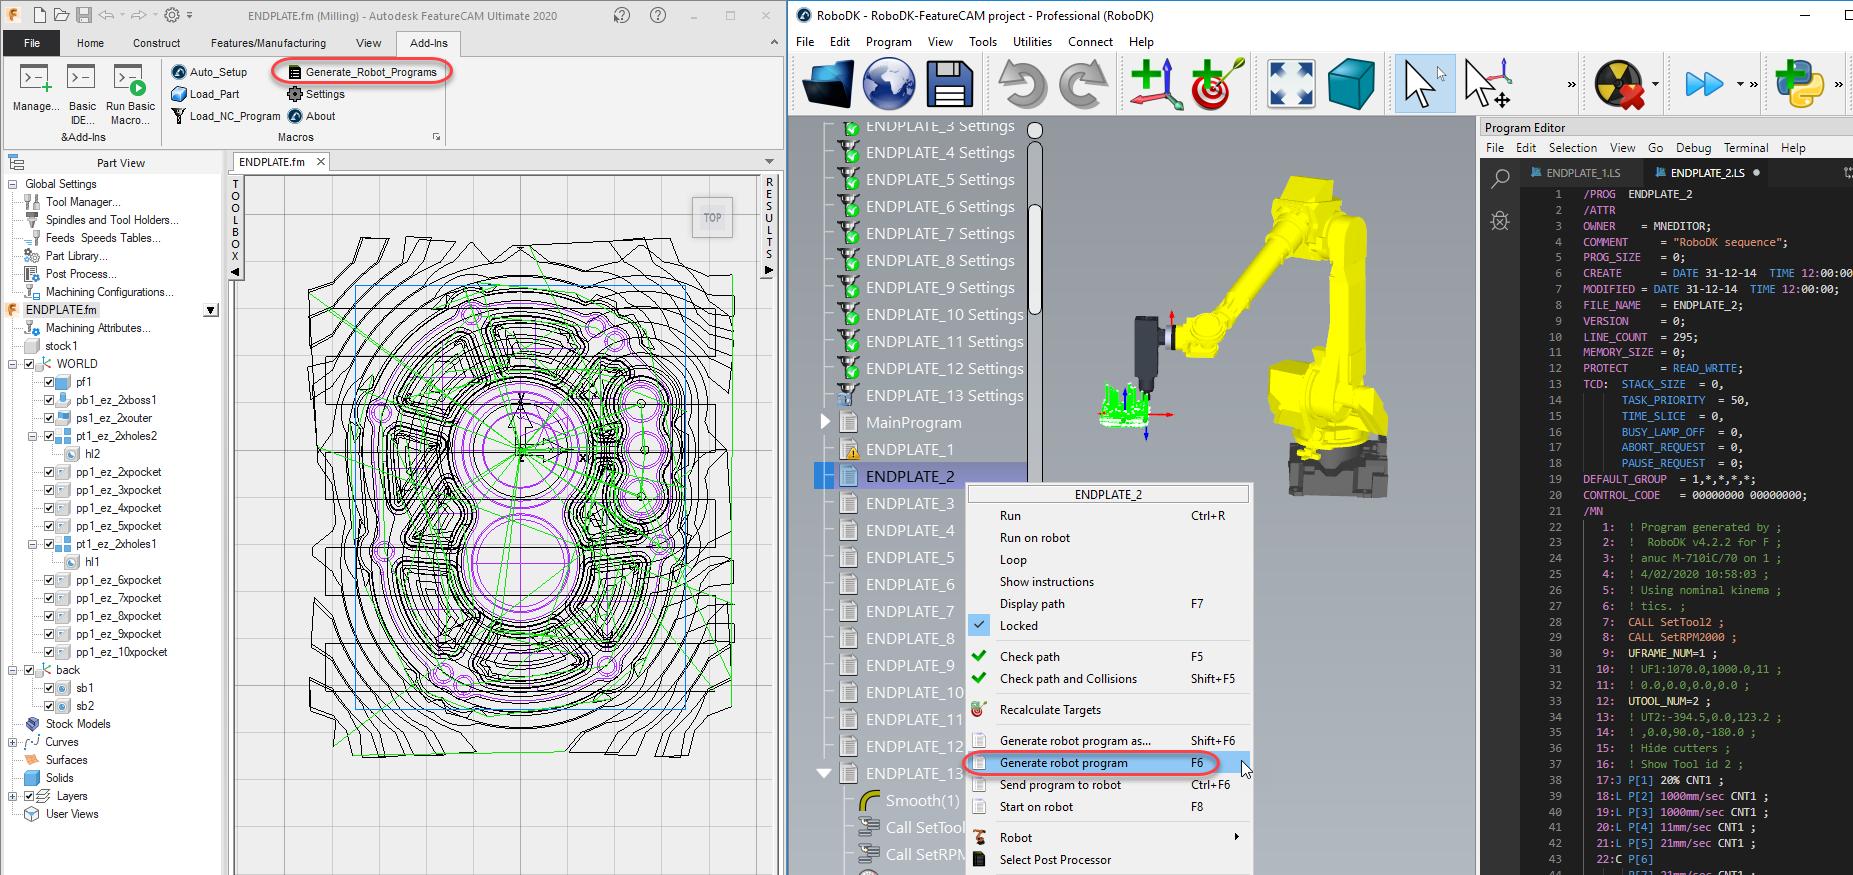
FeatureCAM will then show the RoboDK commands in the Add-Ins section as shown in the following image.
Commands
This section describes the RoboDK add-in commands available in FeatureCAM for robot machining.

●Auto Setup macro automatically loads the part and the machining program in RoboDK.
●Load Part automatically loads the 3D model of your part in RoboDK.
●Load NC Program automatically creates a robot machining project in RoboDK to simulate your robot and create a robot program for robot machining.
●Generate Robot Programs automatically generates robot programs available in RoboDK.
●Settings opens additional settings window.
●About opens this help document.
Auto Setup
The Auto Setup 
Auto setup will load/update the 3D model and your robot machining toolpath in RoboDK.
If you already have a RoboDK station open it will use the existing RoboDK project without overriding the robot, tool or coordinate system.
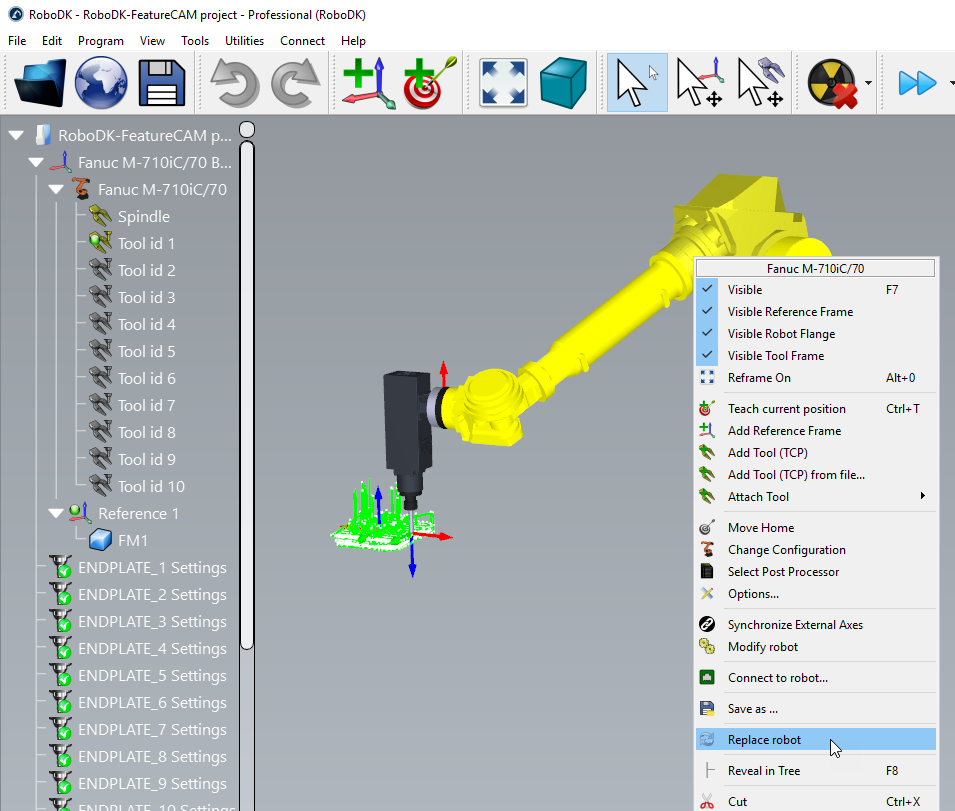
You can easily change the robot, modify the tool and/or the reference frame. As an example, follow these steps to change the robot:
1.Right click the robot
2.Select Replace robot (as shown in the following image)
3.Select the robot you would like to use
The RoboDK installer only provides a few robots by default, however, it is possible to download more robots from the online library.
More information about adding a robot tool is available in the Getting Started Section.
Save the project to keep the changes by selecting File➔Save Station (Ctrl+S).
Once you’ve updated your robot cell, select Utilities➔Update Robot Machining Project to update all programs. A green check mark will be displayed if the programs are feasible with the current cell parameters. If there are any issues (such as singularities, axis limits or reach issues), a red mark will be displayed.
Double click the robot machining project 
Right click a program and select Run to simulate it (or double click the program). You can also select Generate robot program (F6) to generate the robot program for your robot controller. More information about how to generate robot programs is available in the Offline Programming section.
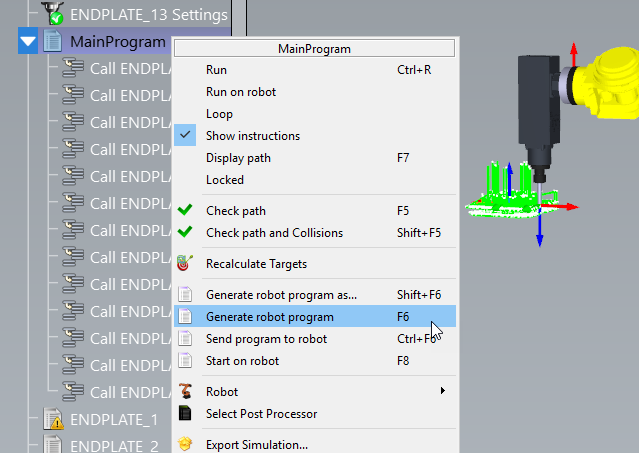
You can also right click a program and select Select Post Processor to change the post processor. More information about post processors available in the post processors section.
Generate robot programs
Select Generate robot programs to generate the robot programs for robot machining. This operation will open a new window (program editor) displaying the robot programs.
Follow these steps in RoboDK to change the location of your saved robot programs:
1.Select Tools-Options
2.Select Program
3.Select Set beside the Robot programs folder
Plugin Settings
Select the Settings macro to open the FeatureCAM settings related to RoboDK. You’ll see the settings window shown in the following image.
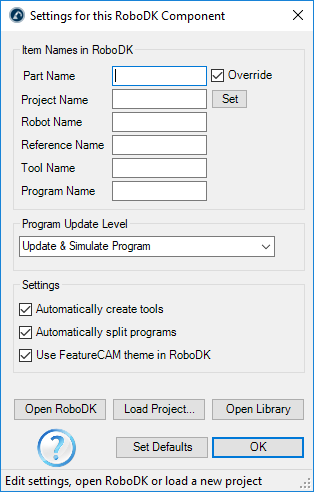
You can modify the following options:
1.Part name is the name of the 3D model when it is loaded in RoboDK. Leave it blank to automatically use the name used in FeatureCAM.
2.Project name allows you to specify a RoboDK project file (RDK). It is possible to specify a default RoboDK project (RDK file) to automatically display simulations or generate robot programs. Leave it blank to automatically use the currently open project in RoboDK.
3.Automatically create tools allows you to automatically create new TCPs based on the tool holder and the cutter geometry defined in FeatureCAM. The first tool held by the robot is considered the tool holder and new TCPs are calculated as an offset from the tool holder.
4.Automatically split programs will automatically split the complete robot machining project as sub projects (operations). Creating one operation for each tool.
5.Use the FeatureCAM theme in RoboDK will make the 3D navigation and background colors in RoboDK match FeatureCAM style.
You can also specify the tool holder and reference frame (datum) for your robot machining operations.
Select Load Project… to preview recently opened project or create a new project using the default setup.
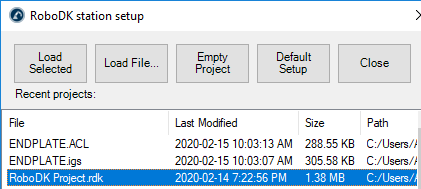
The following options are available:
●Load Selected: Load a previous project used in RoboDK (RDK file)
●Load File…: Select a RoboDK station file (RDK) to open it with RoboDK and use it as the default project with the current FeatureCAM project.
●Empty Project: Open RoboDK with a new empty station to build a new setup. More information to set up a new project from scratch available in the Getting Started section.
●Load Part: Load the part from FeatureCAM to RoboDK (the part will be saved as an STL file and loaded automatically).
●Default Setup: Set up new station with a default robot, spindle and reference frame. The part will also be automatically exported to RoboDK.
Visit the robot machining section for more information about building a new setup for robot machining.
Examples
3-Axis Robot Machining
This example shows how to create a 3-axis robot machining project using the FeatureCAM plugin.
5-Axis Robot Machining
This example shows how to create a 5-axis robot cutting project using the FeatureCAM plugin.