RoboDK Plugin for Mastercam
Introduction
The RoboDK add-in for Mastercam allows you to quickly set up robot machining projects directly from Mastercam. With this plugin you can easily combine Mastercam software for machining and RoboDK for simulation and offline programming of industrial robot arms.
With this Mastercam add-in you can easily generate error-free programs for robot machining directly from Mastercam. Alternatively, RoboDK also supports NCI (native preprocessed Mastercam files), and standard APT CLS and G-code files.
More information about RoboDK for robot machining is available in the Robot Machining Section.
Add-In set up
If you installed RoboDK after installing Mastercam you should have the RoboDK plugin for Mastercam already installed. This includes the DLL in CHOOKS folder, a RoboDK.pst post, mill and router machine definitions and some default/generic machine configurations.
Follow these steps to set up the RoboDK plugin for Mastercam:
1.Start Mastercam.
2.Set up the RoboDK commands:
a.Select File➔Options.
b.Select Customize Ribbon.
c.Select New Tab.
d.Select Rename and enter RoboDK.
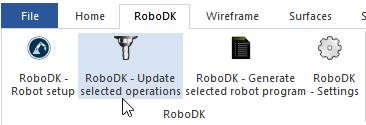
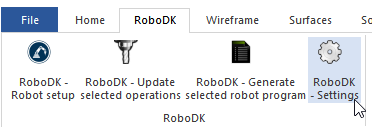
e.Add the selected commands as shown in the image.
f.Click OK to save the new tab.

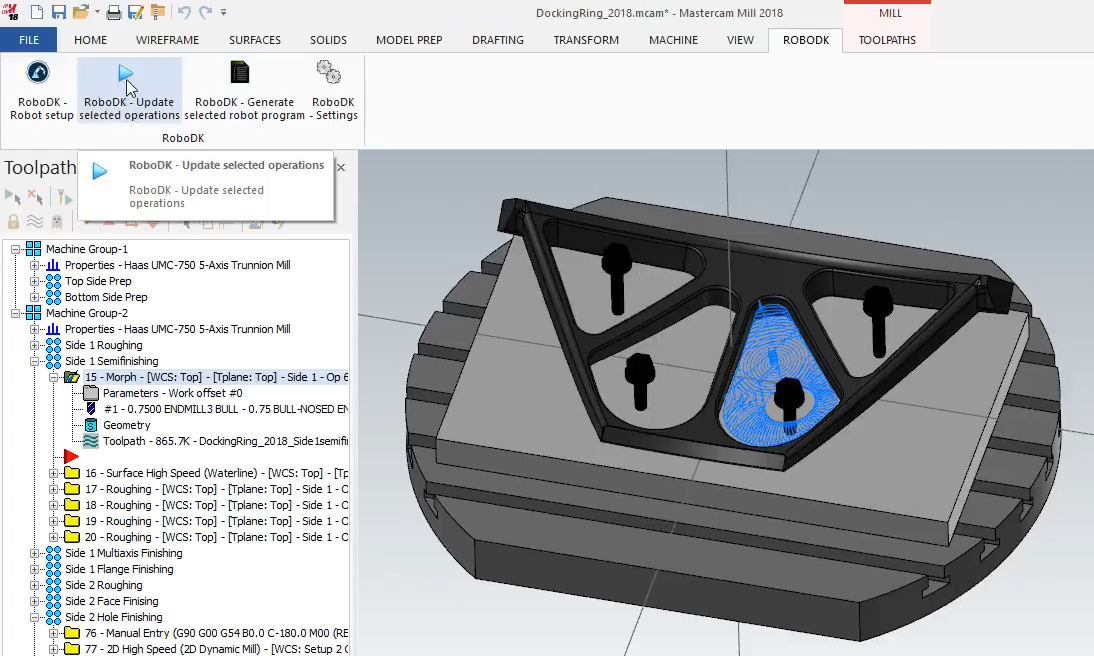
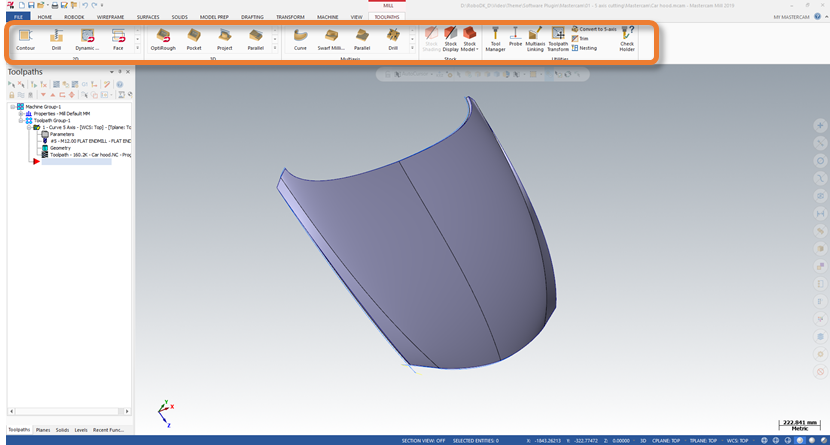
You’ll then see the RoboDK tab in Mastercam as shown in the following image.
Toolbar
When you open Mastercam software you should see a RoboDK toolbar tab. Select this RoboDK tab to see the available options to setup your robot machining project in RoboDK.
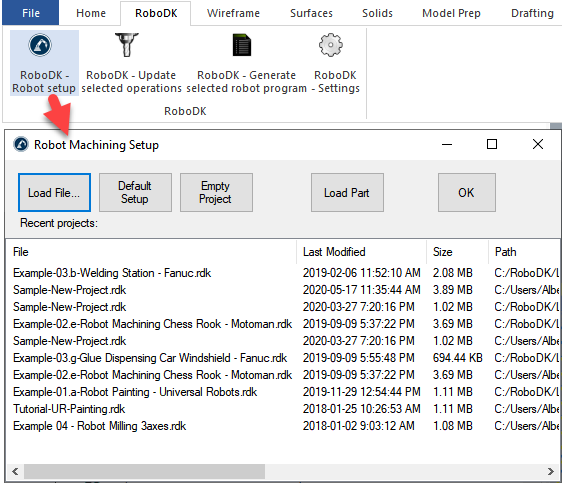
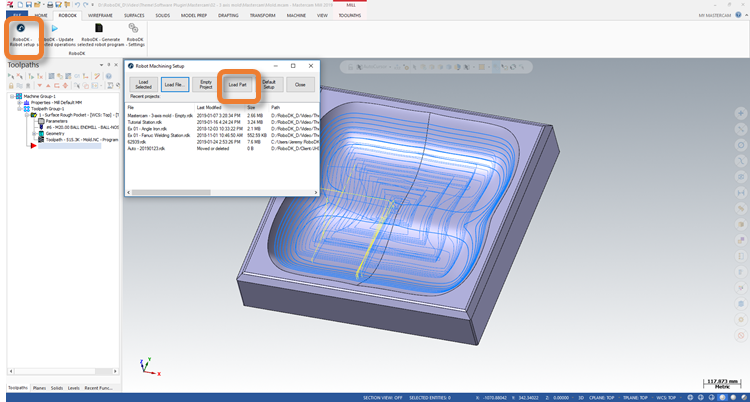
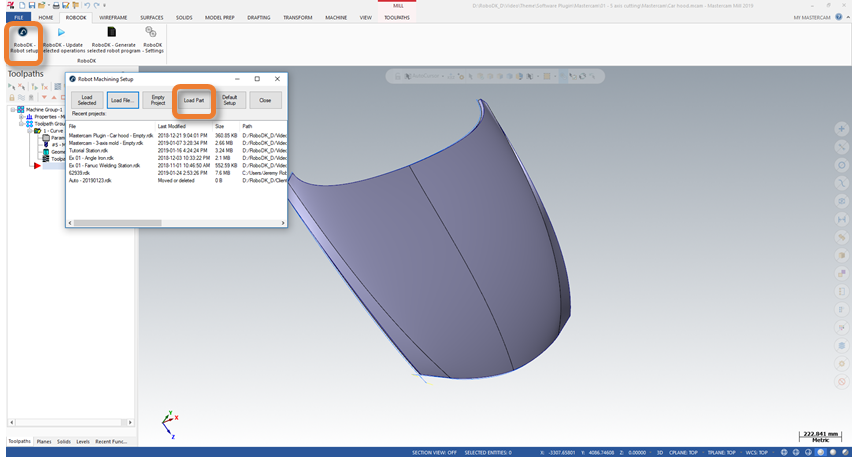
Robot setup
The Robot setup 
●Load File…: Select a file to open it with RoboDK and use it as the default project for your Mastercam project.
●Default Setup: Set up new station with a default robot, spindle and reference frame. The part will also be automatically exported to RoboDK.
●Empty Project: Open RoboDK with a new empty station to let the user build a new setup. More information to set up a new project from scratch available in the Getting Started section.
●Load Part: Load the part from Mastercam to RoboDK (the part will be saved as an STL file and loaded automatically). All visible solids and surfaces will be loaded.
Visit the robot machining section for more information about building a new setup.
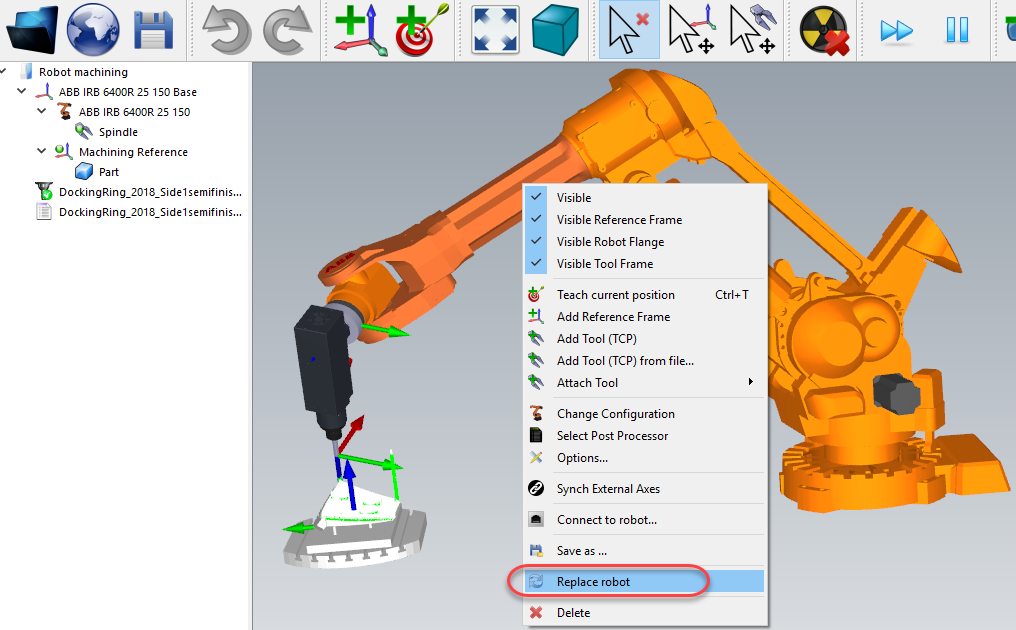
You can easily change the robot, modify the tool and/or the reference frame. As an example, follow these steps to change the robot:
1.Right click the robot
2.Select Replace robot (as shown in the image)
3.Select the new robot
The RoboDK installer only provides a few robots by default, however, it is possible to download more robots from the online library.
More information about adding a robot tool is available in the Getting Started Section.
Hold Alt+Shift to move a robot tool (TCP). This is useful to set the pose of the robot before teaching a target.
Save the project to keep the changes by selecting File➔Save Station (Ctrl+S).
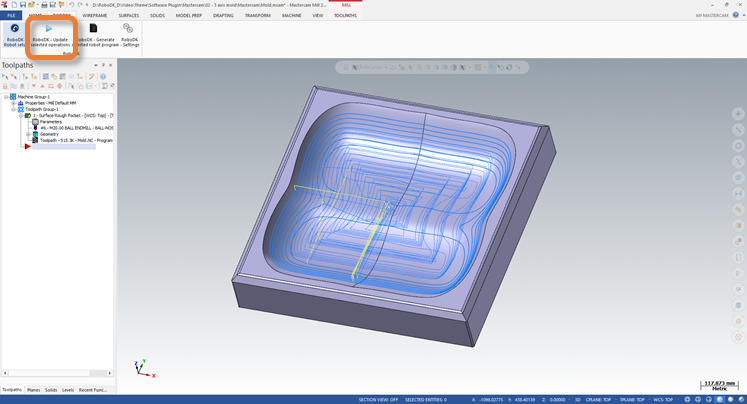
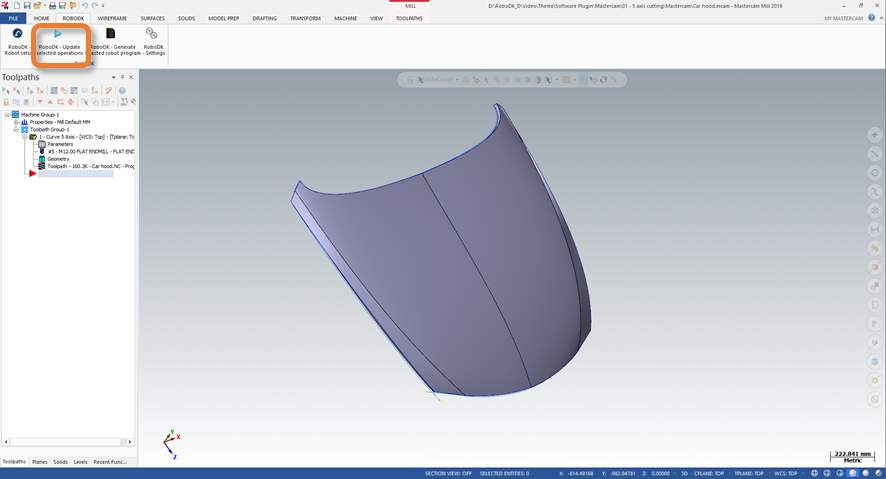
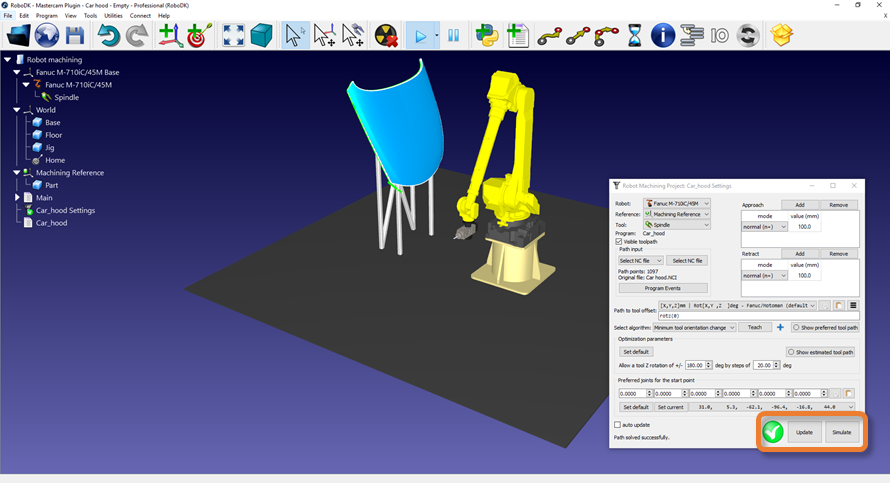
Update selected operation(s)
Select Update selected operations to generate the toolpath for the selected operations and simulate them in RoboDK.
This action will load the selected toolpaths in RoboDK for robot machining. By default, each machining operation will be split as a separate robot program.
A green check mark will be displayed if the program is feasible with the selected robot. If there are any issues (such as singularities, axis limits or reach issues), a red mark will be displayed with a message of the issue.
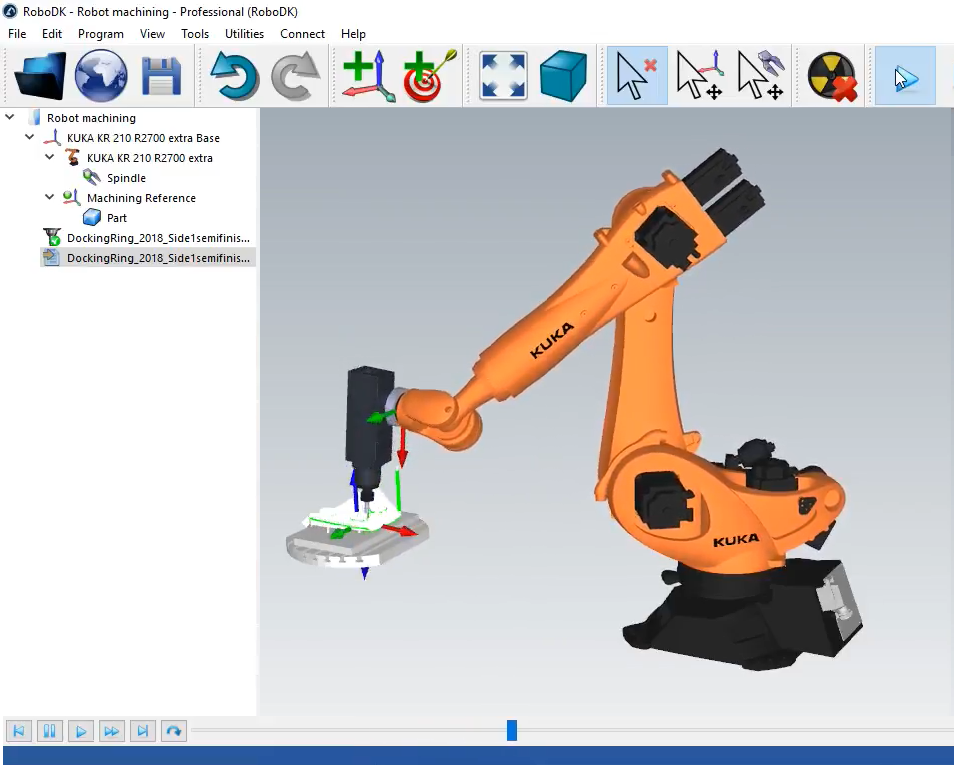
Double click the robot machining project 
Right click a program and select Run to simulate it (or double click the program). You can also select Generate robot program (F6) to obtain the robot program that needs to be loaded on the robot controller. More information about how to generate robot programs is available in the Offline Programming section.
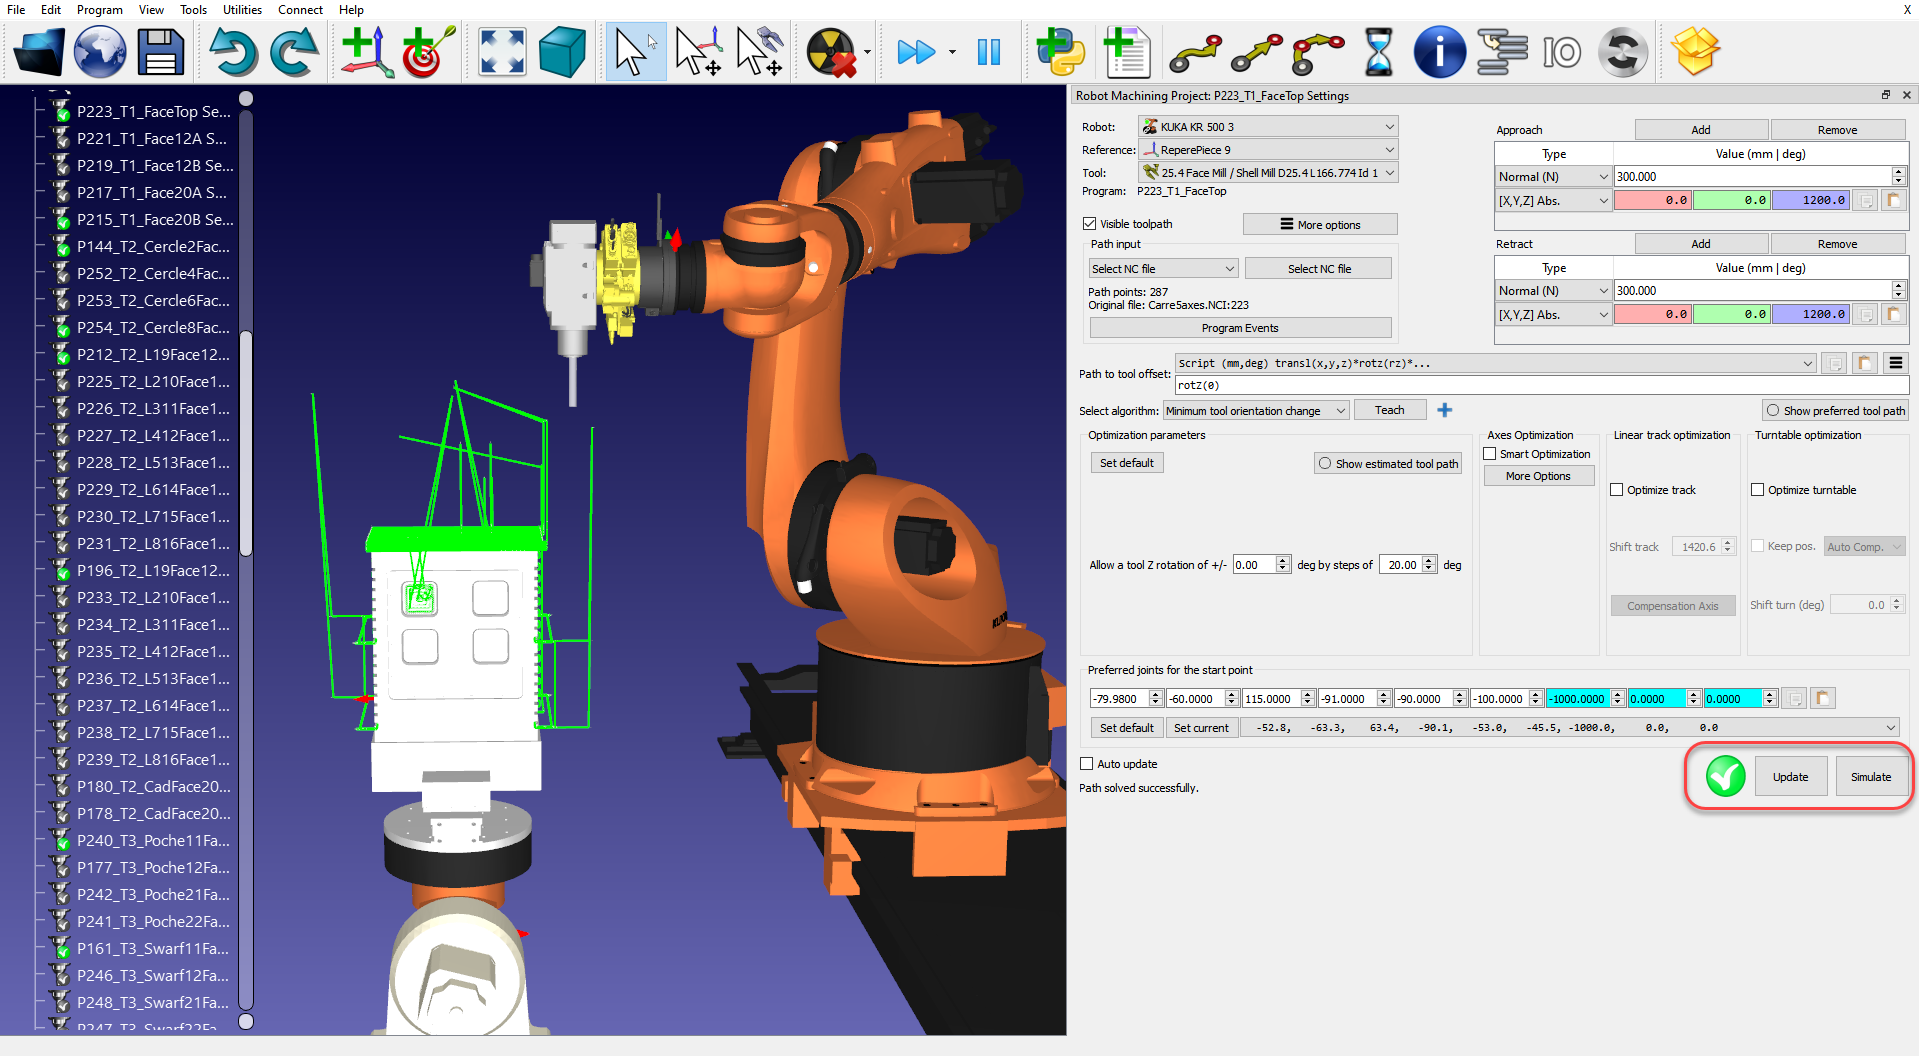
If required, right click a program and select Select Post Processor to change the post processor. This step is may help you customize the appearance of your generated code. More information about selecting and customizing post processors is available in the post processors section.
For example, when you use a KUKA robot, RoboDK generates automatically uses the post processor for KRC2 robots (called KUKA KRC2), however, if you have a KRC4 you can choose the KUKA KRC4 post processor.
Generate robot programs from Mastercam
You can generate robot programs directly from Mastercam once your RoboDK station is ready. To do so, select Generate selected robot program 
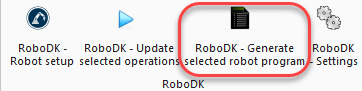
RoboDK will not be displayed unless there are program issues. This option can be used even if RoboDK is not running, in that case, RoboDK will run in the background.
Follow these steps in RoboDK to view or modify the location of your robot programs:
1.Select Tools-Options
2.Select the Program tab
3.Select Set in the Robot programs folder
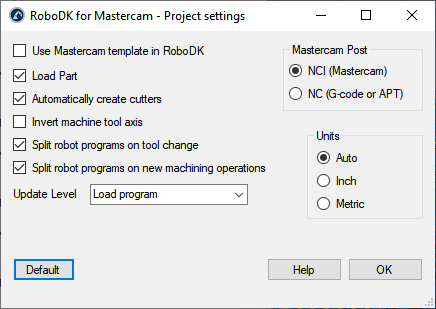
Plugin Settings
Select RoboDK Settings 
Among other things, you can modify the following options:
1.Use the Mastercam template instead of RoboDK template (the 3D navigation and color templates in RoboDK will match Mastercam style). In RoboDK, make sure to uncheck Ignore changing settings from 3rd party applications in the menu Tools➔Options➔Other to allow this template in RoboDK.
2.Load and update the part in RoboDK every time you post a new machining operation. Only visible solids and surfaces will be loaded.
3.Automatically create tool cutters. In this case, new tools will be created automatically with respect to the first tool of the robot (tool holder) and the TCP will be offset by the overall tool length with respect to the tool holder.
4.Checking the option Invert machine tool axis allows you to automatically account for your tool Z axis pointing towards the inner side of the tool (instead of pointing toward the outside).
5.Use NC files (such as APT or G-code) instead of NCI files. RoboDK can read the following files to generate robot simulations and programs:
a.NCI files (default option): Loads Mastercam native toolpath in RoboDK. This is the preferred method for most operations.
b.NC files (G-code files). Allows you to load canned drill cycles (longhand) using the RoboDK machine definition.
Examples
The following sections show a 3-axis machining example and a 5-axis robot cutting example, respectively.
3-Axis Robot Machining
This example shows how to create a 3-axis robot machining project using the Mastercam plugin.
1.Load the part in Mastercam.
2.Create the toolpath using Mastercam Mill tools.
3.Create a station in RoboDK with your robot, your spindle and any other required objects.
4.In the RoboDK plugin tab, select RoboDK ➔ Robot setup.
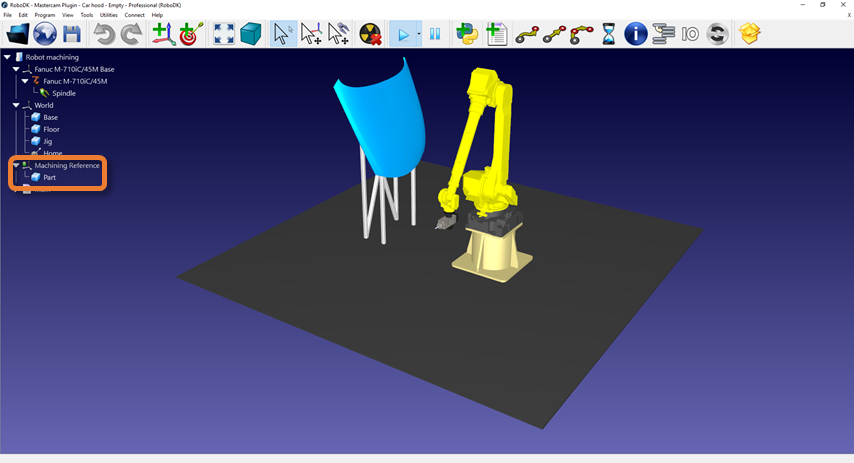
5.In the Robot Machining Setup window, select Load Part.
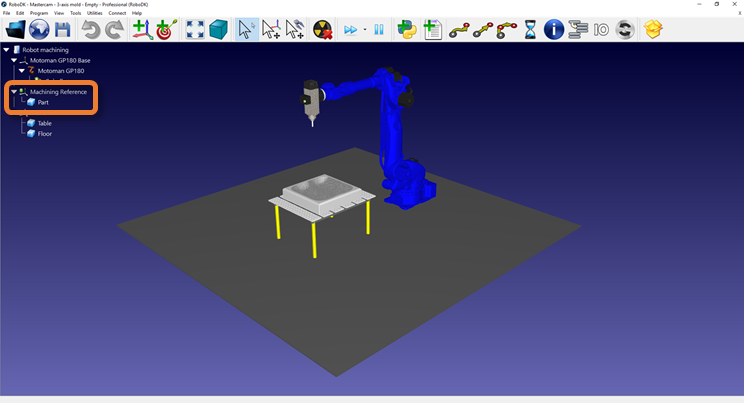
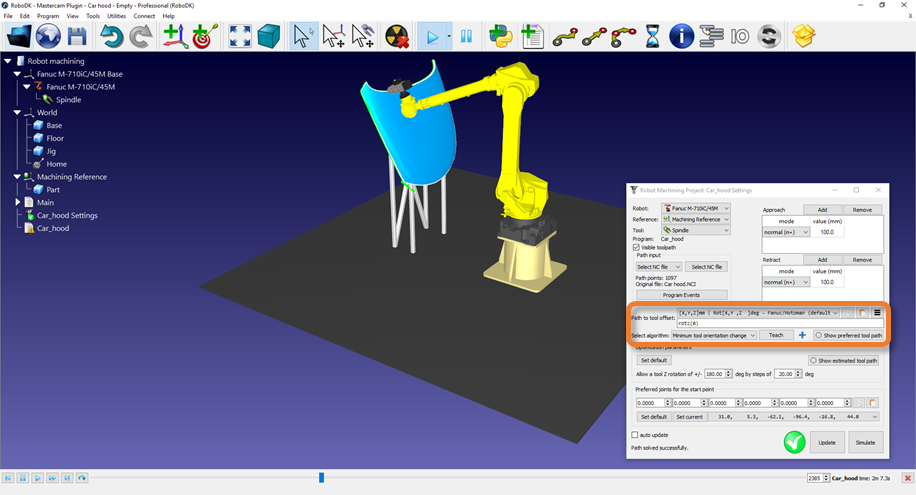
6.In RoboDK, adjust the position of the Machining Reference reference frame if needed. Hold the Alt key and move the reference with its arrows using the cursor to reposition the part in front of the robot.
7.In the RoboDK plugin tab, select RoboDK ➔ Update selected operations.
8.In RoboDK, select Update and Simulate in the Robot Machining Project window.
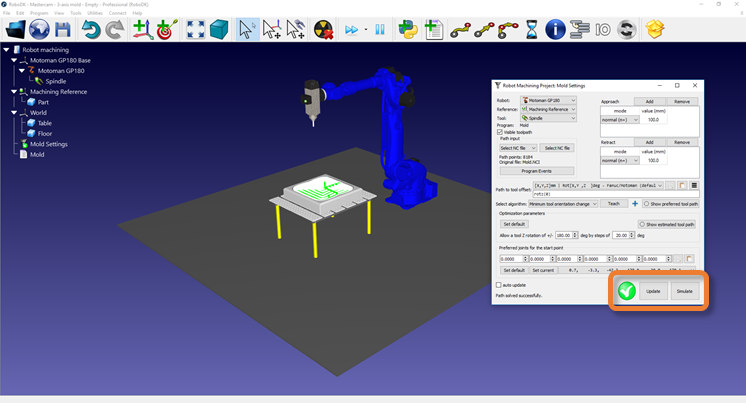
9.Modify the orientation of the tool along the path if needed. Hold the Alt key and orient the tool around its Z axis arrows using the cursor. Select the Teach button to set the desired pose for the path. Select Update to recalculate the path using this new pose. Select Simulate to simulate the modified path.

5-Axis Robot Cutting
This example shows how to create a 5-axis robot cutting project using the Mastercam plugin.
1.Load the part in Mastercam.
2.Create the toolpath using Mastercam Mill tools.
3.Create a station in RoboDK with your robot, your spindle and any other required objects.

4.In the RoboDK plugin tab, select RoboDK ➔ Robot setup.
5.In the Robot Machining Setup window, select Load Part.
6.In RoboDK, adjust the position of the Machining Reference reference frame if needed. Hold the Alt key and move the reference with its arrows using the cursor to reposition the part in front of the robot.
7.In the RoboDK plugin tab, select RoboDK➔Update selected operations.
8.In RoboDK, select Update and Simulate in the Robot Machining Project window.
9.Modify the orientation of the tool along the path, if needed. Hold the Alt key and orient the tool around its Z axis arrows using the cursor. Select the Teach button to set the desired pose for the path. Select Update to recalculate the path using this new pose. Select Simulate to simulate the modified path.
Manual Install
These are manual steps to setup the RoboDK Plug-in for Mastercam. You should follow these steps if the RoboDK plug-in for Mastercam was not automatically installed by default using the RoboDK installer:
1.Install or update RoboDK: https://robodk.com/download.
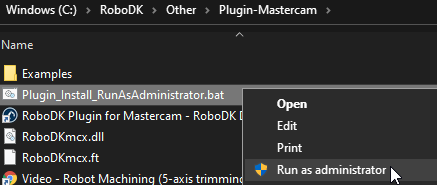
2.You should find the required files to install the RoboDK plug-in for Mastercam in the folder: C:/RoboDK/Other/Plugin-Mastercam/.
3.Right click the file Plugin_Install_RunAsAdministrator.bat and select Run as administrator.
If this process failed, you should follow these steps and copy the required files manually:
1.Copy the RoboDKmcx.dll and RoboDKmcx.ft files to the Mastercam chooks folder (C:\Program Files\Mcam2020\chooks\).

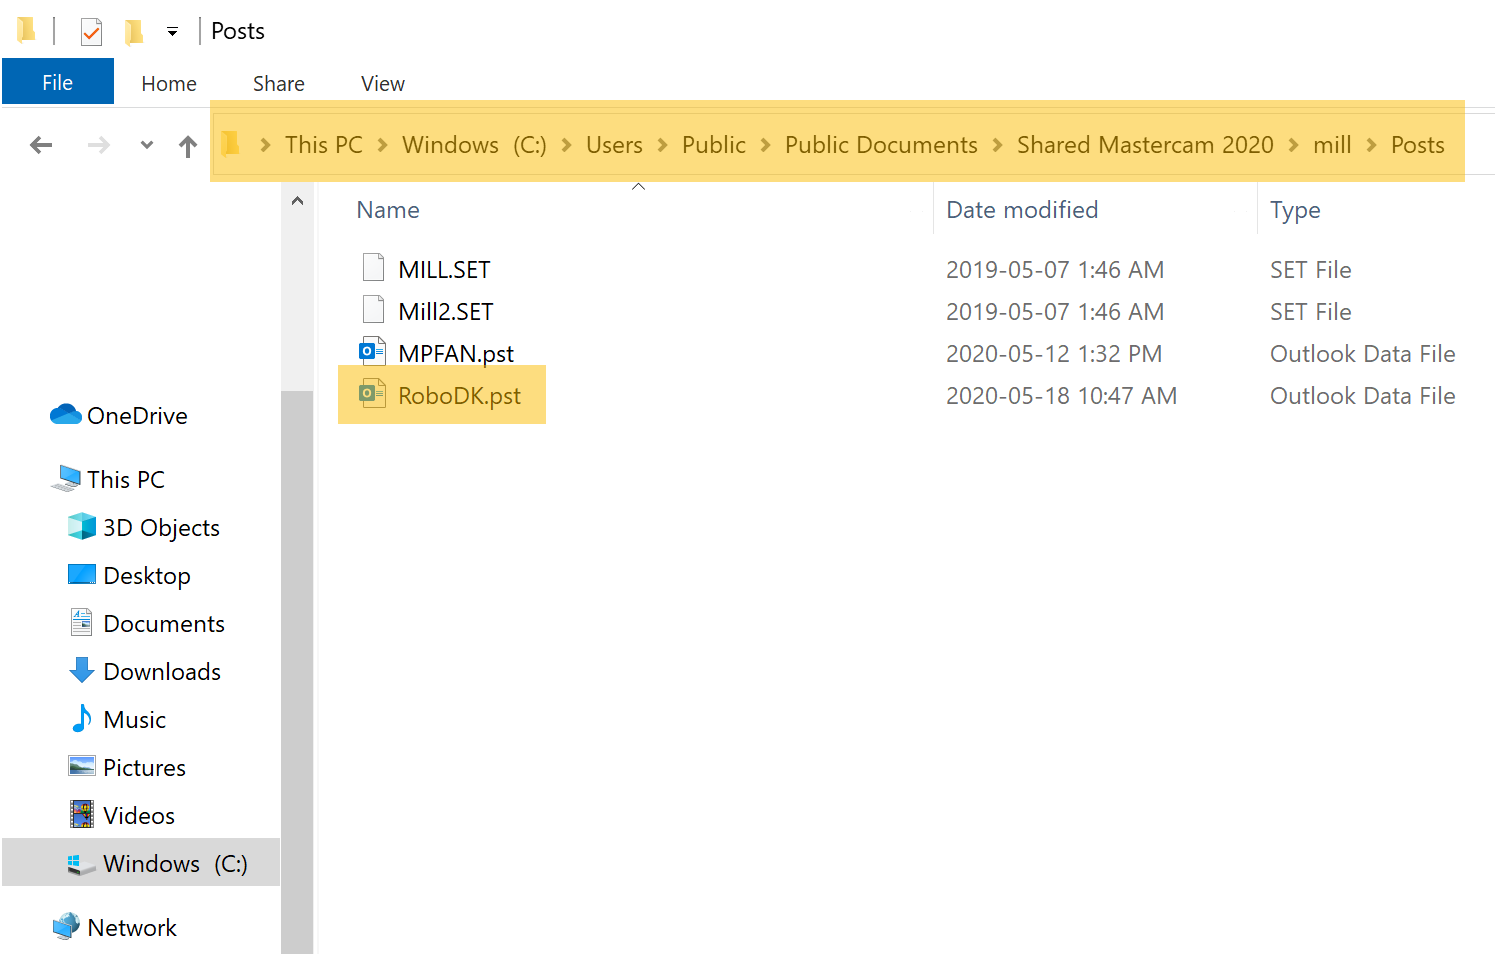
2.Copy the file RoboDK.pst in the folder: C:\Users\Public\Documents\Shared Mastercam 2020\mill\Posts\.
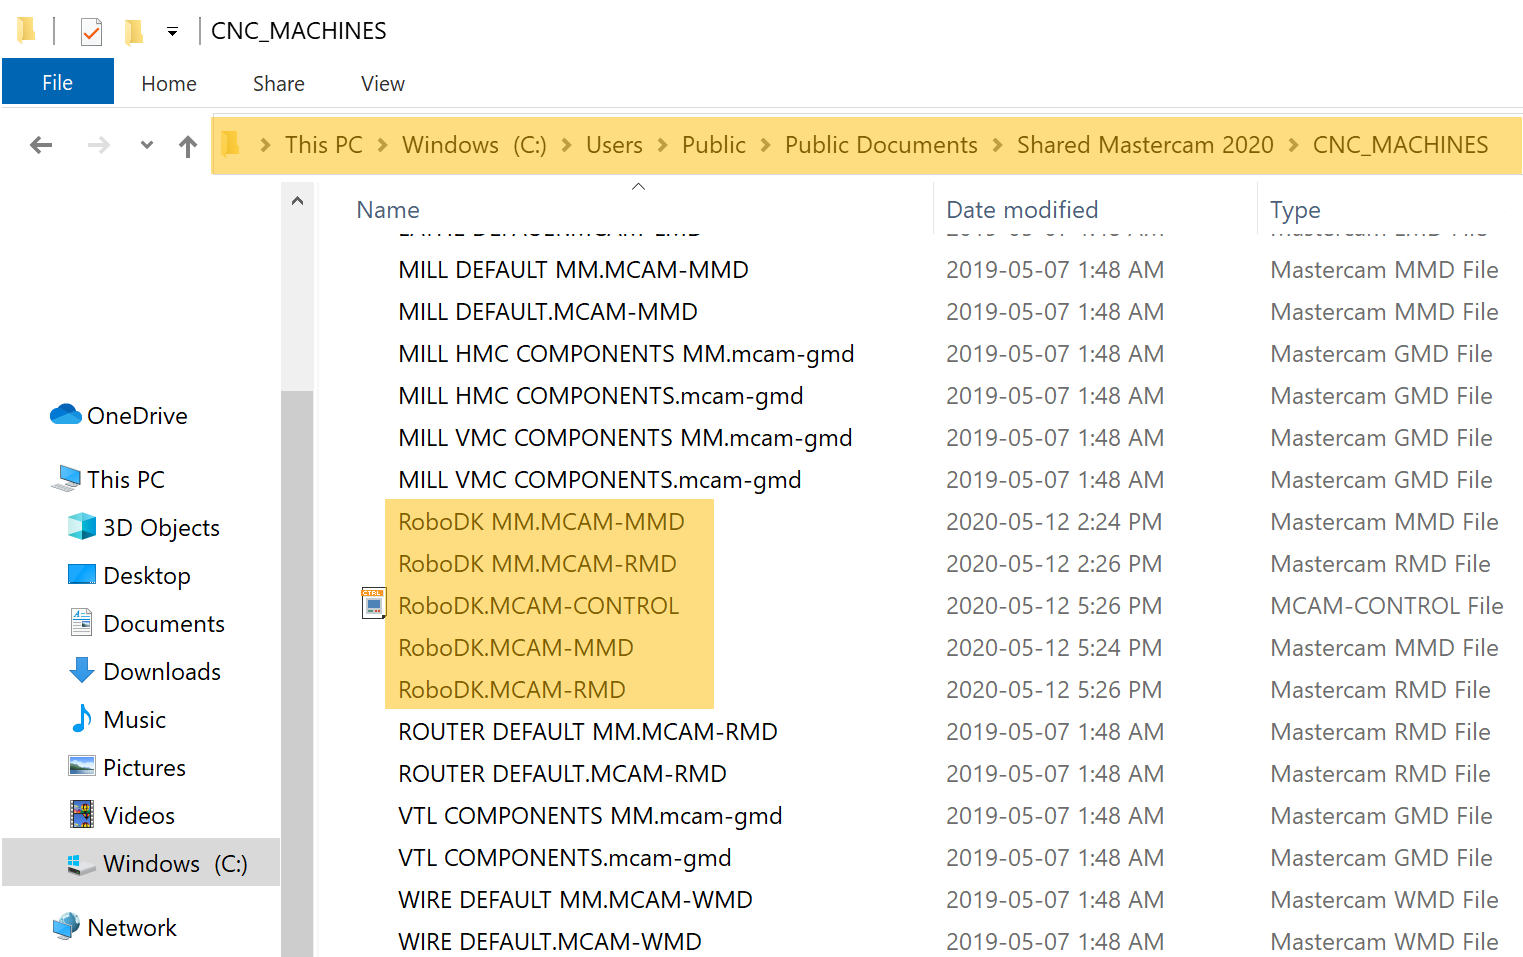
3.Copy the following machine definition files in the folder C:\Users\Public\Documents\Shared Mastercam 2020\CNC_MACHINES\:
a.RoboDK.MCAM-MMD
b.RoboDK MM.MCAM-MMD
c.RoboDK.MCAM-RMD
d.RoboDK MM.MCAM-RMD
e.RoboDK MM.CONTROL
C:\Program Files\Mcam2025\chooks,
C:\Users\Public\Documents\Shared Mastercam 2025\mill\Posts\,
C:\Users\Public\Documents\Shared Mastercam 2025\CNC_MACHINES\
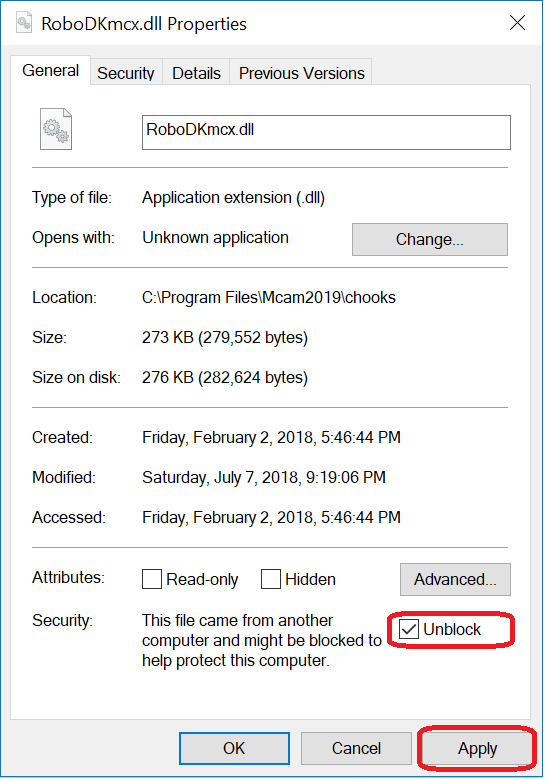
If you experience issues with the installation process, you may need to right click the RoboDKmcx.dll file, select Properties, then, check Unblock and select Apply, as shown in the following image. You don’t need to follow this step if you don’t see the Unblock option.