RoboDK CNC
RoboDK CNC is a collection of tools that facilitate using robots like a CNC. RoboDK CNC enables the execution of large programs up to unlimited number of lines in streaming mode. Large programs are usually the result of using CAD/CAM systems and using robots for machining.
Most robot control systems have very limited resources and are unable to load large programs into memory. RoboDK CNC eliminates these limitations by sending these coordinates one by one or in groups of subprograms to the control system (also known as dripfeeding).
RoboDK offers a dedicated add-in (RoboDK CNC) that allows executing large robot machining projects on KUKA robot controllers. RoboDK also offers dedicated post processors for some controllers to implement this strategy.
Install the RoboDK CNC add-in
If you already have RoboDK with the Add-In Manager plugin installed, the only action you need to do is to install the add-in from RoboDK Online Library.
The C3 Bridge Interface Server must be installed in the robot control system. For more information on this, see RoboDK driver for KUKA.
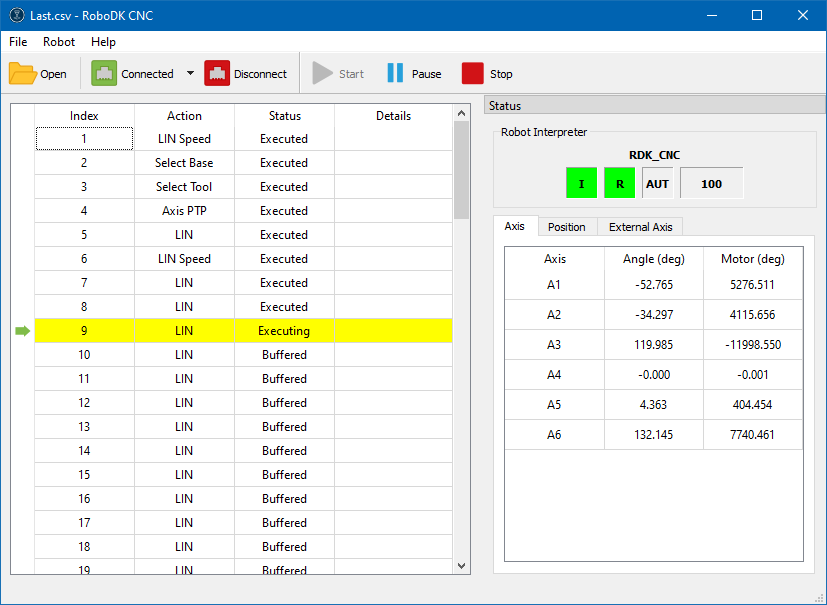
RoboDK CNC User Interface
The RoboDK CNC allows feeding large programs to a robot controller.
The main window of RoboDK CNC contains the following elements:
1.Main Menu
2.Toolbar
3.Instruction Table
4.Status Panel
The Main Menu and Toolbar operations overlap.
| Open | Open a CSV file generated using the RoboDK CNC post processor. |
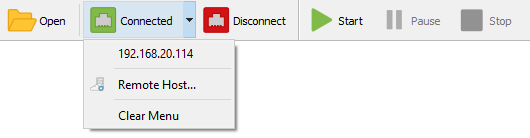
| Connect | This icon indicates that there is currently no connection to the robot control system. Pressing this button will open the connection history menu. |
| Remote Host... | This action will bring up the New Connection dialog box to connect to the IP address and port of the remote robot control system. |
| Connecting | This icon indicates an attempt to connect to the robot control system. |
| Connected | This icon indicates a successful connection to the robot control system. |
| Disconnect | This action immediately interrupts the connection to the robot control system. Be careful, the robot may continue to move even after the RoboDK CNC has been disconnected. |
| Start | Start performing the robot's movements with the very first instruction. Or continue running a previously started program. |
| Pause | Suspend execution of a previously started program. |
| Stop | Cancel program execution and stop the robot's movements. |


The Status Panel contains information about the currently running KRL program, readiness and speed override indicators, and information about the current robot position.
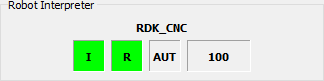
The Robot Interpreter panel contains four indicators:
Robot Drives and Motion |
| The robot's drives are turned on, and the robot is ready to make movements. |
| The robot actuators are switched off and the robot is not ready for operation. | |
KRL Program Status |
| The robot program is not loaded. |
| The robot program is loaded and ready for execution. | |
| The robot program is being executed. | |
| The robot program was interrupted due to an error. | |
| The robot program was fully executed. | |
Robot Controller Mode |
| The current operating mode of the robot control system. It can take the following values: T1, T2, AUT, EXT. |
Speed Override |
| The program execution speed override value in percent from 0 to 100. |


Workflow Example
This section describes the steps to use the RoboDK CNC to execute a program on a KUKA controller.
1.Launch RoboDK CNC application: with the plugin enabled, select Utilities➔RoboDK CNC.
2.Connect to the remote robot control system with the C3 Bridge Interface Server running.
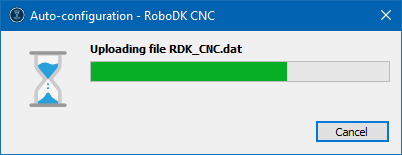
3.If you are running the application for the first time or your robot control system has never used RoboDK CNC, automatic configuration is required before starting. Run it using the menu Robot ➔ Configure...
4.Open a CSV program file generated using theRoboDK CNC post processor.
5.Make sure that the robot is ready for operation: the drives are switched on, the desired run mode and speed settings are set.
6.Press the Start button to start executing the program.