Robot Drivers
A robot driver can control a real robot that is connected to a computer. Robot drivers use specific software interfaces to control and monitor a specific robot controller, enabling a computer to directly control a robot arm.
Robot drivers provide an alternative to Offline Programming (where a program is simulated, generated, then, transferred to the robot and executed). With robot drivers you can move a robot while it is being simulated (Online Programming).
The following article shows an example of an Online Programming project using robot drivers: https://robodk.com/blog/online-programming/
Any robot simulation that is programmed in RoboDK can be executed on the robot using a robot driver. The robot movement in the simulator is then synchronized with the real robot and it is possible to debug robot programs in real time.
The following list provides some of the supported robot drivers in RoboDK:
●ABB
●Annin Robotics
●AUBO
●Automata
●Borunte
●Comau
●Dobot
●Doosan
●Elephant Robotics
●Elite Robots
●Epson
●FAIRINO
●Han’s Robot / Huayan Robotics
●Hanwha
●IGUS
●JAKA
●Kawasaki
●KEBA
●Kinova
●KUKA KRC
●KUKA IIWA
●Mecademic
●Mitsubishi
●Niryo
●Productive Robotics
●Siemens
●Staubli
●uFactory xArm
●Wlkata
How to use Robot Drivers
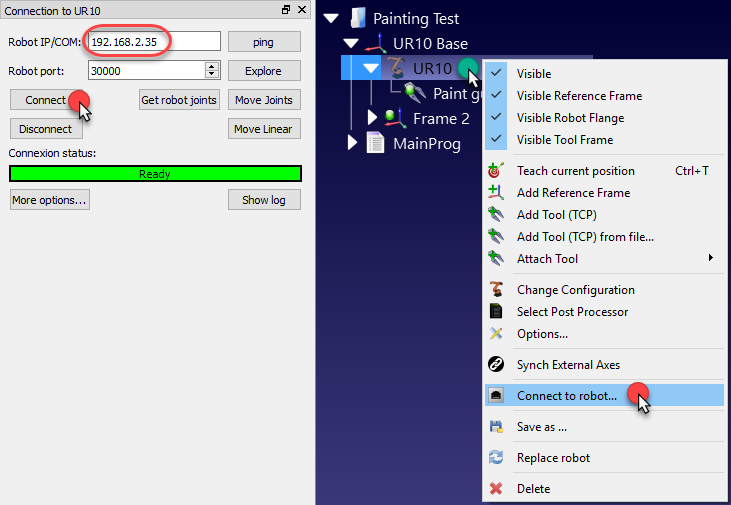
This section shows how to connect to a real robot arm from RoboDK using robot drivers and perform some simple operations.
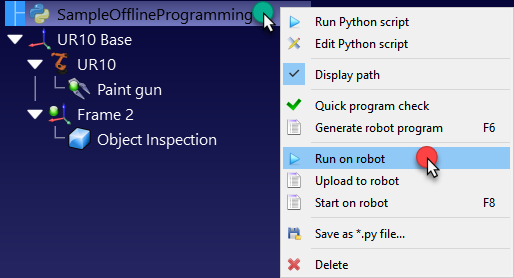
1.Right click a robot
2.Select 
3.Enter the IP of the robot
4.Select Connect
A green message displaying Ready will appear if the connection was successful, as shown in the following image.
Using the GUI
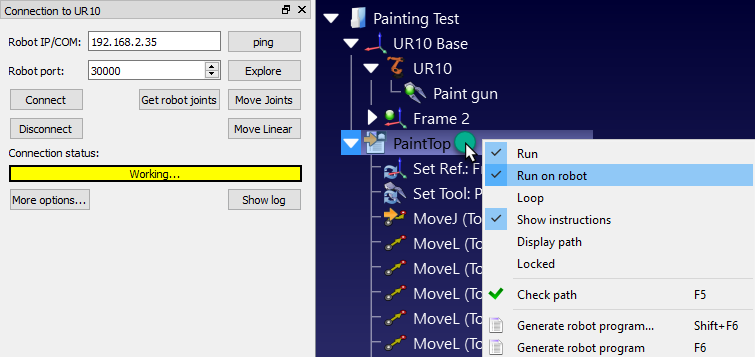
A robot program that has been created using the Graphical User Interface (GUI) can be executed on the robot following these steps.
1.Right click a 
2.Check the Run on robot option
3.Double click the program to start it
The program should start on the real robot and the simulator will follow the robot movements. The Connection status will display Working… in yellow when the robot is busy.
Using the API
It is possible to control the movement of a robot from the RoboDK API, for example, to program a robot from a Python program or a C# application.
The Run on robot option is managed automatically when a Python program is run from RoboDK. Follow these steps to run a Python program on the robot:
1.Right click a 
2.Select 
The program should start running on the robot and the robot connection status will be updated accordingly.
If the program is executed outside the RoboDK’s GUI (for debugging purposes, or if we are using the RoboDK API for C# for example), we can set the RunMode using RDK.setRunMode to RUNMODE_RUN_ROBOT. This will force the program to run on the robot. It is also possible to establish the connection using robot.Connect().
The following code shows a brief example to establish a connection with the robot directly from the API:
# Start the RoboDK API
RDK = Robolink()
robot = RDK.Item('',ITEM_TYPE_ROBOT)
# Connect to the robot using default connetion parameters
success = robot.Connect()
status, status_msg = robot.ConnectedState()
if status != ROBOTCOM_READY:
# Stop if the connection did not succeed
raise Exception("Failed to connect: " + status_msg)
# Set to run the robot commands on the robot
RDK.setRunMode(RUNMODE_RUN_ROBOT)
# Note: This is set automatically if we use
# robot.Connect() through the API
# Move the robot:
robot.MoveJ([10,20,30,40,50,60])
prog = RDK.Item('MainProgram', ITEM_TYPE_PROGRAM)
prog.setRunType(PROGRAM_RUN_ON_ROBOT) # Set the run on robot option
# Set to PROGRAM_RUN_ON_SIMULATOR to run on the simulator only
prog.RunProgram()
while prog.Busy() == 1:
pause(0.1)
print("Program done")
Customize Robot Drivers
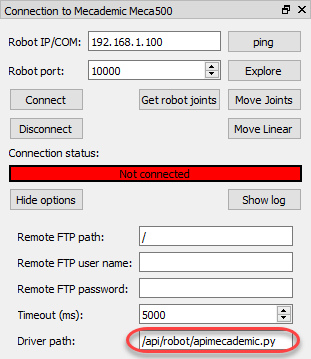
Robot drivers are in the folder /RoboDK/api/Robot/ by default. RoboDK links to a specific driver in the robot connection settings:
1.Right click a robot
2.Select
3.Select More options…
4.Locate or enter the path of the driver path in the Driver path section
One robot driver is a standalone console application. Robot drivers can be developed using any programming platform, for example, they can be a Python module (PY format) or any executable programs built under any development environment.
The robot driver allows communicating with a robot through the command line. The same commands that can be manually executed are also used by RoboDK to drive the robot from the PC. Each robot driver can be run in console mode to test it.
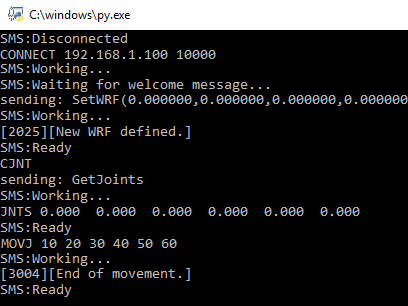
A sample Python driver (apimecademic.py) with its source code to control Mecademic robots is available in C:/RoboDK/bin/robot/.
Double click the apimecademic.py file to run the module in console mode (Python must be installed). The driver will wait for any new commands. For example, we can type the following command to connect to the robot provided an IP and a communication port:
CONNECT 192.168.100.1 10000
If the connection succeeds we should see a SMS:Ready message. Then, we can type the following command to retrieve the current robot joints:
CJNT
We can also type other commands such as MOVJ, MOVL or SETTOOL to move the robot or update the TCP:
MOVJ 10 20 30 40 50 60
Some robots support monitoring the joint position in real time. In this case it is possible to provide joint position feedback as the robot moves by sending the JNTS_MOVING command. When the driver is run from RoboDK, the virtual robot will follow the movement of the real robot in real time. A new command will not be processed until the Ready message is sent.
The interaction with the console and the connection to the robot are managed by the one Python module for the Mecademic driver. The interaction with the console should be the same for all robots, as described in this section. However, the interaction with each robot depends on the robot manufacturer, in this case we referred to the Meca 500 programming manual to send the appropriate commands. These commands allow moving and monitor the Meca 500 robot.
Troubleshoot
Setting up the robot driver might not be as simple as generating programs offline (Offline Programming). If the connection doesn’t work, this section provides some tips to help you find the source of the problems.
1.Make sure the IP of the robot is correct and reachable: Select the ping button from the robot connection menu (or ping the robot through the command line) to make sure the robot and the computer are in the same network.
2.Set a static IP for the computer if the robot and the computer are not in the same network.
3.If you are using Windows: Make sure that Windows Firewall is turned Off to prevent blocking any connections.
4.Make sure the communication port is appropriate and available on the robot side.
5.Make sure appropriate instructions are followed on the robot controller depending on the controller model.
6.Double click Disconnect on the Robot connection window to force the driver to stop, then, select connect again to try a new connection.
Ping test
A ping test will test the reachability of a robot on an Internet Protocol (IP) network.
Follow these steps to perform a ping test on Windows:
1.Open a new console window by selecting 
2.Type cmd and select OK
3.Type ping IP, where the IP should be the IP of your robot). Example:
ping 192.168.125.2
We should see a response similar to the image with a 0% signal loss
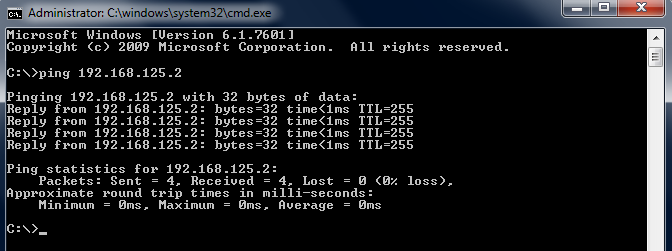
If there is no communication we should verify that the IP of the robot and the PC are in the same local area network (LAN). It might be required to turn off the Windows Firewall or add a rule to allow the communication.
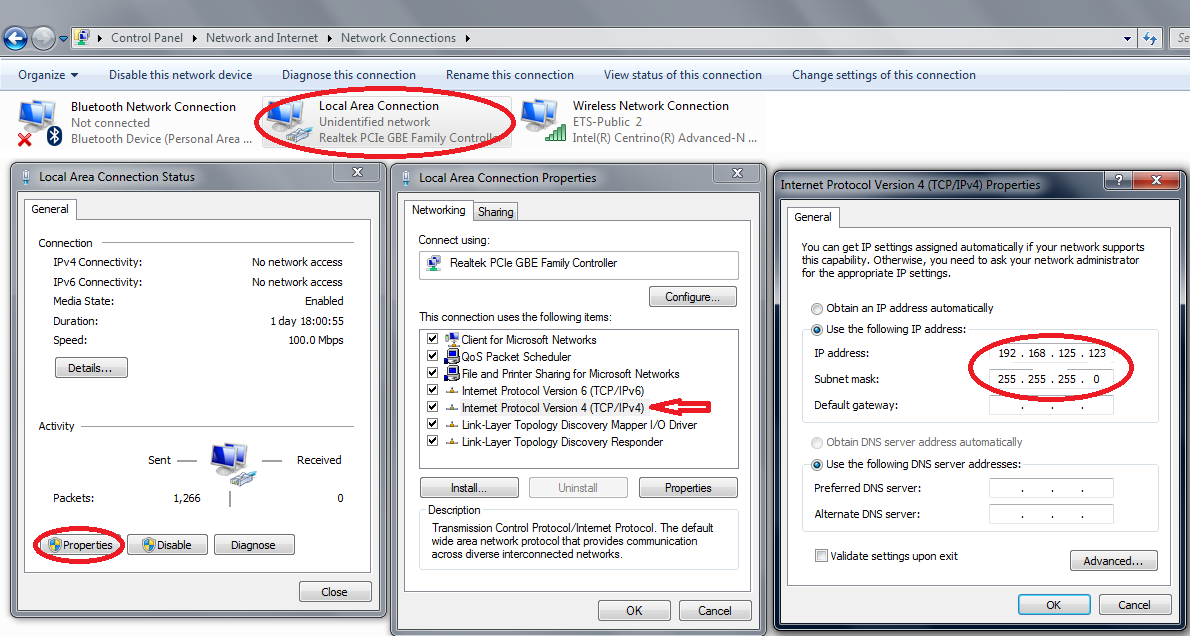
Set a Static IP
Follow these steps to change the IP of a computer:
1.Select Windows Start➔Control Panel➔Network and Internet➔Network Connections
2.Double click the local area connection card
3.Select Properties.
4.Select Internet Protocol Version 4 (TCP/IPv4)
5.Select Properties
6.Enter the IP of the computer according to the robot IP and a subnet mask.