Brooks robots
RoboDK supports the Brooks PreciseFlex robots using GPL (Guidance Programming Language). Users can generate advanced laboratory automation programs using a selection of their robot arms, grippers, and linear rails.
Gripper Simulation
To control the Brooks PreciseFlex IntelliGuide grippers from a simulation, including the IntelliGuide s23D (dual) gripper, follow the steps outlined in this section.
1.Right-click your program, and add a Program Call Instruction.
2.Enter “Gripper(gripper ID, gripper value)”. For example, “Gripper(2, 50)” to move the gripper #2 of a dual gripper to 50 mm.
a.You can shorten the call to “Gripper(gripper value)” with a single gripper.
b.If more than one robot is present, use “Gripper(gripper ID, gripper value, item.ptr)”. For example, “Gripper(2, 50, item.ptr)” will move the gripper #2 of a dual gripper to 50 mm, ensuring the parent robot is linked to the program.
3.Add the Gripper() instruction as the first instruction of all subprograms and after all subprogram calls. This is to ensure compatibility with the post processor. Duplicated Gripper() instructions are expected.
4.Add a Python script, rename it to “Gripper”.
5.Edit the “Gripper” Python script and paste the following:
from robodk import robolink
import sys
if len(sys.argv) < 2:
quit()
def get_item(ptr_item, RDK):
item = robolink.Item(RDK, str(ptr_item), robolink.ITEM_TYPE_PROGRAM)
if not item.Valid(True):
return None
return item
RDK = robolink.Robolink()
gripper_id = -1
gripper_value = 0
prog_item = None
# Get the gripper ID, value, possibly the caller
if len(sys.argv) == 2:
gripper_value = float(sys.argv[1])
elif len(sys.argv) >= 4:
gripper_id = int(sys.argv[1])
gripper_value = float(sys.argv[2])
prog_item = get_item(int(sys.argv[3]), RDK)
elif len(sys.argv) == 3:
prog_item = get_item(int(sys.argv[2]), RDK)
if prog_item:
gripper_value = float(sys.argv[1])
else:
gripper_id = int(sys.argv[1])
gripper_value = float(sys.argv[2])
# Get candidates
grippers = [x for x in RDK.ItemList(robolink.ITEM_TYPE_ROBOT_AXES) if 'intelliguide' in x.Name().lower() and len(x.Joints().tolist()) == 1]
if len(grippers) > 1 and prog_item:
robot_item = prog_item.getLink(robolink.ITEM_TYPE_ROBOT)
if not robot_item.Valid():
robot_item = RDK.ItemUserPick("Select the linked robot", robolink.ITEM_TYPE_ROBOT)
prog_item.setRobot(robot_item)
def get_flat_childs(item):
childs = item.Childs()
for child in item.Childs():
childs.extend(get_flat_childs(child))
return childs
childs = get_flat_childs(robot_item)
grippers = [x for x in childs if x.Type() == robolink.ITEM_TYPE_ROBOT and len(x.Joints().tolist()) == 1]
if not grippers:
RDK.ShowMessage('Unable to find a gripper!', False)
# Try to find the right gripper id (i.e. Dual Gripper 1)
gripper = grippers[0]
if gripper_id > 0:
gripper_ids = [g for g in grippers if g.Name().endswith(str(gripper_id))]
if gripper_ids:
gripper = gripper_ids[0]
gripper.MoveJ([gripper_value])
Note that this method is also compatible with the Brooks post processor.
Linear Rails
As the base frame of the PreciseFlex robot is not placed at the physical base of the robot, specific offsets are required between the PreciseFlex robots and the PreciseFlex linear rails.
Brooks PreciseFlex Linear Rail 0-degree configuration:
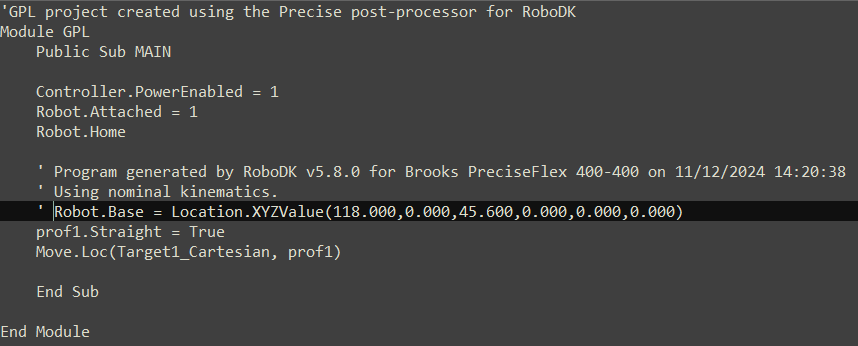
a.Brooks PreciseFlex 400: [118, 0, 45.6, 0, 0, 0]
b.Brooks PreciseFlex 3400: [118, 0, 62.6, 0, 0, 0]
Brooks PreciseFlex Linear Rail -90-degree configuration:
a.Brooks PreciseFlex 400: [101.6, 0, 45.6, 0, 0, 0]
b.Brooks PreciseFlex 3400: [101.6, 0, 62.6, 0, 0, 0]
The linear rail must be synchronized for the post processor to account for the axis position. Refer to the https://robodk.com/doc/en/General.html#SyncAxes section for more information.
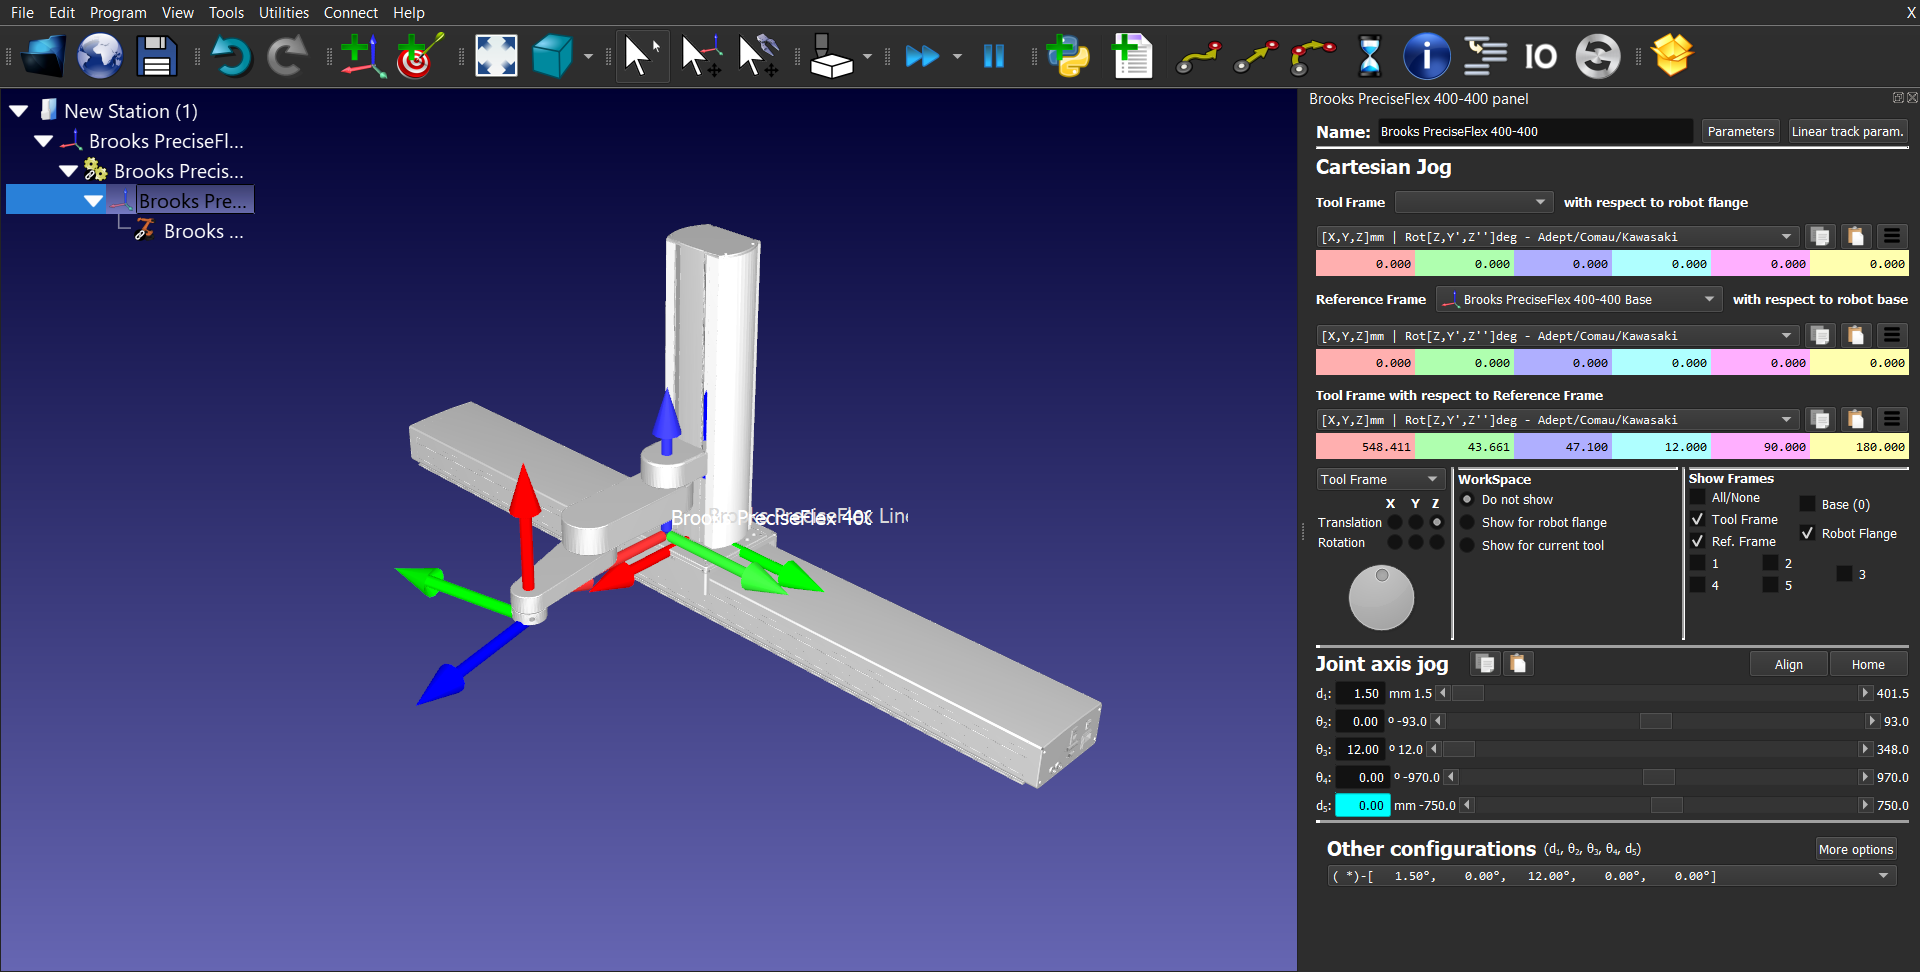
To properly save targets in the World Reference Frame of the robot and later use them in a GPL project created using the post processor, the user must define a new reference frame. This must be defined with respect to the station reference frame, with the same offsets used before between the robot base and the linear rail (as reported above). The targets must be defined with respect to this reference frame.
Below is a picture showing a PreciseFlex 400 robot mounted on a 1m linear rail (in 0-degree configuration) and the reference frame defined as the World Reference Frame of the robot.
After having generated the GPL project, open the Main.gpl file using any text editor, and comment the line where the base reference frame of the robot is defined:
Brooks PreciseFlex c8A
Given the unique kinematics of the Brooks PreciseFlex c8A robot, its model has been developed in RoboDK by combining two robots’ models, to handle the 3+3 degrees of freedom of the robotic arm.

This development makes it not possible to use the models of the Brooks PreciseFlex c8A robots in combination with the Brooks post processor.
The Brooks PreciseFlex c8A robots are not compatible with any of the Brooks PreciseFlex IntelliGuide grippers.
If a Tool Center Point (TCP) must be added, this must be defined with respect to the flange of the wrist mechanism of the robot. Look at the information reported in the paragraph “Tool Center Point (TCP)” to set the pose of the TCP as it is configured in the robot’s controller.
Brooks PreciseFlex 100 XZTS
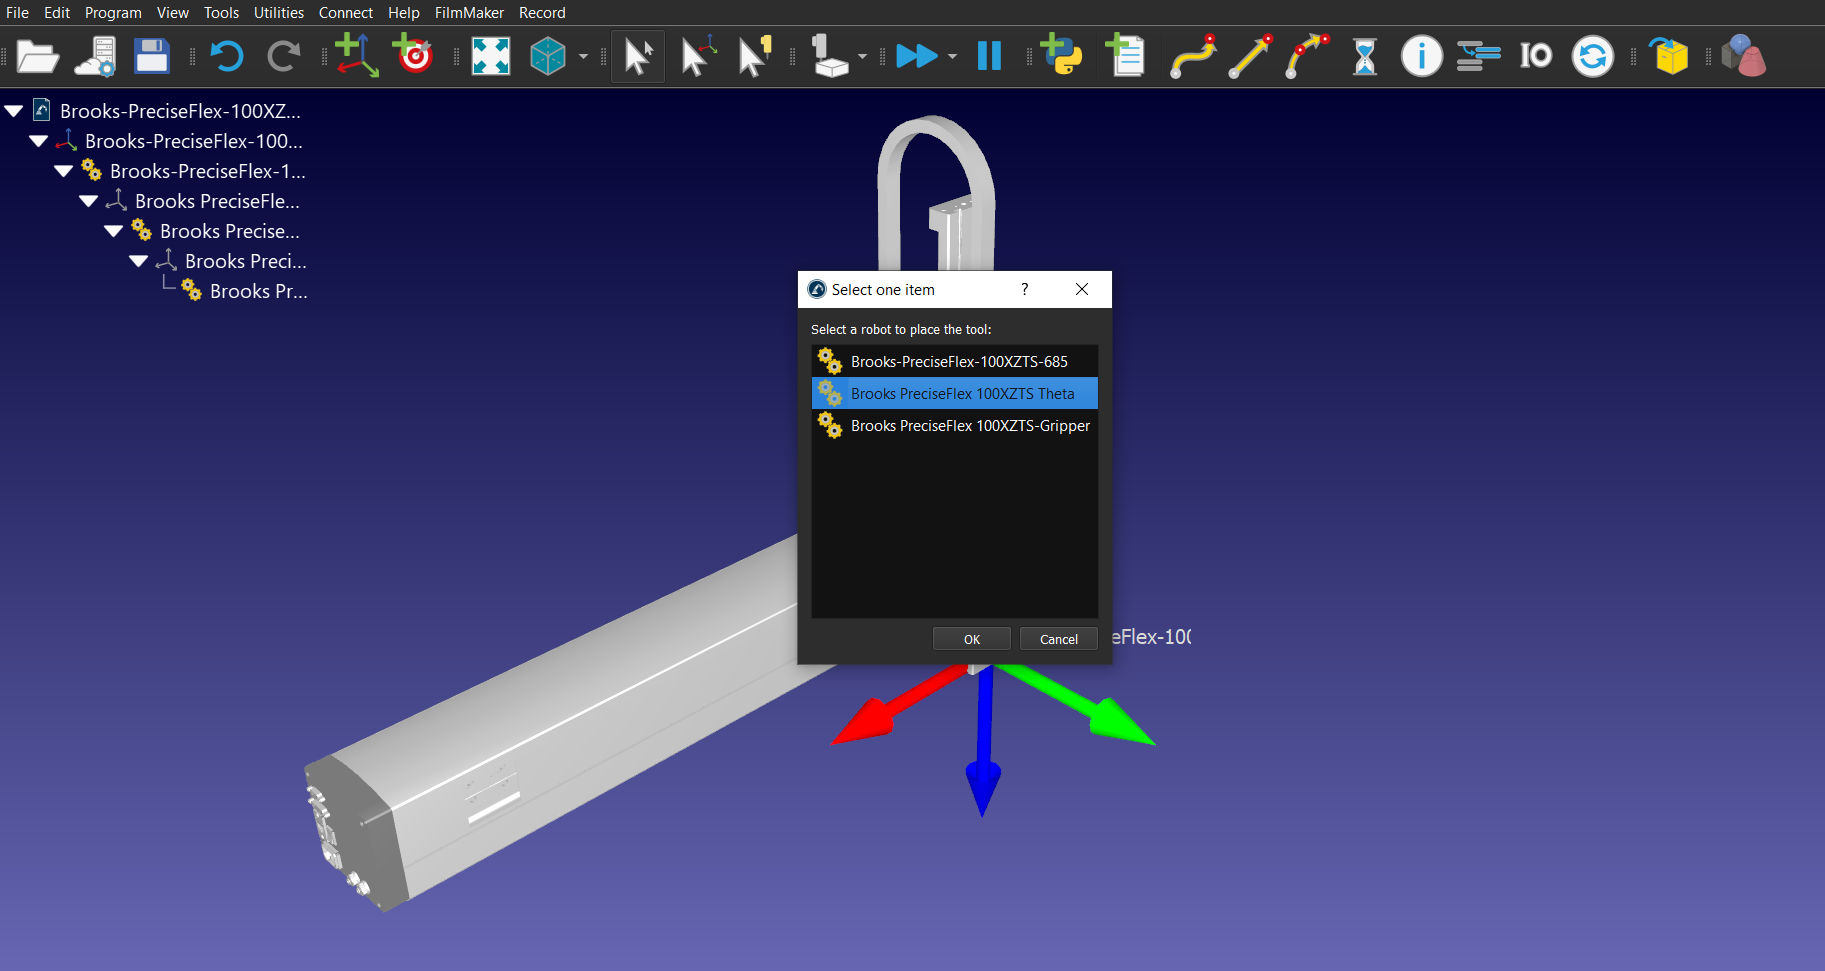
Similarly to the Brooks PreciseFlex c8A robot, the Brooks PreciseFlex 100 XZTS robots have been developed by combining two robots’ models, to which the gripper has been added. This allows to handle the 3 degrees of freedom of the arm (linear movements along the X and Z axes, and rotation Theta around the Z axis), and the degree of freedom of the gripper.
The Brooks PreciseFlex 100 XZTS with 685 mm of range of motion on the X axis is shown below.
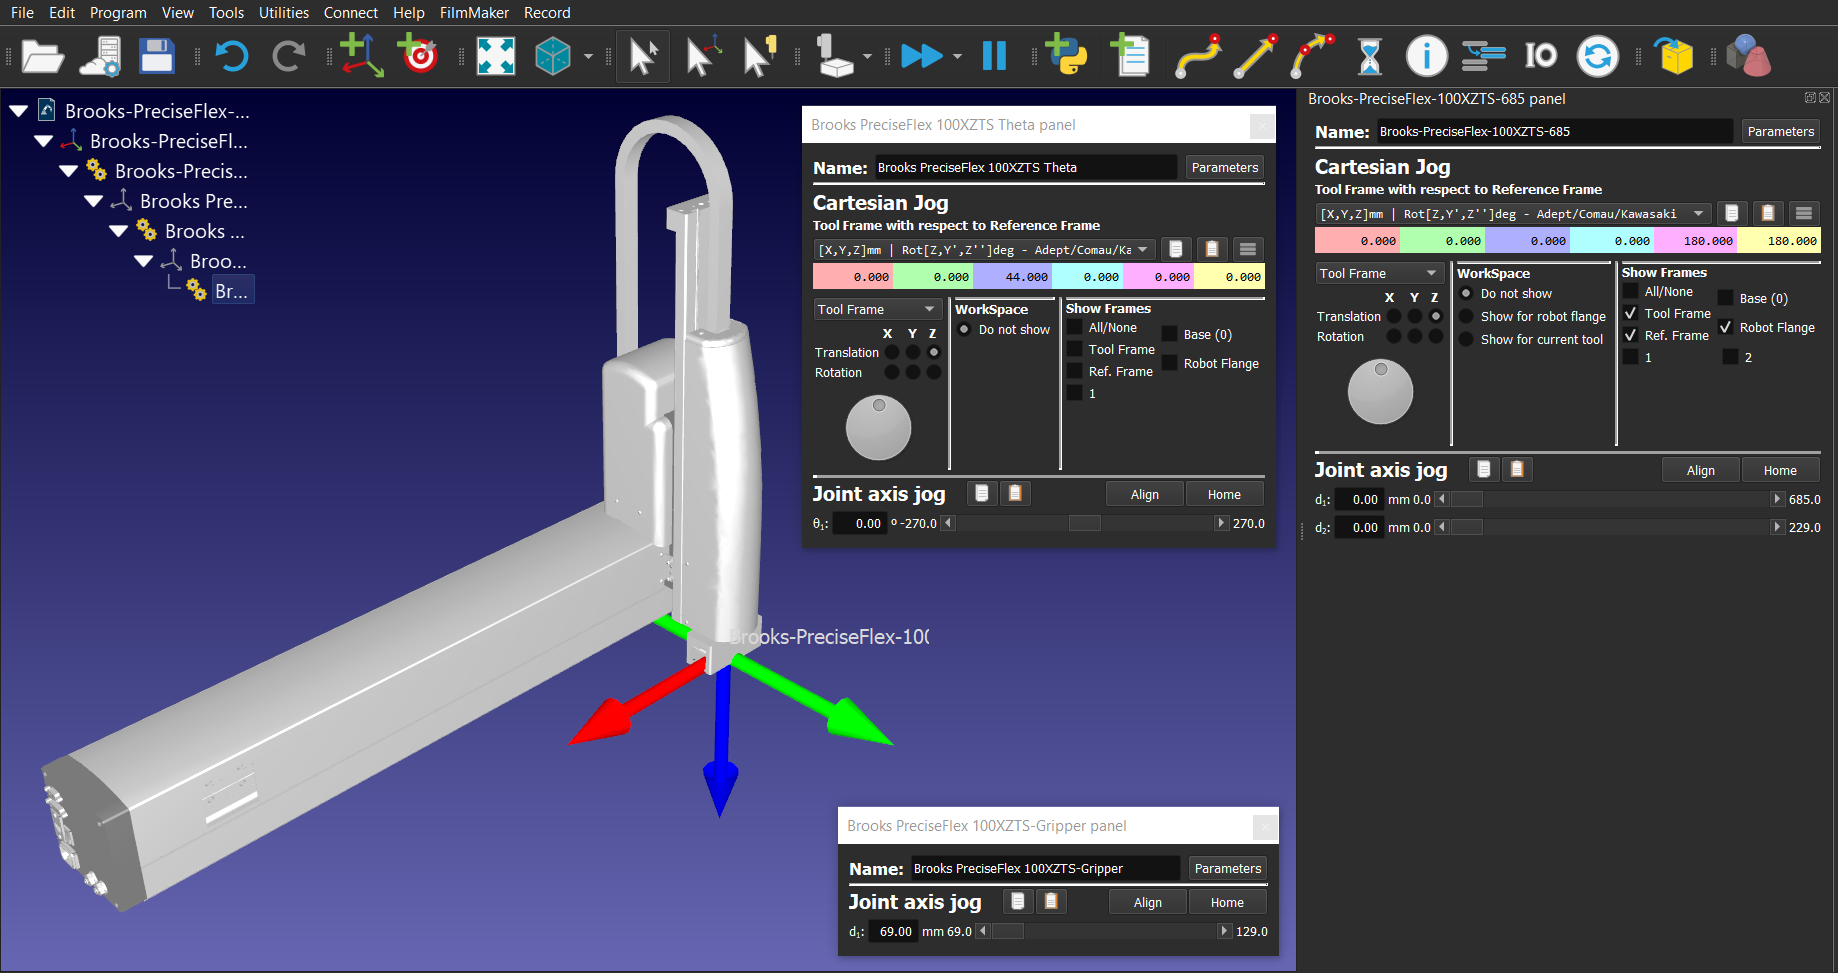
Like the Brooks PreciseFlex c8A robot, the Brooks PreciseFlex 100 XZTS robots are not compatible with the post processor.
If a Tool Center Point (TCP) must be added, this must be defined with respect to the flange of the Theta (rotation around the Z-axis) mechanism of the robot.
Look at the information reported in the paragraph “Tool Center Point (TCP)” to set the pose of the TCP as it is configured in the robot’s controller.
Post Processor
This section explains some tips related to generating programs for Brooks robots.
Tool Center Point (TCP)
The Tool Center Point (TCP) in RoboDK and the one defined in the robot's controller must match. If you are using a gripper mechanism, it is required to add a TCP using “Add Tool (TCP)” that is at the expected position. The new tool TCP should match the gripper mechanism TCP. Information related to the Tool Center Point (TCP) of the Brooks PreciseFlex robots can be found by going to the Web Interface and following these steps:
1.Admin
2.Setup – Parameter Database
3.Robot
4.Joint/Cartesian control
5.Dynamic Parameters
6.DataID 16051
Gripper
See the previous section Gripper Simulation on how to properly define gripper instructions compatible with the post processor. This approach properly defines locations in the GPL project, avoiding unexpected movements of the gripper’s axis/axes.
The Brooks PreciseFlex IntelliGuide grippers available are:
1.Brooks PreciseFlex IntelliGuide s23
2.Brooks PreciseFlex IntelliGuide s60
3.Brooks PreciseFlex IntelliGuide s23D
4.Brooks PreciseFlex IntelliGuide v23
5.Brooks PreciseFlex IntelliGuide v60
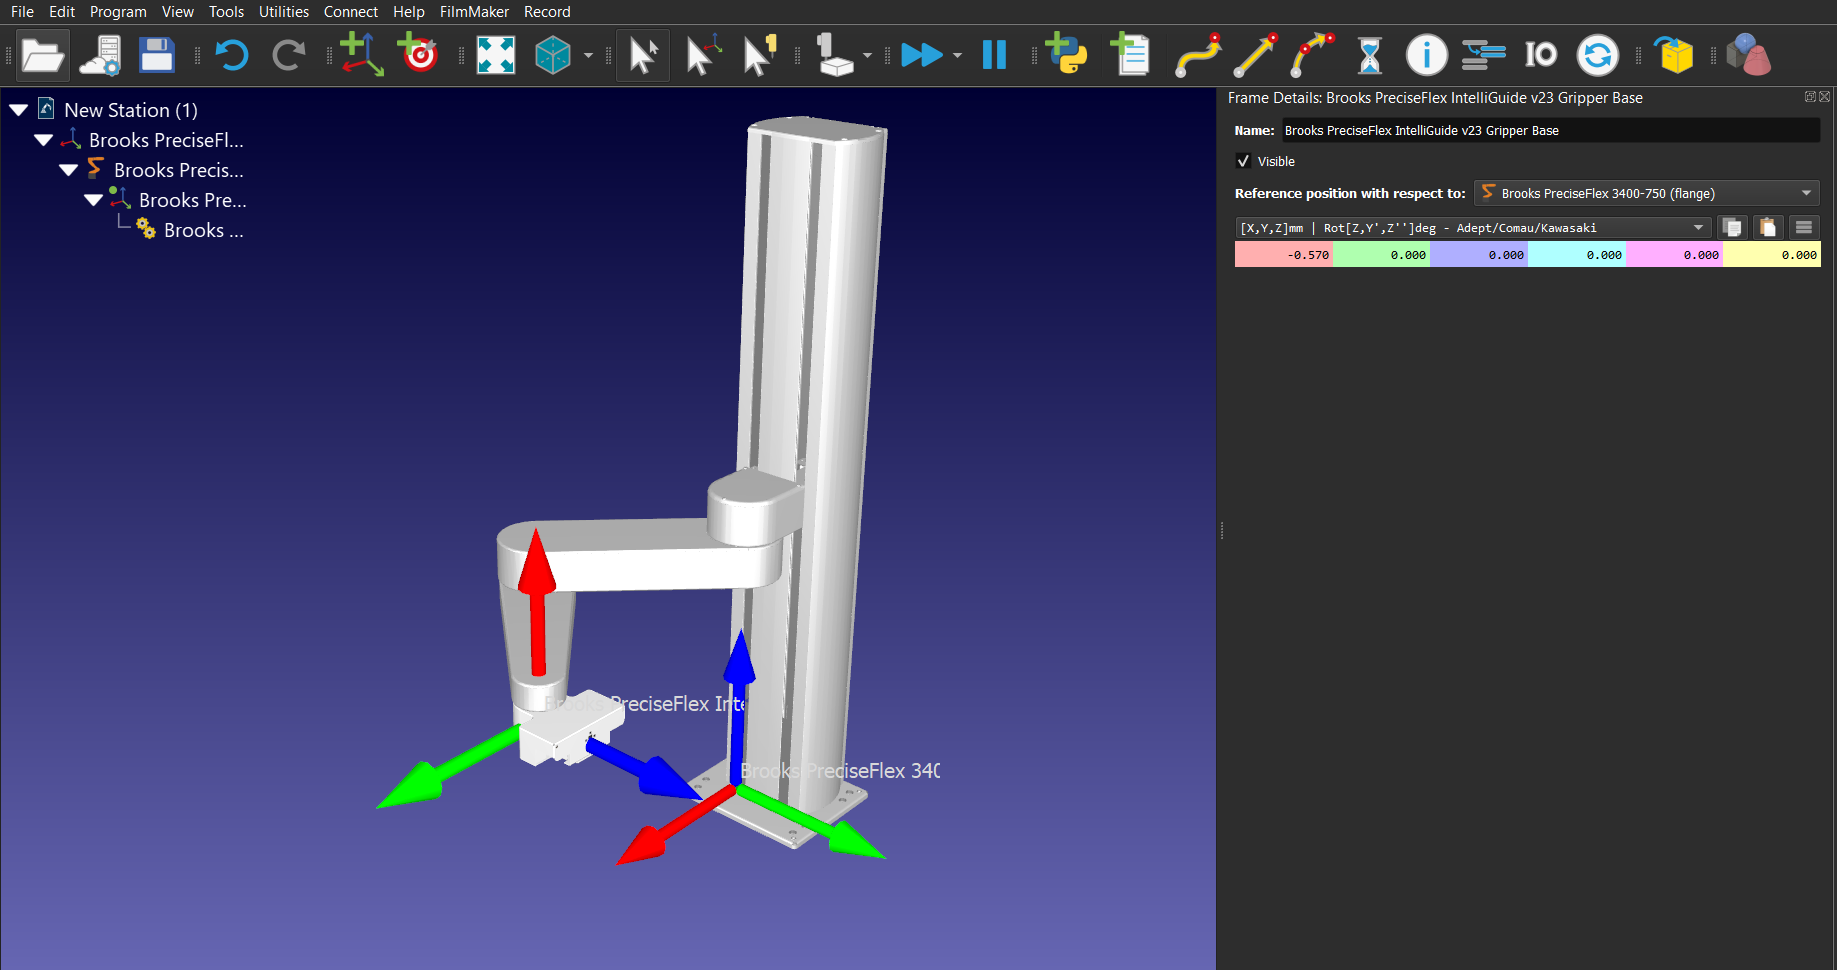
The Base Reference frame of each one of the grippers above is uniquely defined. To properly place the grippers with respect to the Flange Reference Frame of the robots, the following Reference position information must be used:
IntelliGuide s23 | IntelliGuide s60 | IntelliGuide s23D | IntelliGuide v23 | IntelliGuide v60 | |
PreciseFlex 400 | [0.603,0,0,0,0,0] | N/A | N/A | [0,0,0,0,0,0] | N/A |
PreciseFlex 3400 | [0.033,0,0,0,0,0] | [0.033,0,0,0,0,0] | [0.033,0,0,0,0,0] | [-0.57,0,0,0,0,0] | [0,0,0,0,0,0] |
PreciseFlex DD 4-axis | [-70.5,0,0,0,180,180] | [-70.5,0,0,0,180,180] | [-70.5,0,0,0,180,180] | [-71.1,0,0,0,180,180] | [-71.5,0,0,0,180,180] |
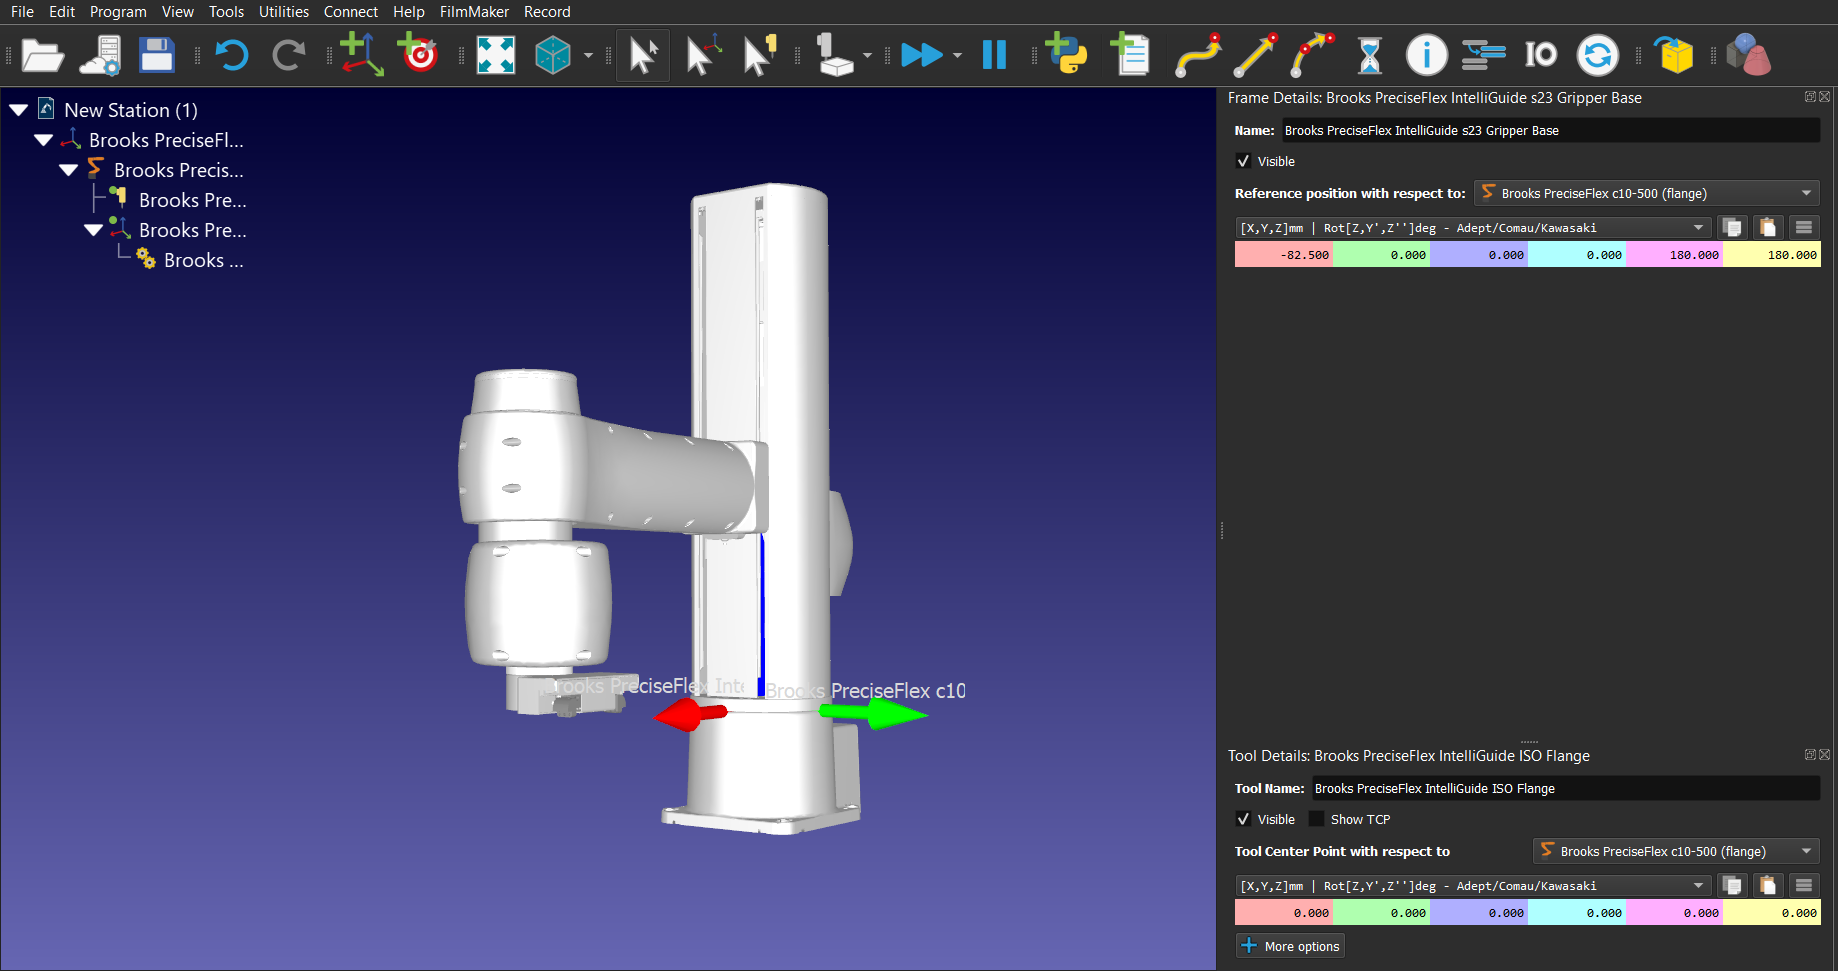
PreciseFlex c10 | [-82.5,0,0,0,180,180] | [-82.5,0,0,0,180,180] | [-82.5,0,0,0,180,180] | [-82.5,0,0,0,180,180] | [-82.5,0,0,0,180,180] |
PreciseFlex c3 | [0.313,0,0,0,0,0] | [0.313,0,0,0,0,0] | [0.313,0,0,0,0,0] | [-0.291,0,0,0,0,0] | [0.279,0,0,0,0,0] |
PreciseFlex c3x | [-14.655,0,0,0,0,0] | [-14.655,0,0,0,0,0] | [-14.655,0,0,0,0,0] | [-15.258,0,0,0,0,0] | [-14.688,0,0,0,0,0] |
PreciseFlex c5 | [113,0,0,0,0,0] | [113,0,0,0,0,0] | [113,0,0,0,0,0] | [112.4,0,0,0,0,0] | [113,0,0,0,0,0] |
For what concerns Brooks PreciseFlex DD 4-axis and c10 robots, the IntelliGuide ISO flange available in the Robot Library must be added to the robot for visualization purposes (for the DD 4-axis robot, the IntelliGuide ISO flange geometry must be moved up by 9mm).
Rounding
An input value of -1 determines that the robot will stop at the end of the motion and a stringent position error constraint will be applied (GPL code: prof1.InRange = 100).
An input value of 0 determines that the robot will stop at the end of the motion, but a small position error constraint will be applied (GPL code: prof1.InRange = 10).
An input value greater than 0 determines that the robot will not stop at the end of the motion and a blended movement will be executed (GPL code: prof1.InRange = -1).
Speed and Acceleration
Information related to the maximum linear, angular, and joints speeds/accelerations of the Brooks PreciseFlex robots can be found by going to the Web Interface and following these steps:
1.Admin
2.Setup – Parameter Database
3.Robot
4.Joint/Cartesian control
5.Dynamic Parameters
6.DataIDs 2700, 2701, 2702, and 2703
The user can set the inputs of the RoboDK speeds/accelerations instructions using the values of the above DataIDs as references. The Precise post-processor will then use these values to calculate speed/acceleration as percentages of the maximum speed/acceleration for each robot, as requested by the GPL Profile class.
To change the limits used by the post processor, you can modify the post processor according to the specific robot you are using. By default, the post processor uses the limits of the PreciseFlex 400 and PreciseFlex 3400 robots. Refer to the https://robodk.com/doc/en/Post-Processors.html#PPEditor section of the documentation to modify the post processor.
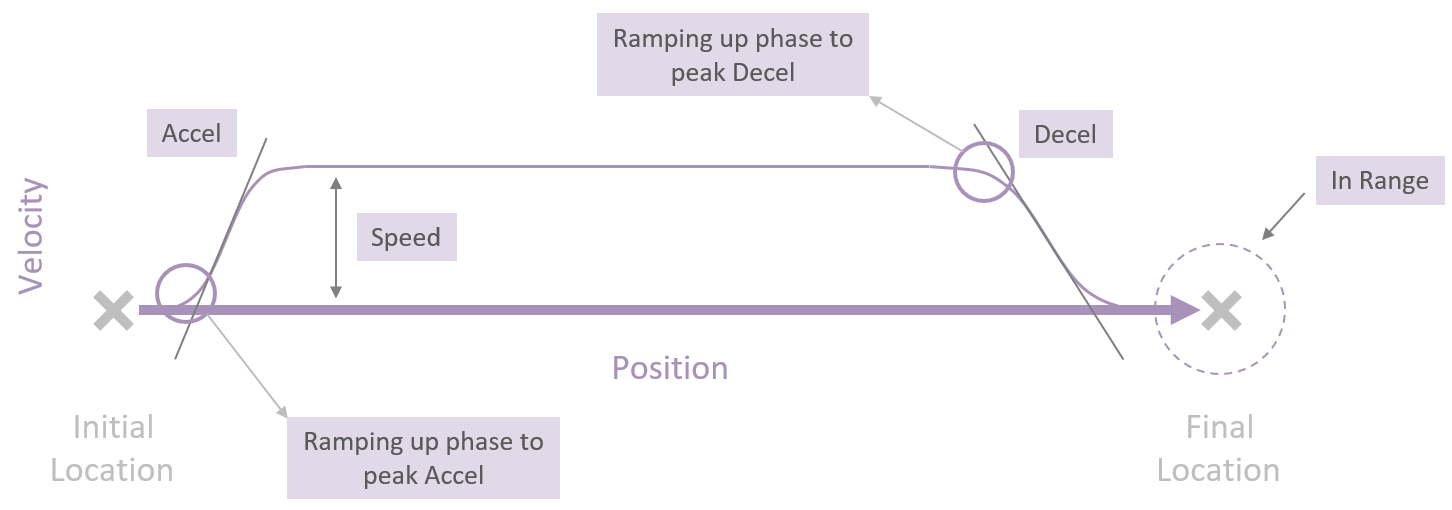
If input values less than 1 are used with linear and angular acceleration instructions, these inputs will be used as the duration in seconds for ramping up to the peak acceleration/deceleration (GPL code: prof1.AccelRamp/prof1.DecelRamp = inputvalue).
The image below gives further information related to the concepts written above and how the controller plans the trajectories that the robot must follow.
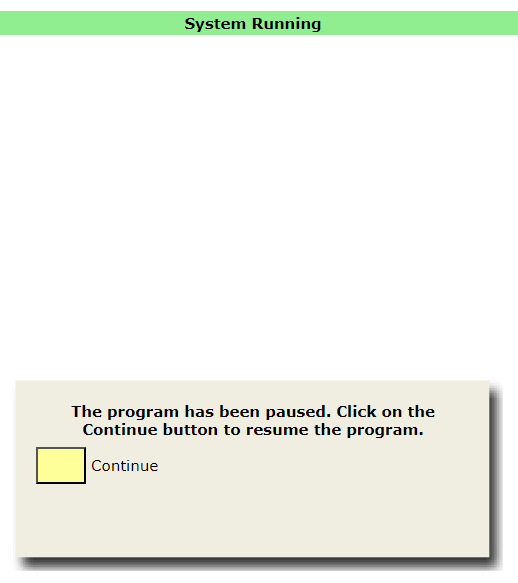
Pause
Setting an input value bigger than 0 will generate a GPL command that will pause the program for the time defined by the input value. A negative input value will open a pop-up dialog box on the Web Interface Operator Control Panel and the program will be paused until the user clicks on the “Continue” button on the dialog box. To visualize the dialog box, the user needs to click on the “Dialog Active” button on the Operator Control Panel.
Transfer Programs Via FTP
Programs can be easily transferred via FTP from RoboDK to Brooks robots:
1.Right click the robot in RoboDK
2.Select Connect to robot…
3.Enter the IP and port of the robot (the default one is 192.168.0.1, with port 21)
4.Enter the remote FTP path (typically /flash/projects)
Once a RoboDK program is ready to be sent to the robot:
1.Right click a program in RoboDK
2.Select Send program to robot (Ctrl+F6)
This will generate the program and attempt to transfer it to the robot controller. A window will pop up showing if the FTP transfer was successful or not.
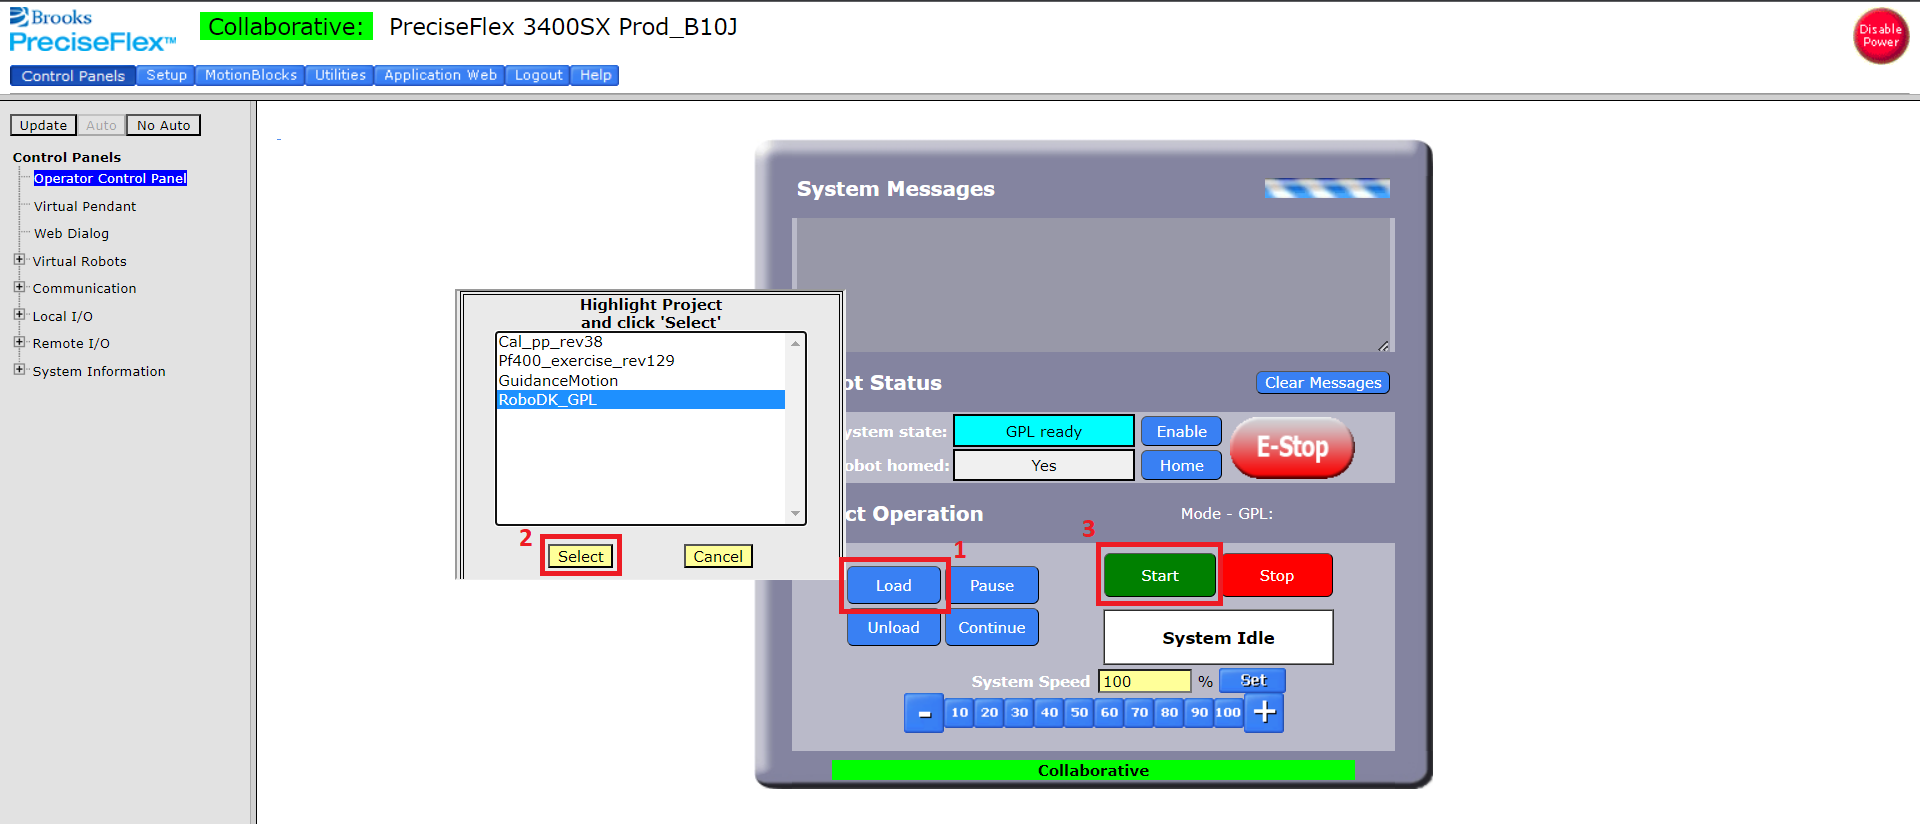
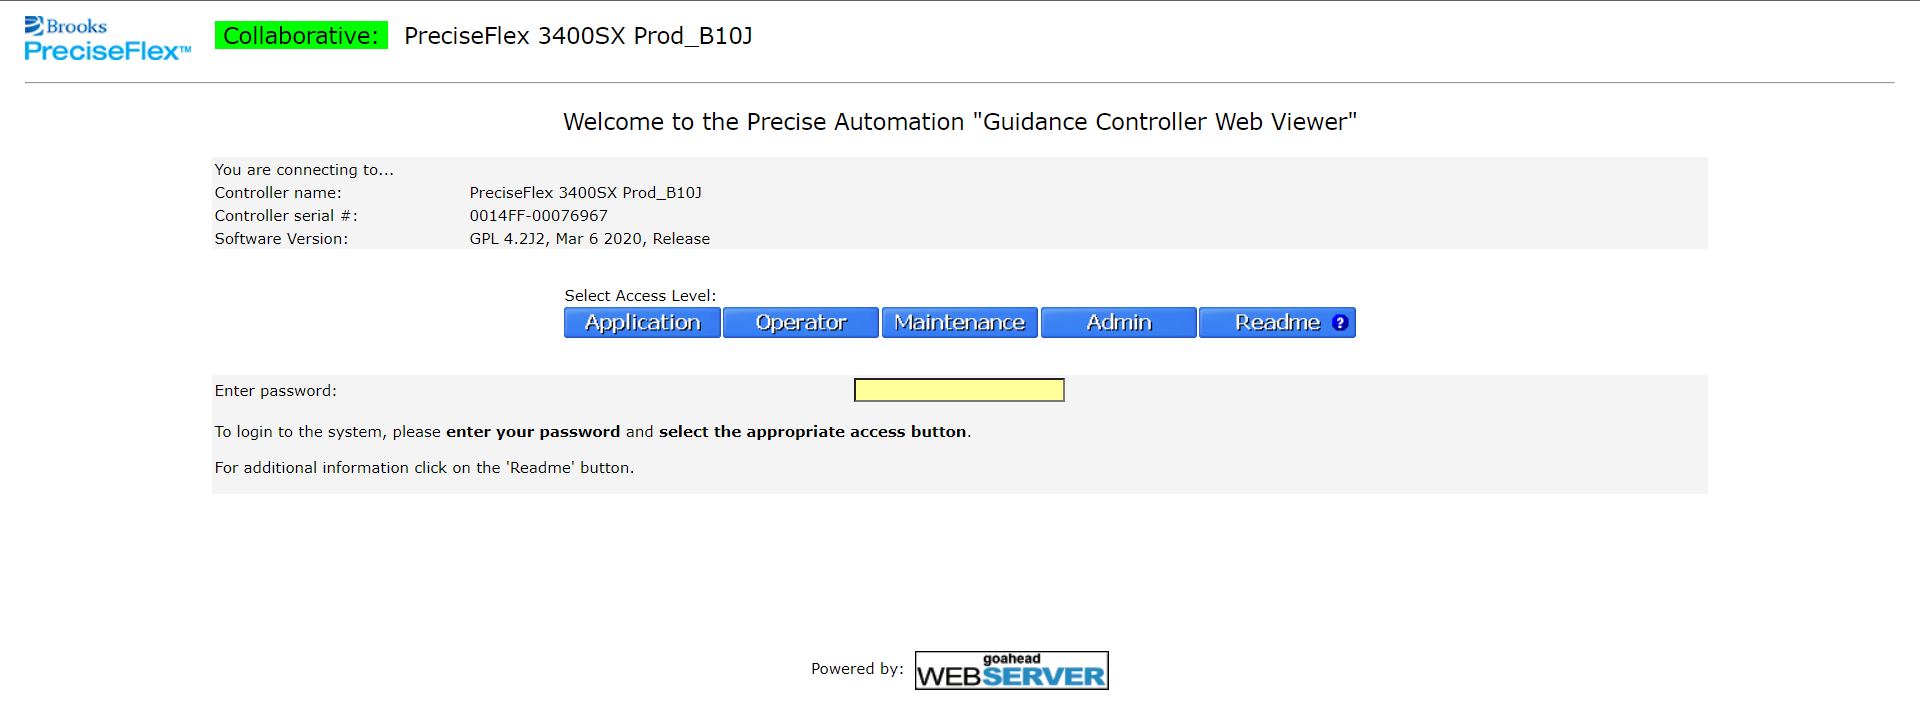
Start A Robot Program
The Web Interface of the robot must be used to load and start the GPL project (it is possible to access the Web Interface of the robot by using any browser and searching for the IP address of the robot). Below is an image of the starting page of the Web Interface.
1.Open a web browser
2.Enter the robot's IP address
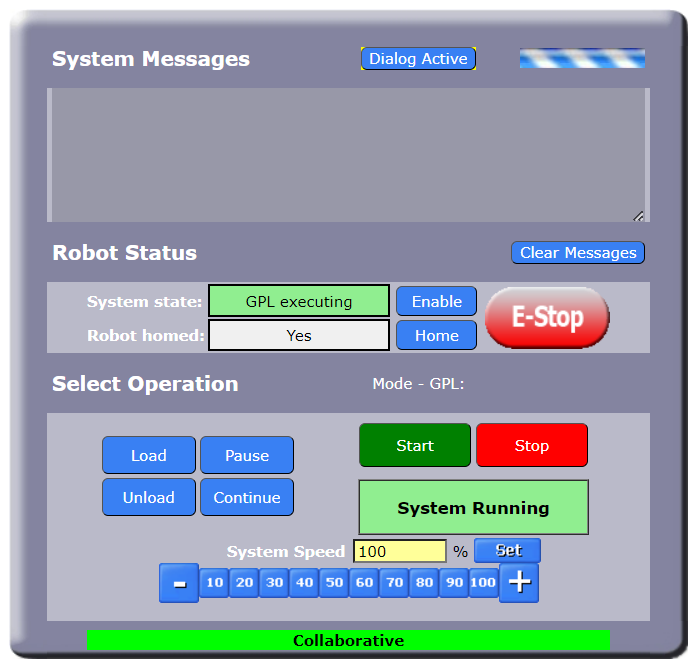
To start the program from the Web Interface:
1.Select Admin -> Control Panels -> Operator Control Panel -> “Load”
2.Select the GPL project created using RoboDK
3.Click on “Select”
4.Click on “Start”
At this point, the robot will execute the program. Below is an image that shows the Operator Control Panel interface and the window that allows the user to select and load the GPL project needed.