Denso robots
RoboDK supports PAC and PacScript programming languages used by Denso robots for offline programming. Simply select the corresponding post processor and generate the robot program.
●PAC (RC7 and older controllers)
●PacScript (RC8 and newer controllers)
Furthemore, RoboDK also supports online programming for RC7 and RC8 Denso controllers. This is possible with the default RoboDK driver for Denso. Older or newer versions may be partially supported as well.
This document mostly provides information related to how to use the online programming features on Denso robot controllers.
Robot drivers provide an alternative to Offline Programming (where a program is generated, then, transferred to the robot and executed). With robot drivers, it is possible to run a simulation directly on the robot (Online Programming). More information available in the Robot Drivers section.
How to Enable the b-Cap server
The b-Cap server must be enabled to use Denso’s robot driver (online programming).
Follow these steps to enable the b-Cap server on the robot side:
1.Switch the robot controller to manual mode.
2.Select Option and Input password 1214 and activate the ORiN option
3.Allow Ethernet communication permission: Communiations setting menu-Permit-Set Read/Write
4.Set the controller’s executable token to Ethernet in the Communications setting menu. This allows starting programs from the computer.
Run Programs from the PC
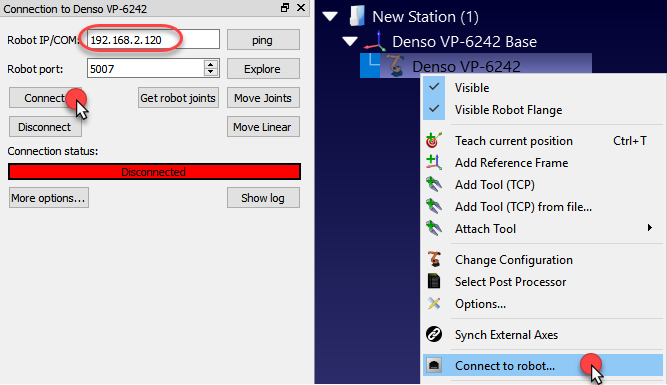
Robot Programs can be executed directly from RoboDK to the real robot if a Network connection has been established.
1.Right click the robot in RoboDK
2.Select: 
3.Enter the IP of the robot
4.Select Connect.
There should be a green message displaying Ready if the connection succeeded.
The robot can be moved by selecting Get robot joints, Move Joints and Move Linear, from the connection menu.
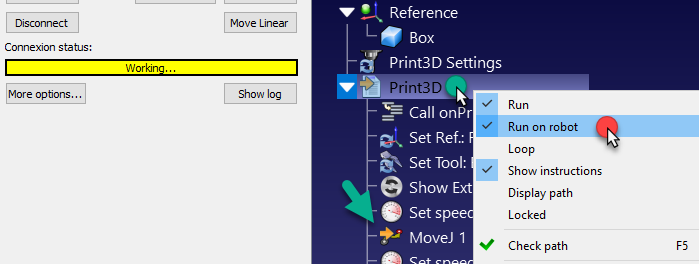
Use the Run on robot option to move the robot while keeping feedback in RoboDK (Online Programming). This method uses the robot as a server and each instruction is sent to the robot step by step as it is executed in the simulator. This method is useful for debugging purposes.
1.Right click the program (Print3D as shown in the following image)
2.Select Run on robot
3.Double click the program to start it (or right click and select Run)
Once this option is checked it will connect to the real robot every time we double click a program (or right click, then, select Run)
These operations are also available from the RoboDK API and it allows integrating robot programming with other applications. The API is available in Python and C# and other programming languages.
RoboDK driver for Denso
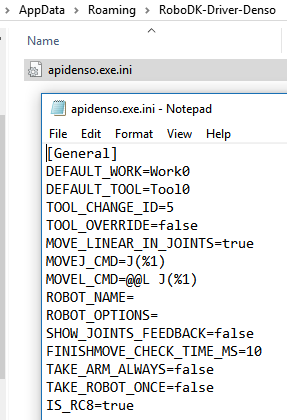
The RoboDK driver for Denso can be highly customized to achieve a specific behavior. This customization can be done by editing the ini file located in:
%APPDATA%/RoboDK-Driver-Denso/apidenso.exe.ini
These customizations allow specifying the type of movements or to be able to drive more than one robot at the same time. Any text editor can be used to modify this file.
The following variables can be configured:
●DEFAULT_WORK – Work object used by default (variable string).
●DEFAULT_TOOL – Tool variable used by default.
●TOOL_CHANGE_ID – Spare tool variable to use when we set a new tool (5=Tool5 for example).
●MOVE_LINEAR_IN_JOINTS – Set to false to provide linear movements as Cartesian targets.
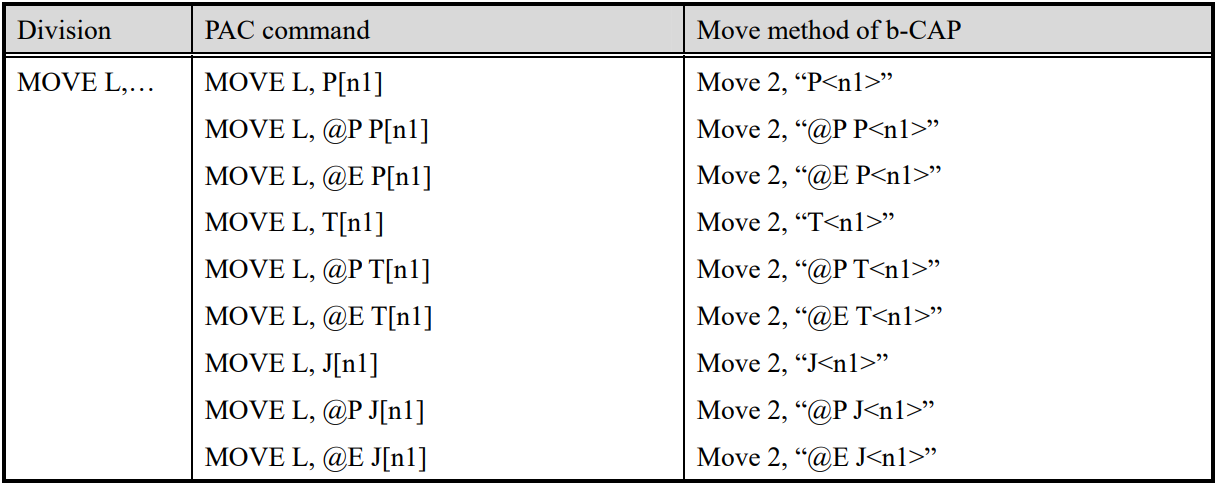
●MOVEJ_CMD – Command to send for a Joint Movement (MoveJ). The following table provides the allowed options.
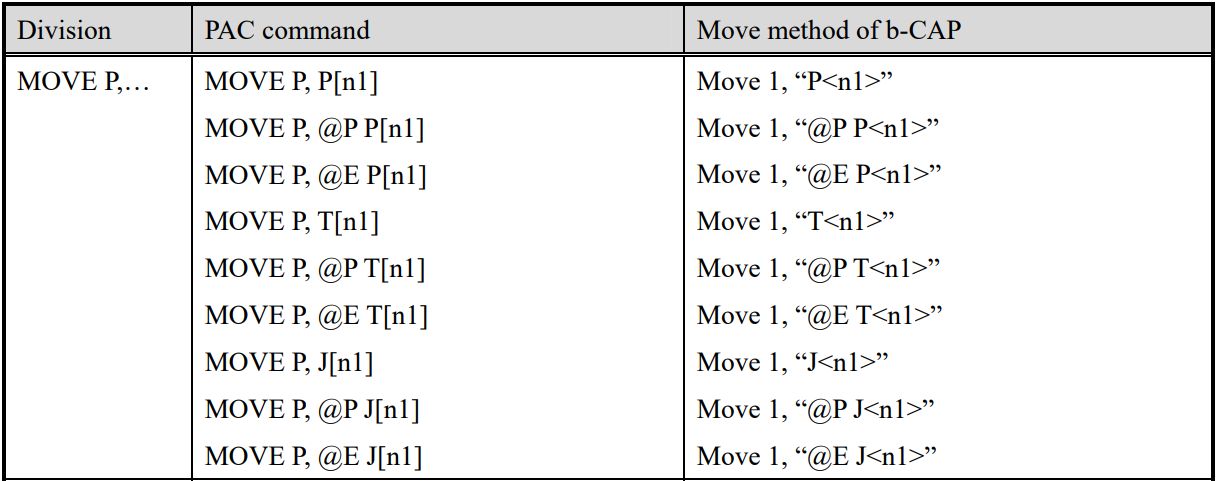
●MOVEL_CMD - Command to send for a Linear Movement (MoveL). The following table provides the allowed options.
●ROBOT_NAME – Name of the robot. Specify this name to select a specific robot of a controller
●ROBOT_OPTIONS – Robot options to get the robot resources. For example, if we are using the slave robot of the controller we must specify ROBOT_OPTIONS=”ID=1”. ID must be 0 (default) if we want to use the master robot (main robot).
●SHOW_JOINTS_FEEDBACK – Set to true to see the robot feedback on the screen in real time (performance can be slower).
●FINISH_MOVE_CHECK_MS – Set how fast the robot position should be refreshed on the screen when showing the joints feedback.
●TAKE_ARMS_ALWAYS – Set to true to keep the controller resources after each movement until the robot is disconnected (faster but it may lead to unexpected results).
●TAKE_ROBOT_ONCE – Set to true to keep the robot resource after each movement while the robot is connected (faster but it may lead to unexpected results).
●IS_RC8 – Set to false to properly connect to RC7 and older Denso controllers.