RoboDK driver for Fanuc
You can establish a connection between RoboDK and the Fanuc robot controller to move the robot automatically from a connected PC using RoboDK.
This allows using the RoboDK Run on robot option for online programming and debugging. The connection can be established through a standard Ethernet connection (TCP/IP).
Robot drivers provide an alternative to Offline Programming (where a program is generated, then, transferred to the robot and executed). With robot drivers, it is possible to run a simulation directly on the robot (Online Programming). More information available in the Robot Drivers section.
Follow these steps to set up the RoboDK driver for Fanuc:
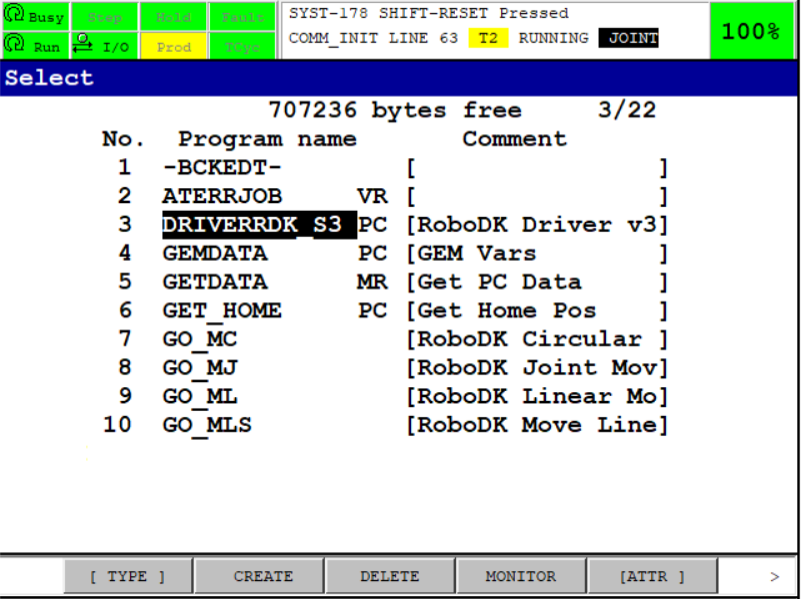
1.Download the Fanuc driver program files from the customer area and transfer the following robot programs to the Fanuc robot controller:
a.RDK_S3.PC➔ This is the main program that manages the communication through S3 (socket communication port number 3 – S3). Make sure to select the correct version (latest Fanuc robot controllers require using the version under the V9 folder).
b.GO_MJ.TP
c.GO_ML.TP
d.GO_MC.TP
e.GO_PROG.TP
Follow these steps on the robot teach pendant to prepare the communication between your Fanuc robot and RoboDK:
1.Select Menu-(Next)-System-[TYPE]-Variables.
a.Select $HOSTS_CFG (holding shift while selecting key down will help you scroll down faster)
b.Select Number 3
c.Set $SERVER_PORT to 2000
($HOSTS_CFG[3].$SERVER_PORT = 2000)
2.Select Menu-Setup
3.Select [TYPE]-Host comm
4.Select [SHOW]-Servers
5.Select “S3”-Enter.
a.Set Protocol Name to SM
b.In Port Name, if multiple ports are available: Set Port to P3 (or the corresponding port).
c.Set Inactivity Timeout to 9999
d.Set Startup state to [CHOICE] START
e.Set Current state to STARTED:
To do so, select [ACTION]-DEFINE, then [ACTION]-START
6.Start the program RDK_S3:
a.Select the Select button from the teach pendant.
b.Scroll down towards the RDK_S3 program
c.Select Enter (button from the teach pendant)
d.Select Shift-Reset and Shift-Forward to start the program
You should see the RUNNING message on the teach pendant. If the program failed to run it is likely that you don’t have a robot option (PC Interface or User Socket Messaging) or you did not take the correct version of the PC program.
7.In RoboDK, provide the IP of the robot and select Connect to connect to the robot.
Driver Configuration
You can configure additional settings of the driver using the INI file. This allows you to configure how you map external axes.
When you run the driver for the first time, it will generate a file containing flags for configuring advanced parameters of the driver such as external axes mapping. The location of this settings file can be found at the beginning of the driver's log on the line that starts with Loading settings.
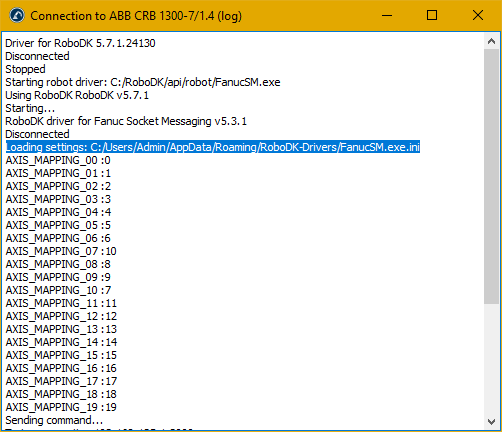
You can open this file with any text editor, and you’ll find a list of axes used by RoboDK and the corresponding axes on the Fanuc robot controller side. Additionally, you can enable extra debug printing and change the number of motion groups that will be used.
If, for example axis 8 in RoboDK corresponds to axis 9 on the robot controller you would simply change the number on the right-hand side to the correct value, you can see the configured mapping in the startup message below the Loading settings message.
Axes 0-9 are Motion group 1 and Axes 10-17 are motion group 2, thus if your external axis is in the second motion group, it corresponds to axes 10 in the configuration file.