Fanuc robots
This section of the documentation provides an overview of typical operations using a Fanuc robot to prepare a new program in RoboDK and transfer it to the robot. RoboDK supports all Fanuc robot controllers since RJ2, including RJ3, R-30iA and R-30iB. This documentation is based on the R-30iA Fanuc controller.
Transfer a robot program
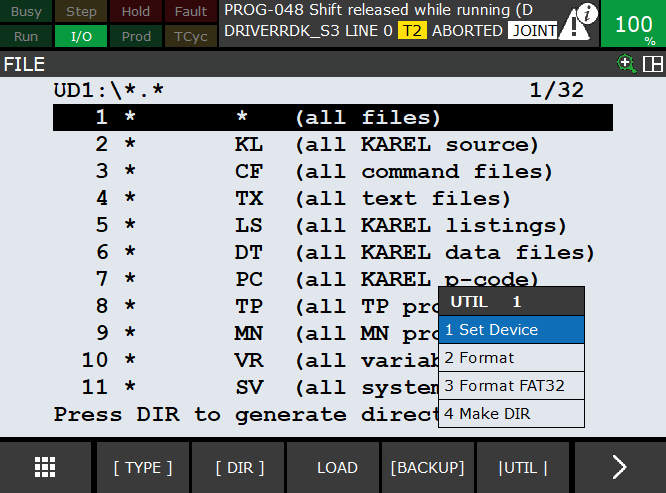
We must follow these steps to load a program from a USB drive:
1.Plug the USB drive on the teach pendant
2.Select Menu➔File
3.Select Utilities➔Set device➔USB
4.Select DIR
5.Select the TP or LS program file from the USB disk (BALLBARTEST.TP for example)
This will automatically save the file to the FR memory of the controller
6.Select the program in the FR memory and select LOAD (screen button)
Select: DATA➔Type➔Register, R[10]=50 (for a speed of 50 mm/s)
Start a robot program
Follow these steps to start a robot program on the Fanuc robot controller.
1.Select FCN (teach pendant button)➔Abort all
2.Select SELECT (teach pendant button)
3.Select the program (BALLBARTEST for example)
4.Press and hold the Deadman switch
5.Select RESET. All alarms should disappear.
6.Select and hold the SHIFT button of the teach
7.Select FWD (button on the teach pendant)
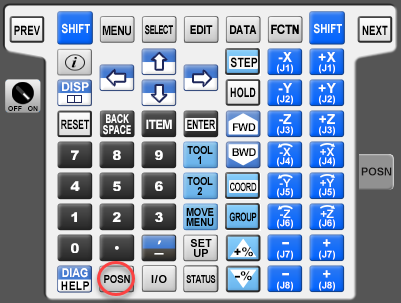
Retrieve robot joints
Follow these steps on the Fanuc teach pendant to retrieve the robot joints of your real robot.
1.Select POSN (button in the teach pendant) to see the current robot position
2.Select JNT on the screen or select COORD (button in the teach pendant) to select the joins mode.
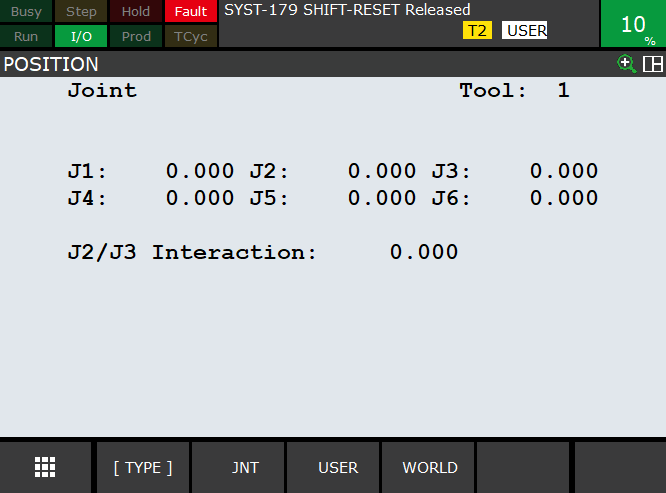
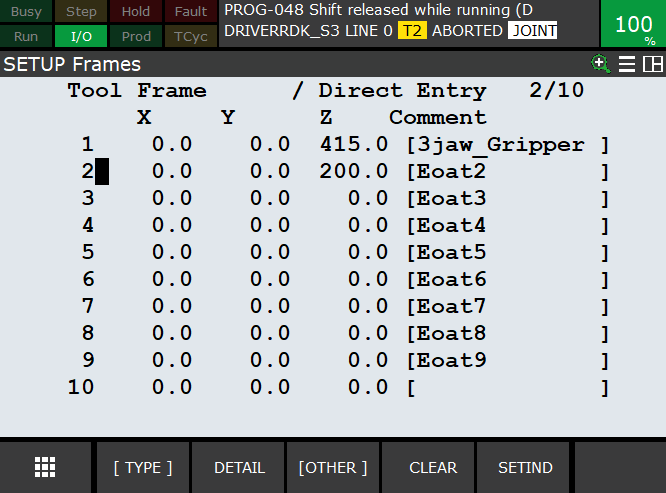
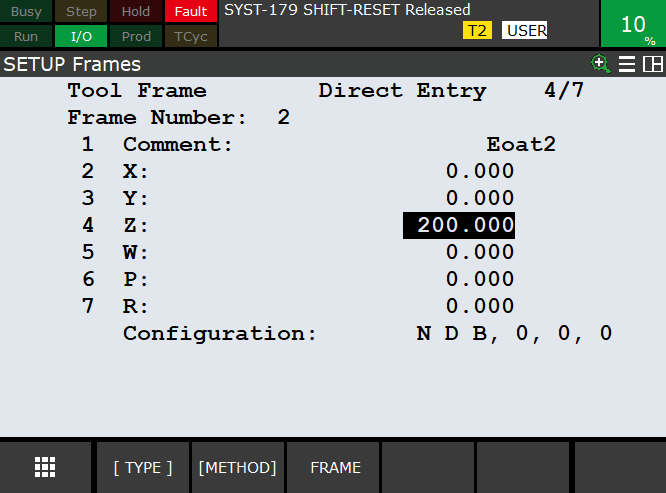
Retrieve the Robot Tool (TCP)
Robot tools are stored as registers on Fanuc controllers (UTOOL). These steps allow you to create or modify robot tools (TCP, also known as UTOOL in Fanuc robot programming).
1.Select MENU➔Setup➔Frames
2.Select a tool using the arrows or the touch screen and select ENTER.
3.Modify the X,Y,Z,W,P,R values as required.
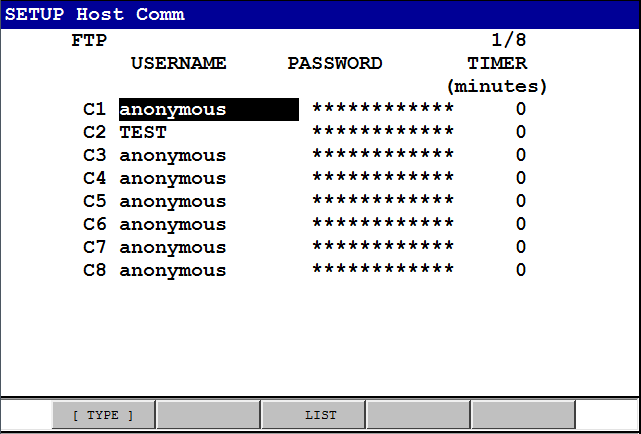
Setup Fanuc’s FTP Server
Fanuc’s FTP server is enabled on recent Fanuc controllers by default.
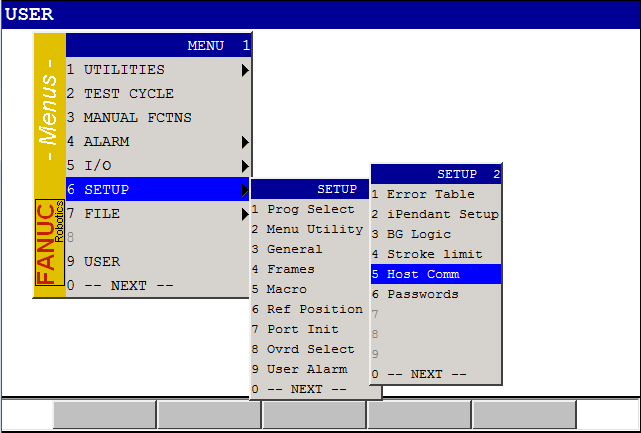
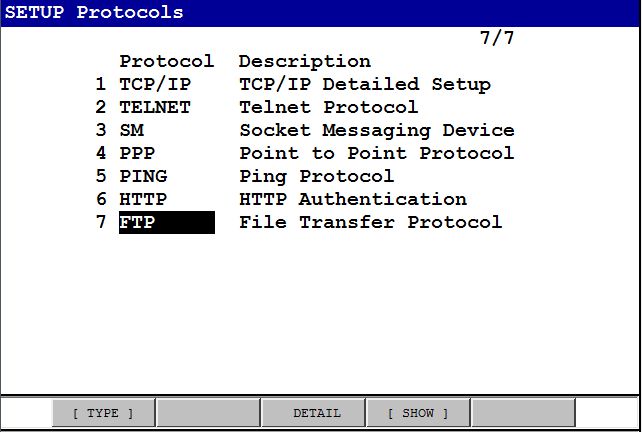
You can validate FTP credentials in the menu:
1.Setup➔Host Comm
2.Select FTP
If you see an anonymous username you may be able to connect through FTP without credentials.
RoboDK driver for Fanuc
You can establish a connection between RoboDK and the Fanuc robot controller to move the robot automatically from a connected PC using RoboDK.
This allows using the RoboDK Run on robot option for online programming and debugging. The connection can be established through a standard Ethernet connection (TCP/IP).
Robot drivers provide an alternative to Offline Programming (where a program is generated, then, transferred to the robot and executed). With robot drivers, it is possible to run a simulation directly on the robot (Online Programming). More information available in the Robot Drivers section.
Follow these steps to set up the RoboDK driver for Fanuc:
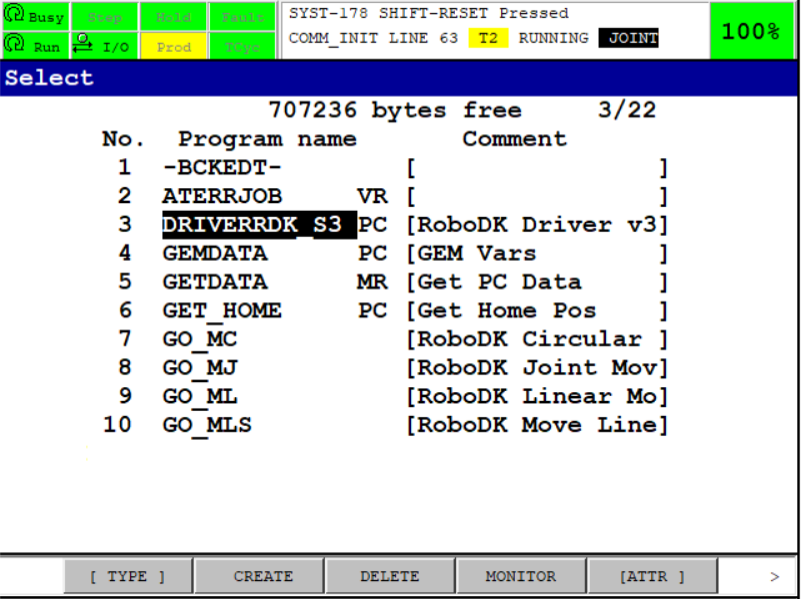
1.Download the Fanuc driver program files from the customer area and transfer the following robot programs to the Fanuc robot controller:
a.RDK_S3.PC➔ This is the main program that manages the communication through S3 (socket communication port number 3 – S3). Make sure to select the correct version (latest Fanuc robot controllers require using the version under the V9 folder).
b.GO_MJ.TP
c.GO_ML.TP
d.GO_MC.TP
e.GO_PROG.TP
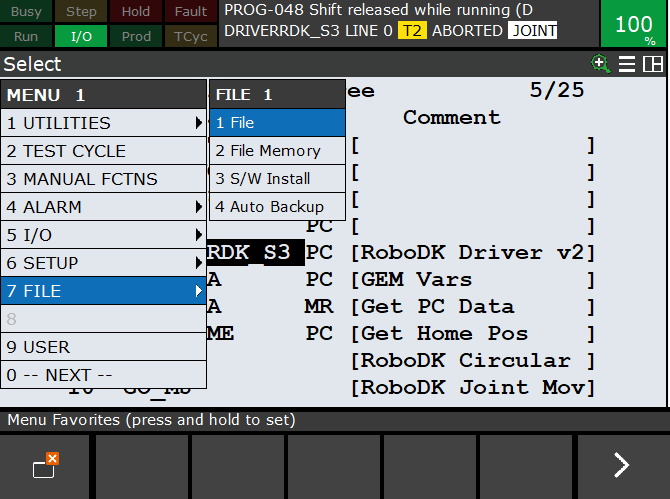
Follow these steps on the robot teach pendant to prepare the communication between your Fanuc robot and RoboDK:
1.Select Menu-(Next)-System-[TYPE]-Variables.
a.Select $HOSTS_CFG (holding shift while selecting key down will help you scroll down faster)
b.Select Number 3
c.Set $SERVER_PORT to 2000
($HOSTS_CFG[3].$SERVER_PORT = 2000)
2.Select Menu-Setup
3.Select [TYPE]-Host comm
4.Select [SHOW]-Servers
5.Select “S3”-Enter.
a.Set Protocol Name to SM
b.In Port Name, if multiple ports are available: Set Port to P3 (or the corresponding port).
c.Set Inactivity Timeout to 9999
d.Set Startup state to [CHOICE] START
e.Set Current state to STARTED:
To do so, select [ACTION]-DEFINE, then [ACTION]-START
6.Start the program RDK_S3:
a.Select the Select button from the teach pendant.
b.Scroll down towards the RDK_S3 program
c.Select Enter (button from the teach pendant)
d.Select Shift-Reset and Shift-Forward to start the program
You should see the RUNNING message on the teach pendant. If the program failed to run it is likely that you don’t have a robot option (PC Interface or User Socket Messaging) or you did not take the correct version of the PC program.
7.In RoboDK, provide the IP of the robot and select Connect to connect to the robot.
Driver Configuration
You can configure additional settings of the driver using the INI file. This allows you to configure how you map external axes.
When you run the driver for the first time, it will generate a file containing flags for configuring advanced parameters of the driver such as external axes mapping. The location of this settings file can be found at the beginning of the driver's log on the line that starts with Loading settings.
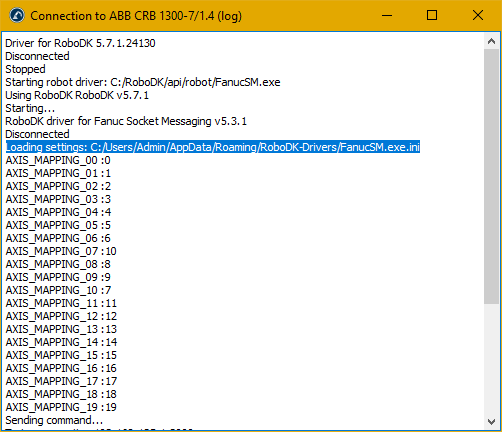
You can open this file with any text editor, and you’ll find a list of axes used by RoboDK and the corresponding axes on the Fanuc robot controller side. Additionally, you can enable extra debug printing and change the number of motion groups that will be used.
If, for example axis 8 in RoboDK corresponds to axis 9 on the robot controller you would simply change the number on the right-hand side to the correct value, you can see the configured mapping in the startup message below the Loading settings message.
Axes 0-9 are Motion group 1 and Axes 10-17 are motion group 2, thus if your external axis is in the second motion group, it corresponds to axes 10 in the configuration file.
Program Compilation (LS vs. TP)
This section explains the difference between Fanuc LS and TP program files and how to automatically compile programs for Fanuc robots using RoboDK.
A binary file is required to run robot programs on Fanuc robots (TP, also known as TPP). Programs for Fanuc robots generated by offline programming software (such as RoboDK) are in LS format (ASCII, text-readable and not compiled). There are two options to convert LS robot programs to TP programs:
1.Have the ASCII Upload software option on the robot. This option might be available on the robot already. The best way to check if this option is available is to provide an LS file to the robot and it should be automatically converted to a TP file. For example, place the file on the FR disk and select LOAD on the teach pendant.
2.Compile the program using the WinOLPC tools from Roboguide. In this case, the same computer where RoboDK is installed can compile the LS program automatically using the “maketp.exe” compiler tool from Fanuc. This command requires a « robot.ini » file. This file can be generated with the setrobot.exe utility from WinOLPC if Roboguide was installed and a work station was saved on the computer (“Work Cell”).
If you have Roboguide WinOLPC tools installed in the default location, RoboDK automatically TP programs automatically right after an LS program is generated.
Make sure you have selected a robot using the setrobot executable file. If the TP file is not generated and you have Roboguide WinOLPC installed, you may need to follow these steps:
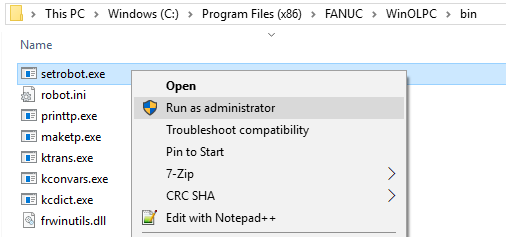
1.Open windows explorer and navigate to the WinOLPC installation folder:
C:\Program Files (x86)\FANUC\WinOLPC\bin
2.Right click the setrobot.exe file and select Run as administrator
3.Select the robot Work Cell (a Roboguide WorkCell is required)
Alternatively, the contents on the following folder can be copied from the default folder:
C:\Program Files (x86)\FANUC\WinOLPC\bin
to the folder:
C:\RoboDK\api\Fanuc
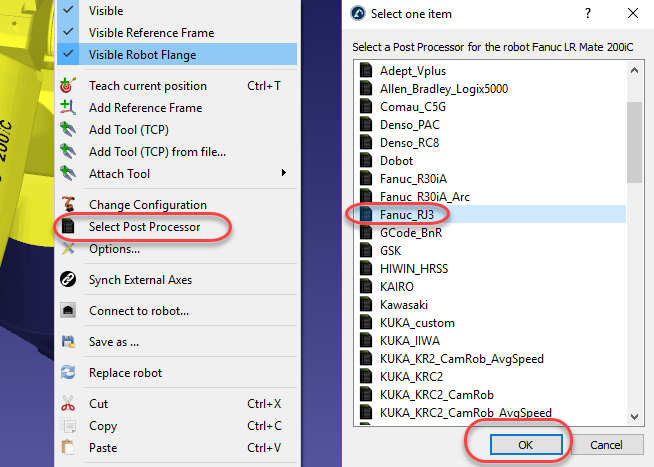
Follow these steps to select a post processor compatible with Fanuc RJ3 controllers:
1.Right click the robot
2.Select Select Post Processor
3.Select Fanuc RJ3
4.Generate your program (F6)
Follow these steps if you did not install Roboguide WinOLPC in the default location and you want to obtain a TP file automatically when you generate a program from RoboDK:
1.Select Program➔Add/Edit post processor
2.Select Fanuc RJ3 (or the post processor you would like to use). All post processors are also accessible via the folder: C:/RoboDK/Posts/. Also, make sure you are not using a compiled post processor.
3.Locate the variable PATH_MAKE_TP (around line 103) and enter the path where the maketp executable is located.
RoboDK post processors for Fanuc robots support using 6 axis robots synchronized with external axes such as turntables or linear axes.
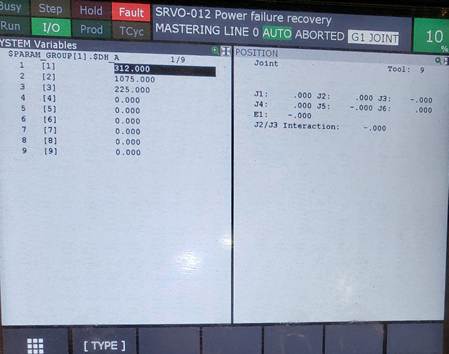
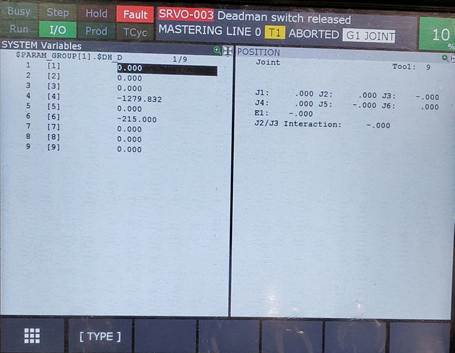
Updating controller kinematic parameters
This section explains how you can update the kinematic parameters (DH table) on the robot controller after calibrating the robot using RoboDK’s Calibration and Performance package.
Modifying the controller DH parameters will impact all programs manually created on the controller. Keep a copy of the original DH parameters in case you would like to revert back to the controller factory settings.
1.In the calibration window, open the Calibration parameters.
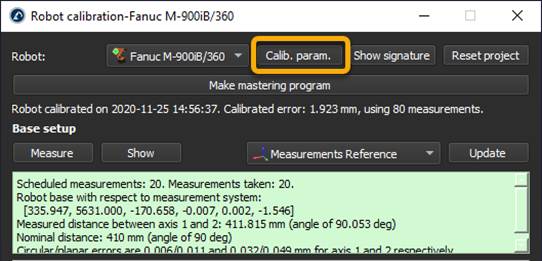
2.Select Geometric simplified.
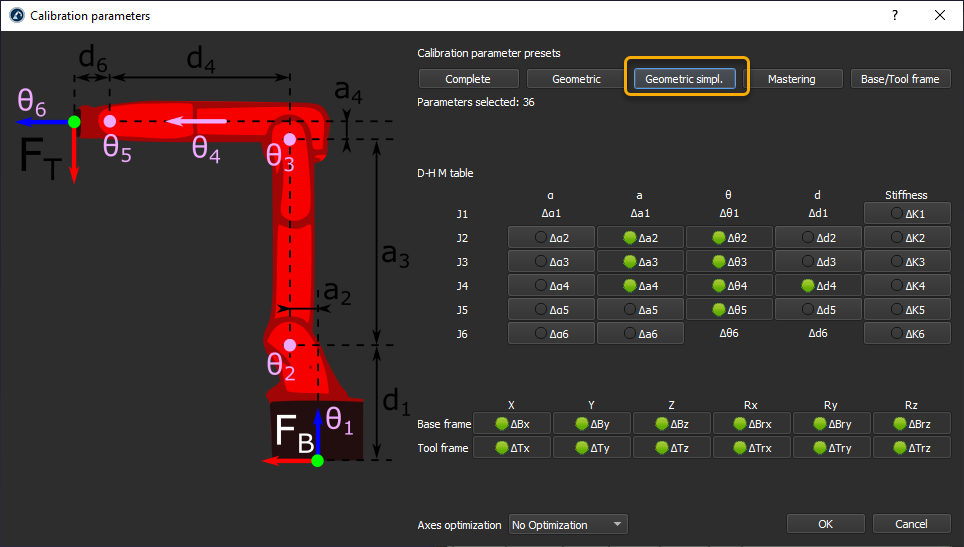
3.Run a calibration sequence or Update an existing one.

4.Retrieve the robot calibrated DH parameters. In the Robot panel and select Parameters. Then select Export Table.
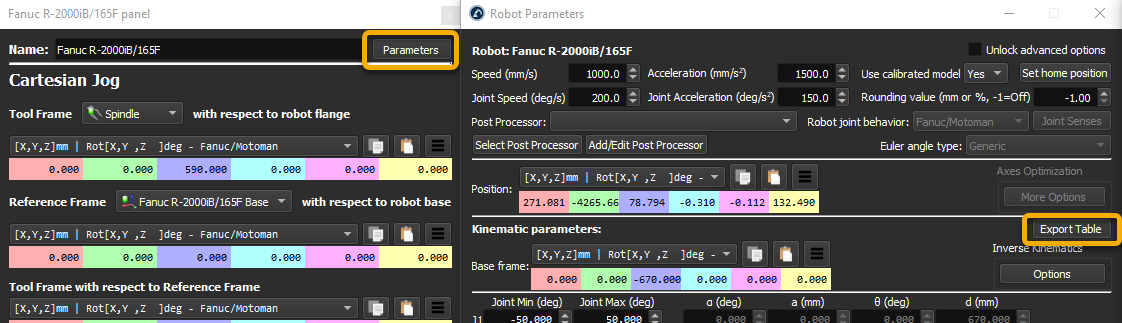
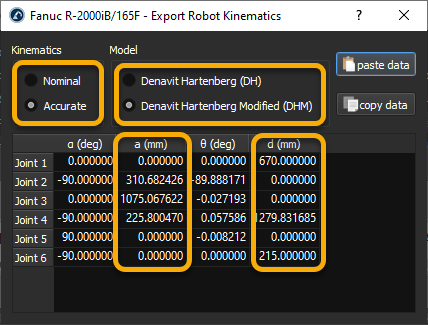
5.Make sure to use the Accurate kinematics. The Nominal one can be used to compare with the controller default DH parameters.
6.Use the Danavit Hartenberg Modified model to modify your controller parameters.
7.On the robot teach pendant, open the System variables -> $PARAM_GROUP[1].
8.Find the $DH_A and $DH_D parameters.
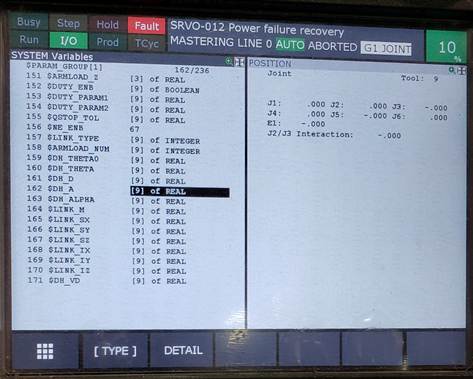
9.Modify the DH values with the a and d values from the Export Robot Kinematics window.