Tips and Tricks
This section shows useful tips and tricks to use RoboDK software more productively.
Smaller/Larger References (-/+)
Having a suitable size for reference frames helps grabbing the right coordinate systems, targets, tools or robots and move them to the desired location.
Press the minus key (-) or the plus key (+) once or multiple times to make the reference frames smaller or larger, respectively.
Rename Object (F2)
Select any item in the tree such as an object, a reference frame or a robot and press F2 to rename it.
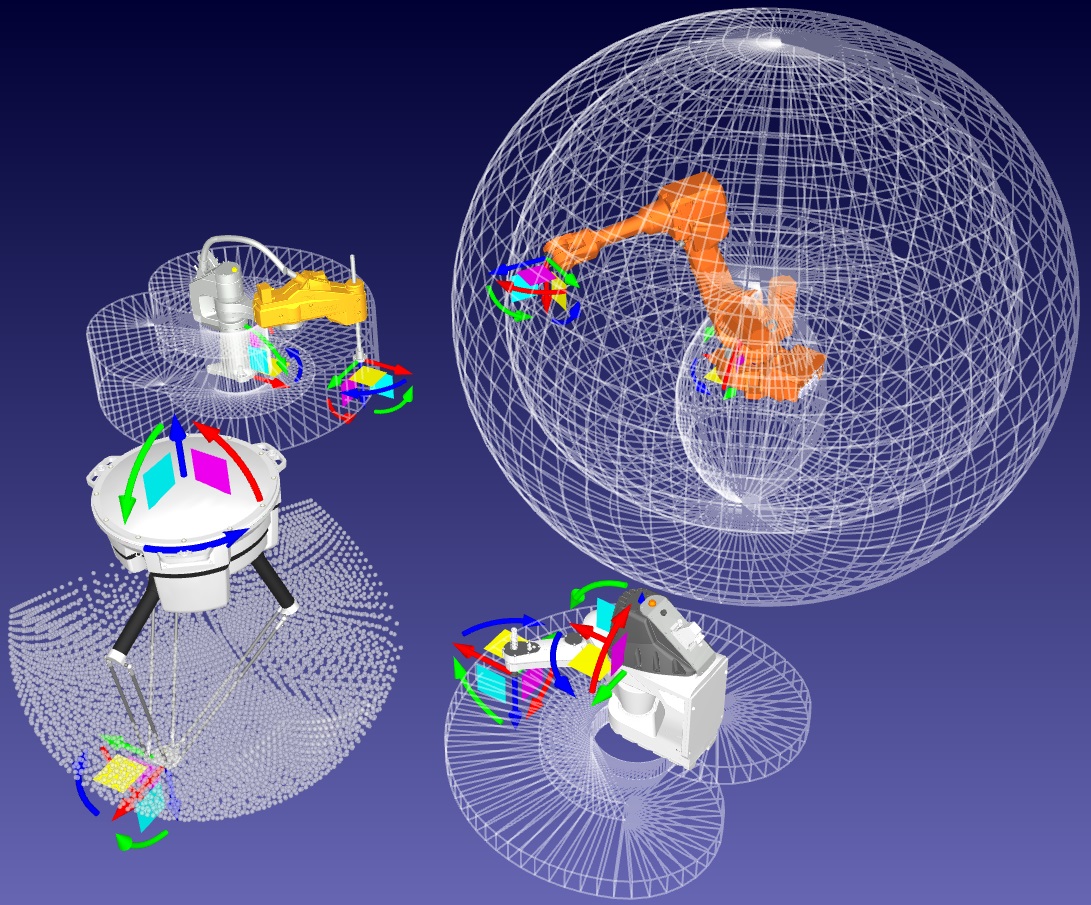
Show/Hide Robot Workspace (*)
You can quickly display the robot workspaces to evaluate the reachability of a robot. Displaying the workspace helps you make sure that the location of your part is reasonable given the size of your robot. Double click a robot and select to display the workspace for the current tool. Otherwise, the workspace of the robot wrist will be displayed by default.
Press the asterisk key (*) to show or hide robot workspaces.
Open your last project or file (Ctrl+1)
You can load the last file you opened or saved by pressing Ctrl+1. You can also access recently opened or saved files in the File menu.
Show the Station Tree as a side window
You can display the station tree as a side window. Select Tools-Options and set the Display tree preference as a Side Window. This layout may be preferable if you work with large objects or complex stations.
Show or Hide Objects (F7)
Select one or more objects and press F7 to make them invisible. Press F7 again and they will switch to visible.
Show or Hide the text on the screen (/)
You can show or hide the text on the screen by selecting the / key (forward slash).
Move Reference Frames or Objects (Alt)
Move any reference frame, robot, target or object by holding the Alt key. You can place one or multiple objects under a reference frame to represent the position of the object or reference frame with respect to the robot.
Move a Robot Tool (Alt+Shift)
You can move a robot tool (TCP) by holding the Alt + Shift keys. Robot programs will be updated automatically.
Reorder Items in the Tree
You can reorder items in the tree with one drag and drop operation inside the station tree. You can do so by dragging objects with the mouse right button.
Reorder Items in the Tree without moving them
You can reorder items in the tree without changing their absolute position. You can do so by holding the Shift key while you drag and drop items within the tree.
This operation modifies the relative position to maintain the same absolute position.
You can also right click a target and use the Change support option.
Change the size of the Station Tree
Hold the Ctrl key while moving the mouse wheel to change the size of the tree. You can also specify the size of the text, icons and toolbar in the Tools➔Options menu.
Teach a Robot Target (Ctrl+T)
You can move the robot to a specific location and press Ctrl+T to create a new target. The current robot position will be recorded in the joint space and the Cartesian space.
Right click the newly created target to specify if you want to prioritize the robot joint axes or the Cartesian coordinates.
Modify a Robot Target (F3)
You can select a target or a movement instruction and press F3 to modify the robot target. You can select to teach a new position or manually enter new coordinates.
Teach Robot Targets on a Surface
You can select Program-Teach Targets on Surface to create new targets as you select points on a surface. The targets will be normal to the surface by default. You can also modify the tool orientation by using the settings on the left panel.
Move Robot Targets on a Surface (Alt+Shift)
Hold the Alt+Shift keys to move a target while keeping it on the object surface. You can also hold the Alt key only if you prefer to freely move the target without constraining it on the object surface.
Change the Robot Configuration
You can select a target and press F4 to change the robot configuration. Industrial robots can reach the same position with different robot configurations. Having the right starting configuration is important as it helps making sure the program does not hit a robot singularity, axis limit or a collision.
Check the status of a Robot Program (F5)
Select a program and press F5 to check if there are any issues with the program path. RoboDK will validate the program and display issues such as robot singularities or axis limits.
You can also select Shift+F5 to include a check for collisions. Make sure to set the right collision map in Tools-Collision Map (Shift+X) and specify the object correlations that you want to include during collision checking.
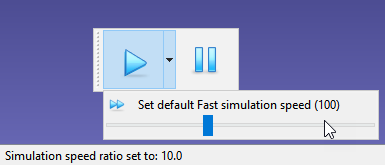
Faster Simulation (hold Spacebar)
You can accelerate a robot simulation by holding the space bar. You can also select the play button in the toolbar. RoboDK simulates robot programs at a ratio of 5 times the real speed by default. This ratio is accelerated to 100 with the space bar.
You can also select the dropdown arrow to change the default normal/fast speeds.
Generate a Robot Program (F6)
Select one or more programs in the tree and press F6 to generate the robot programs. RoboDK will automatically generate all available robot programs in the station if you don’t select any program.
Export a Simulation (Ctrl+E)
Once you have a program simulation ready, right click the program and select Export Simulation… to generate a 3D HTML or a 3D PDF simulation.
Examples:
●UR painting robot
Send a Program to the Robot (Ctrl+F6)
You can connect your robot to a computer to send programs directly from RoboDK to the robot. Select Connect➔Connect Robot and enter the Robot IP. Then, right click your program and select Send Program to robot. The program will be generated and automatically transferred to the robot.
This option uses FTP transfer or other dedicated protocols depending on the robot controller. These protocols can be FTP, socket communication or a serial connection.
Run the Program on the Robot
You can connect robots to a computer to move the robots directly from RoboDK. Select Connect➔Connect Robot and enter the Robot IP. Then, select Connect to establish communication using the robot driver.
You can right click any robot program and activate the Run on robot option. Then, double click a program to move the real robot together with the simulation.
This option uses a dedicated driver connection. This allows you to program robots online and proper debugging.
Display the Robot Trace (Alt+T)
You can activate the trace of the robot by pressing Alt+T. You can also change the trace style in the Tools➔Trace menu.