Thread Rating:
  • 0 Vote(s) - 0 Average
  • 1
  • 2
  • 3
  • 4
  • 5

Link Joints when Creating Robot Model

#1
Hello,
I have a Fanuc LR Mate 200iB. The model is not available in the library, so I created the robot via a CAD model and created a mechanism in RoboDK. The model works correctly, with one exception. On my physical 200iB, joint 3 (see attached picture) remains parallel to the table surface when joint 2 is moved. In RoboDK, both work independently, which throws off the degree rotation of joint 3. Is it possible to link these two joints in RoboDK to mimic the actual behavior of the 200iB?
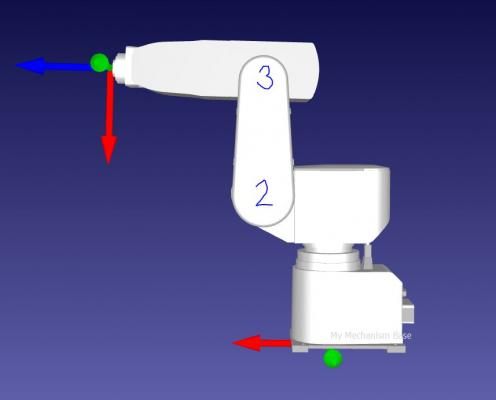
   

Thanks!
#2
Hi denrya,

Can you share the robot you made so I can have a closer look at the problem?

Olivier
#3
Sure thing, attached. To clarify, on the iB, joint 3 can move independently, but at any time joint 2 is moved, 3 retains its relative angle to the table surface.


Attached Files
.robot   LRMate200ib.robot (Size: 174.22 KB / Downloads: 280)
.rdk   200ib_build.rdk (Size: 696.79 KB / Downloads: 305)
#4
Hi denrya,

I dont see anything wrong with your robot.
Since your robot is a 6 axis, it should be able to more all its joints independently, so its normal.

Are you moving your robot in joint or cartesian mode?

Olivier
#5
Thanks for the reply, Olivier. I am moving in Joint mode.
I have attached a few photos that will hopefully better illustrate the problem. In both photos, the position data is:

J1: 0.00
J2: -25.00
J3: -25.00 *this is the issue
J4: 0.00
J5: -90.00
J6: 0.00

In RoboDK, each Joint is moved independently via an absolute degree change.
   

On the actual robot, J3 is measured relative to its position, parallel to the table surface, regardless of J2's position. You will notice that this results in J3 being tilted towards the table surface by -25 degrees.
   

For the actual arm to match the position shown in the RoboDK picture, J3 would need to read 0.00 on the pendant.

Is it possible to assign a relative positioning for J3 relative to a surface in RoboDK?

Thanks,
Ryan
#6
Hi Ryan,

That should do the trick:
go into the robot Parameters -> Unlock advanced options -> Robot joint behavior to Fanuc/Motoman

Olivier


Attached Files Thumbnail(s)
   

.robot   Fanuc LR Mate 200iB.robot (Size: 174.35 KB / Downloads: 277)
#7
Perfect! Thank you very much for your help, Olivier.

Ryan
#8
Hi Ryan,

Another important detail, you can fix your axis limitation to prevent the robot from colliding with itself.

Double click on joint 2 or 3 limit values (the highlighted numbers) and new screen like the one in the picture should appear. There you can change the limits of joint 2 relative to joint 3.

Olivier


Attached Files Thumbnail(s)
   
#9
Excellent! Thank you so much.


Users browsing this thread:
1 Guest(s)