Thread Rating:
  • 0 Vote(s) - 0 Average
  • 1
  • 2
  • 3
  • 4
  • 5

Make Tool Normal to the Path

#1
Hello,

I have a question regarding the curve following function in RoboDK. 

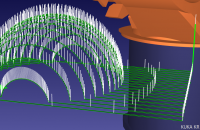
I used the RoboDK plugin for Rhino3D and imported a path into RoboDK, however, the tool is following the robot "normal to the base plane", as shown below:



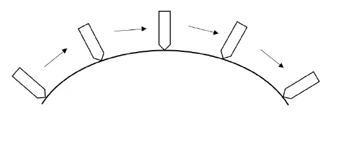
Ideally, I would like the tool to follow the tool to follow the the curve "normal to the curve itself", as shown below:
   

Is there a solution for this?

Thank you in advance for anyone that can help me.


P.S. I've also attached my RoboDK file of the project here: 
.rdk   path.rdk (Size: 598.44 KB / Downloads: 372)
#2
Hi Robo,

Did you watch this tutorial?
https://www.youtube.com/watch?v=hgS-CmmG...GL&index=2

To have the TCP normal to the surface, you simply need to select the surface after selecting the curve in Rhino.

Have a great day.
Jeremy
Find useful information about RoboDK and its features by visiting our Online Documentation and by watching tutorials on our Youtube Channel


#3
(12-02-2020, 07:53 PM)Jeremy Wrote: Hi Robo,

Did you watch this tutorial?
https://www.youtube.com/watch?v=hgS-CmmG...GL&index=2

To have the TCP normal to the surface, you simply need to select the surface after selecting the curve in Rhino.

Have a great day.
Jeremy

Hello Jeremy,

Thank you for your reply. I watched the video, I understand my problem now, I only imported the curves and didn't import the surface, that's why the robot doesn't know where to be normal to. However, while I was trying to import BOTH the surface and the curve to RoboDK using Auto Setup in Rhino, by following your video, it didn't work, there is always a message popping up saying "Unknown file format: ...... .obj". I've attached a picture below:


RoboDK cannot import .obj file? So should I change some settings in Rhino to make the exported surface not in .obj format?

Robo
#4
I'm a bit surprised by that message. Did you try just "load part"? Do you end up with the same message.
But you can go to Rhino, in the RoboDK plugin tab click on "Settings".

There's a "Export Format" dropdown menu, simply select another format.
Find useful information about RoboDK and its features by visiting our Online Documentation and by watching tutorials on our Youtube Channel


#5
(12-04-2020, 06:25 PM)Jeremy Wrote: I'm a bit surprised by that message. Did you try just "load part"? Do you end up with the same message.
But you can go to Rhino, in the RoboDK plugin tab click on "Settings".

There's a "Export Format" dropdown menu, simply select another format.

Hi Jeremy,

Problem solved! Thank you very much! 
Yes, when the file type is set to .obj, both "load part" and "auto setup" show that message. But now I changed the exported file to to .stp format and it works.

Robo
#6
Good, I do prefer .stp to be honnest.
Find useful information about RoboDK and its features by visiting our Online Documentation and by watching tutorials on our Youtube Channel


#7
Hello,
I am facing a very similar problem to Robo. However in my case the curve is a continuous polyline in a 3d printing project. Whatever i do the normals of the surface seem to be pointing in a different direction or the tools stays normal to the curve all the time, doesnt do what Robo was asking for.

How can i approach this problem?

I uploaded a screenshot of the project and the project file itself.


Attached Files Thumbnail(s)
   
#8
How did you load the polyline? I assume you used Slicer software and G-code. I would help if you can attach it. Keep in mind that most Slicer software create toolpaths using XYZ values and a constant tool orientation.

I didn't see your RDK project file attached.
#9
I created the polyline out of isocurves in Grasshopper and then just added the curve to RoboDK.

My mistake, this time the robodk file should be attached.


Attached Files
.rdk   Donica_iso1cm.rdk (Size: 1.69 MB / Downloads: 59)
#10
If you want to specify the normals you should then load the curve with the information of the normals added to the XYZ information as an IJK vector.

The Z axis of the tool will then match the normal when you create a 3D printing project.


Users browsing this thread:
1 Guest(s)