Want to use your own end effector with offline programming? There’s only one problem… custom tools can take ages to integrate. But, wait! Here’s how you can add any end effector to RoboDK in just 5 minutes.
Offline programming is a wonderful solution to many of life’s biggest problems — assuming, of course, that the biggest problems in your life are caused by programming (which sounds about right to me). It allows you to update your program while the robot is still running, it reduces development time, and it can be very intuitive.
But, there’s one big difficulty… most offline programming tools offer low support for end effectors.
There are so many end effectors available on the market and so few of them are supported out-of-the-box. Although your robot might be well-supported by a particular offline programming solution, you often have to jump through hoops to get your favorite end effector to work.
Is RoboDK Really Any Different?
When you first load up RoboDK and look at the included examples, you would be forgiven for thinking that RoboDK also has low support for end effectors. Perhaps you have looked at the online Robot Library and seen that we offer only a handful of end effectors out-of-the-box, many of which are generic models.
There is a very good reason that we don’t have a huge catalog of end effectors — compared to our giant catalog of supported robots. There are just so many end effectors available! There is also an infinite number of customizations you can make to them. Would it really make sense for us to create millions of end effector models when a custom fingertip would make those models useless?
Instead, we’ve chosen another option. We’ve made it super-easy to create your own end effector in RoboDK. It’s just as easy to add a custom-built end effector as it is to add a common, off-the-shelf gripper.
The process is so simple, you can do it on your own in just 5 minutes. But remember, you don’t have to do it alone! If you need any help creating your end effector, just ask a question in the forum.
What You Need to Create a Custom End Effector
Before you get started, you will need just one thing: Find a 3D object file of your custom end effector.
There will be two ways to do this, depending on which end effector you’re using.
For a Custom-Built End Effector
If you have built the end effector yourself, you should already have a 3D model of it from when you manufactured it. Simply export the whole model from your CAD program as a single 3D mesh (not as an assembly). RoboDK supports various 3D files, including STL, OBJ, SLP, etc.
For a Purchased End Effector
It’s more likely that you have purchased your end effector from a supplier. If so, you should get a 3D model of it from them. Many manufacturers offer models for free online. Have a look on their website and see if there is one available for your model. If not, the manufacturer will almost certainly send you one if you ask for it.
You might have to convert the file to a single mesh (if it is provided as an assembly or an unsupported file type). You can either convert it with your favorite CAD package or — if you don’t have one — the open-source software FreeCAD is a good option. Just import the file and export the model as an STL or another mesh file.
5 Steps to Load Any End Effector Into RoboDK in 5 Minutes
Once you have your mesh file, the process is very simple. It should take you 5 minutes, or even less!
1. Open Your Robot Model
If you haven’t already, load up your robot into RoboDK. The Robot Library has a huge selection of different robots from the top manufacturers. If yours isn’t there, just let us know and we will add it for you.
2. Open Your End Effector Model
Now it’s time to add the 3D model of your end effector. There are two ways you can do this:
- Go to the “File” menu and select “Open.” Then, navigate to the directory where your model is and open it.
- Drag the file from its directory and drop it into the RoboDK window. This should load the model. If it doesn’t work, use the previous method.
The end effector model should load into RoboDK as a 3D object — shown as a cube icon in the project tree. You can change the name of the end effector by right-clicking on the icon and choosing “Options.”
3. Attach End Effector to Robot
You now need to tell RoboDK that the object is an end effector. This is very easy to do. In the project tree, click and drag the cube icon, and drop it onto the orange robot icon.
RoboDK will show that the object is an end effector by changing the icon to a gripper image and attaching the model to the robot flange.
4. Adjust the Model
It’s likely that the end effector is not aligned properly when you first load it into the program. Double click on the end effector icon (or right click on it and choose “Options”). This will open the “Tool Details” panel.
First, you should adjust the visual geometry of the end effector. This won’t affect the robot program but it will make sure that the end effector looks right in the simulation.
In the “Tool Details” panel, click on “More options.” Then, adjust the position (left three values) and rotation (right three values) until the model is correctly aligned. The most common adjustment you’ll need to make is to move one or more of the rotations by 90 degrees.
If the end effector is the wrong size, you can also scale it by clicking “Apply Scale” and entering a new value.
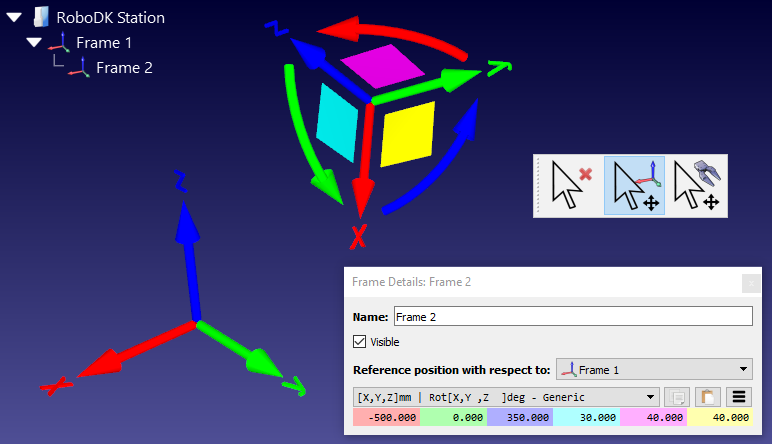
5. Adjust the Reference Frame
The Tool Center Point (TCP) is the most important property to get right. This is the functional position of the tool, so it will affect the accuracy of your robot program.
The exact position of the TCP depends on the type of end effector you are using. For a gripper, for example, it could be the center of the fingers. For a paint gun, it could be the optimal distance from the gun for painting. For a pencil, it could be the tip of the pencil.
Adjust the TCP values in the “Tool Details” panel until the reference frame is shown in the correct position and orientation. You might want to hide the robot’s flange reference frame (right click on the robot icon and deselect “Visible Robot Flange”) to get a better view of the tool frame.
Now Create Your Program!
That’s it! You now have an end effector which you can use in your offline programs.
If you want to save your end effector for use in other simulations, simply right click on the end effector icon, select “Save as” and RoboDK will save it as a “.tool” file.
There are more complex features that you can add to your end effector (e.g. adding animation for open/closed, activated/deactivated, etc) but the tool you have created now is enough to program the position of the robot correctly.
For more details on robot programming, check out the Getting Started guide.
What’s your favorite end effector? Tell us in the comments below or join the discussion on LinkedIn, Twitter, Facebook, Instagram or in the RoboDK Forum.