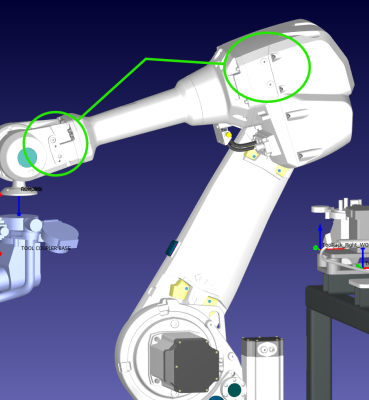
Is there a way to attach objects to the different joints of a six axis robot arm so that they are represented for simulation and collision purposes? We have cable management hardware and a couple of electrical boxes that are attached to the arm and I would like to add them so that the simulations and collision detection are accurate. I have added an image showing where I would like to attach some models.

Thread Rating:
How to attach auxiliary objects to different robot joints? |
|
03-31-2025, 03:45 PM
We can't currently simulate cables attached to a robot arm itself.
03-31-2025, 04:32 PM
Yes, I had assumed that simulating cables would not be possible. I am more concerned about some rather large hardware that we bolt onto the robot that helps with the cable management on the real robot. We also have some electrical boxes attached to J3 on the real robot that I would like to exist in the simulation but I can't find a way to have those represented in simulation.
03-31-2025, 04:53 PM
You can attach an object to a robot arm by following these steps:
https://robodk.com/forum/Thread-Attach-a...to-an-axis You can also use this addin: https://robodk.com/addin/com.robodk.plug...tachobject You can also model your own robot arms as shown here: https://robodk.com/doc/en/General.html#Model6axis |
| Users browsing this thread: |
| 1 Guest(s) |
Copyright © 2026 RoboDK Global
Powered by MyBB


