Thread Rating:
  • 0 Vote(s) - 0 Average
  • 1
  • 2
  • 3
  • 4
  • 5

Program Events From Apt File

#1
I am using RoboDK for our UR10e, we will be sanding parts with it. The UR is not in our building at this time as it is at our OEM getting the cell for the sanding constructed. I want to output the linear inches of my path to help and set a global variable on the UR, my OEM says that this is possible but has not given me the format of what that need to look like coming out of the UR post processor. I am outputting an apt file from Siemens NX. i have figured out how to change the apt file to output the linear inches of the tool path and i can change it to look how i want but as of now it is just like this, just because i copied the AUXFUN for now

GOTO/879.0570,413.1193,-11.3725
AUXFUN/170.457
PAINT/SPEED,10

i have read thru some of the help threads but i am still unsure of how to get RoboDk to read this and output it to what i need it to be. Again, i don't know how it will need to look in the script file but for now if i could understand how to get RoboDk to read something from the apt file and output it how i need it to be would be great
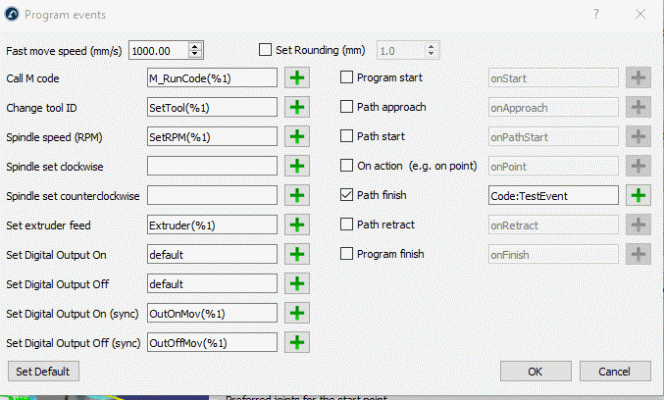


Thanks 
John
#2
Hi there,

Even if it's not exactly the same subject, some interesting information can be found in this thread :
https://robodk.com/forum/Thread-Turning-...on-and-off

You can catch some specific code from your G-Code to trigger specific behavior from RoboDK.

Have a great day.
Jeremy
#3
Hi John,

With APT files you can use the commands CALL to provoke a program call and CODE to output any code. The main difference is that when you use CALL, the post processor takes care of generating the code syntax, when you use CODE, you need to provide the full syntax the robot controlller needs.

For example, on a Motoman robot:
CALL Program1 will output CALL JOB:Program1
whereas:
CODE Program1 will output Program1

Other than the GOTO commands you can use the commands provided in this example:

$$ This line is a comment

$$ Fast move to X,Y,Z (uses RoboDK rapid speed, 1000 mm/s by default, you can change it in Program Events)
RAPID
GOTO 0 0 100

$$ Define the cutter:
$$ CUTTER/ Diameter (D), Radius (Rc), (ignored), (ignored),  (ignored),  (ignored),  Length
$$ RoboDK will automatically create a cutter if you activate:
$$ Tools-Options-CAM-Automatically create cutters
CUTTER/ 4,  1,  3,  2,  0,  0, 20

$$ Provoke a tool change event such as SetTool(2) (default event settings)
$$ RoboDK will automatically split to one program per tool if you activate:
$$ Tools-Options-CAM-Automatically set one project per tool
LOADTL/2,1

$$ set the TCP speed:
FEDRAT/ 500.0,MMPM

$$ move to X,Y,Z,i,k,k
GOTO / 0 0 0 0 0 1

$$ move to X,Y,Z,i,k,k
GOTO / 100 0 0 0 0 1

$$ Next line is a program call
CALL ProgramCall

$$ Next line is a program passing parameters, for example, XYZ values
$$ The macro shows an example to simulate the movement: C:/RoboDK/Library/Macros/CallNC.py
$$ This file needs to be added to the RoboDK station
CALL CallNC(100,0,-25)

$$ move to X,Y,Z,i,k,k
GOTO / 100 0 0 0 0 1

$$ move to X,Y,Z,i,k,k
GOTO / 0 0 0 0 0 1

$$ Next line is a raw input line (supported with a new release next week)
CODE RawLine;

PPRINT Turning Digital Output 12 to ON
SET 12 ON

PPRINT Pause 5 seconds
DWELL 5

PPRINT Turning Digital Output 12 to OFF
SET 12 OFF

PPRINT Wait Digital Input 12 to turn OFF
WAIT 12 OFF
$$ Inputs and outputs are simulated using station variables
$$ for example, using the API you can call:
$$ RDK.setParam('IO_12',1)

$$ You can also have a timed out wait:
$$WAIT 10 ON TIMEOUT 5
#4
Thanks Guys, I played around with this and it works good, i will just need to wait to see what the output will need to look like in the UR and change accordingly. Thanks again
#5
Good morning,

My name is Henry Christian.

So I would like to know if there is someone who knows how to convert the G-code program to a Fanuc robot. Normally, I designed trajectory of the robot using a slicer and save it as Gcode, so I would like to know how I can use it for a Fanuc robot for additive manufacturing purposes.

Thank you
HHC


Users browsing this thread:
1 Guest(s)