What can you do if your robot’s workspace is not big enough? There’s no need to rush into buying a new robot! An auxiliary axis could be the answer to all your problems.
You’ve invested in an industrial robot to improve your process, but there’s a problem. It’s just not got a big enough work envelope to suit your needs. Perhaps your workpiece is much bigger than you had anticipated, or you need the robot to operate on two different workstations.
Should you get a bigger robot?
Should you change your process?
Perhaps an auxiliary axis is what you need!
Auxiliary axes (aka external axes) are a great way to add extra work envelope to your robot without changing other aspects of your setup. According to Welding Productivity magazine, choosing whether or not to use auxiliary axes is “a critical decision” when considering robotic automation.
But, what is an auxiliary axis and how do you use it with offline programming? Let’s find out.
What is an Auxiliary Axis?
An auxiliary or external axis is any extra mechanism which you add to your robot cell to add extra Degrees of Freedom and/or extend the robot’s range of motion. They can either be attached to the robot itself or to the workpiece.
There are various benefits to using external axes, including increased flexibility, the ability to work on larger workpieces, and access to previously unreachable areas of the workspace. An extra benefit can also be reduced cost — in some cases it can be cheaper to use a smaller robot with an auxiliary axis than to invest in a larger robot.
However, probably the clearest benefit is the increase in work envelope. Theoretically, there are no limits to how much you can extend the robot’s workspace with auxiliary axes.
3 Types of Auxiliary Axis
The RoboDK Robot Library has 40 different external axes from manufacturers including KUKA, ABB, and GUDEL. However, although there are many different models, there are basically 3 types of auxiliary axis:
1. Linear Tracks
Linear tracks add a single, extra Degree of Freedom to the robot. Tracks are usually mounted onto the floor. The robot is then mounted onto the track and moves along its length.

An example of a linear track from the Robot Library is the KL4000 from KUKA, which can hold payloads of 4000kg and can add up to 30m to the robot’s workspace.
2. Workpiece Positioners
Unlike linear tracks, workpiece positioners are not attached to the robot itself. Instead they are used to hold the workpiece. They provide additional Degrees of Freedom by allowing you to precisely position the workpiece while the robot operates on it.

The robot is usually fixed to the ground when using a workpiece positioner. However, you can also extend the flexibility of the robot even further by fixing the robot to another auxiliary axis. For example, here is a video of an 8-axis robotic machining application where the robot is mounted on a linear axis and operating on a part attached to a workpiece positioner.
An example of a workpiece positioner from the Robot Library is the IRBP L from ABB, which is aimed at positioning workpieces for arc welding, thermal cutting, and robot machining.
3. Gantry Cranes
Gantry cranes are used when you want to mount the robot above the workspace. By integrating the robot programming with the crane, you can increase the robot’s workspace hugely. Gantry cranes can be a single linear axis, an XY cartesian mechanism, or an XYZ mechanism. The Z axis actuation allows you to change the height of the robot, either by raising and lowering the robot itself, or in some cases, by raising and lowering the entire crane.
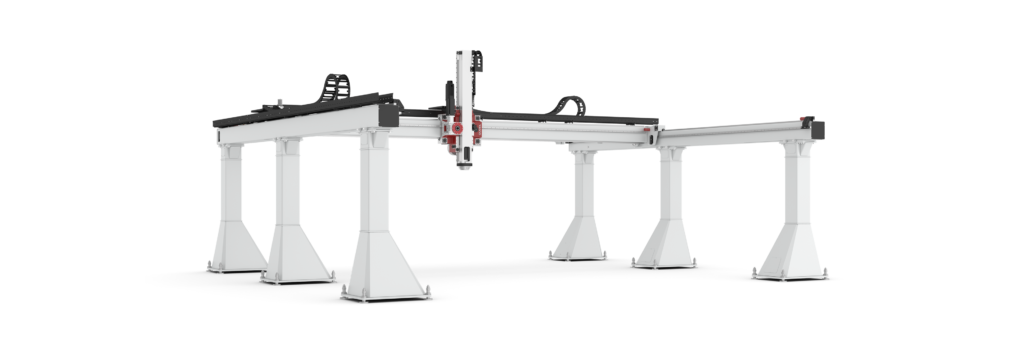
An example of a gantry crane from the Robot Library is the GUDEL FP. It provides an XYZ actuation and is used in industries such as logistics, aerospace, and automotive.
5 Steps to Use Auxiliary Axes With Offline Programming
Here are the basic steps you can take to add an auxiliary axis to your offline programming.
1. Assess Your Needs
Firstly, it’s always a good idea to assess your needs for the robot cell and decide if an auxiliary axis is really the right option. Look at your application and work out how much workspace is required for the task. Decide what type of auxiliary axis would be best to meet this need.
Of course, you can use also offline programming as a way to experiment with auxiliary axes before you invest in the real technology. If so, you might not want to make a decision yet.
2. Create Your Mechanism (or Use the Library)
If your chosen auxiliary axis is included in the Robot Library, you simply need to open it up and you can start using it immediately, just as you would with any other robot.
However, if there isn’t an axis which is similar to the one you will be using (e.g. if you have a custom-built axis) you can also create your own mechanism. This page of the documentation introduces the custom mechanism window and this video tutorial shows how to create a 3 axis Cartesian mechanism from scratch.
3. Attach Your Robot
Once you have a working model of your auxiliary axis, you just need to attach your robot to it. In RoboDK, this is very easy to do. You just load the robot model into the software then drag it onto the auxiliary axis. This will place the robot onto the right place on the mechanism.
4. Synchronize the Axis
You can now control both the robot and the auxiliary axis separately. However, the real power of offline programming comes when you synchronize the external axis with the robot. You do this in RoboDK by right clicking on the robot model in the program tree and clicking “Synch External Axis“. This brings up a window which allows you to synchronize a robot, linear axis, and a workpiece positioner.
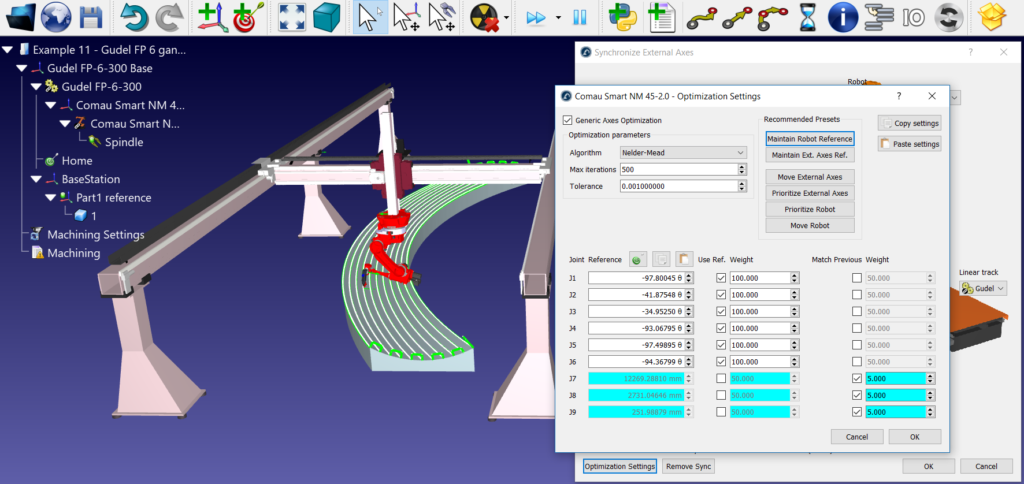
This means that whenever you move the robot, it will also move the external axis if the position you are trying to move to does not fall within the robot’s workspace.
5. Program the Robot
Finally, you can now create your robot program! Check out our ever-growing catalog of tutorial videos for examples of how to create programs in RoboDK.
Auxiliary axes really have the power to take your robotic application to the next level. When workspace is no limit, you can do anything!
How could you use auxiliary axes in your robotic application? Tell us in the comments below or join the discussion on LinkedIn, Twitter, Facebook, Instagram or in the RoboDK Forum.