Pick and place programming is a fundamental skill in robotics. But, how can you create this robot program quickly and easily for your industrial robot?
With RoboDK’s simple programming interface, you can create a pick and place program within only a few minutes.
Here’s how to get started with simple pick and place programming.
The Benefits Of Pick And Place With An Industrial Robot
This is a simple task, possibly even the simplest robotic task there is!
Even if your plans for your robot are more advanced, it’s worth learning how to program this basic task before you move onto more complex setups.
Industrial robots are a perfect solution this application. They are more consistent than human workers, whose efficiency at the task tends to fall over long work shifts doing the same repetitive motion.
Lots of industrial tasks fall under the heading of pick and place, including stacking, sorting, packaging, and machine tending.

Why Program Pick and Place with RoboDK
There are various options for programming an industrial robot for this specific task.
These options include using the robot’s teach pendant, hand guiding, or coding with the manufacturer’s proprietary language.
The benefit of using RoboDK is that the programming interface is extremely easy to use. You can program this motion in just a few minutes and it is compatible with hundreds of industrial robots.
None of the alternative programming options for an industrial robot offer this flexibility.
How to Program a Pick and Place Robot with RoboDK
Programming this task is very simple with RoboDK. The exercise introduces you to some basic concepts that are good to know about the tool’s simulation environment.
Here are 9 steps for programming your first pick and place robot in RoboDK:
1. Create Your Robot Program
First, you need to create your robot program. This involves loading your robot model from our Robot Library, adding any other simulation objects (e.g. tables, conveyors objects for picking), and adding your gripper or another end effector.
2. Learn to Attach and Detach Objects from the Robot
In RoboDK, both pick and place actions are centered around two “simulation events” — attach object and detach object. You should become familiar with these two events.
When you want the robot to pick up an object, you just move its end effector close to the object and select “attach object.” RoboDK will attach the end effector to the object closest to it. With “detach object” the robot releases any attached objects.
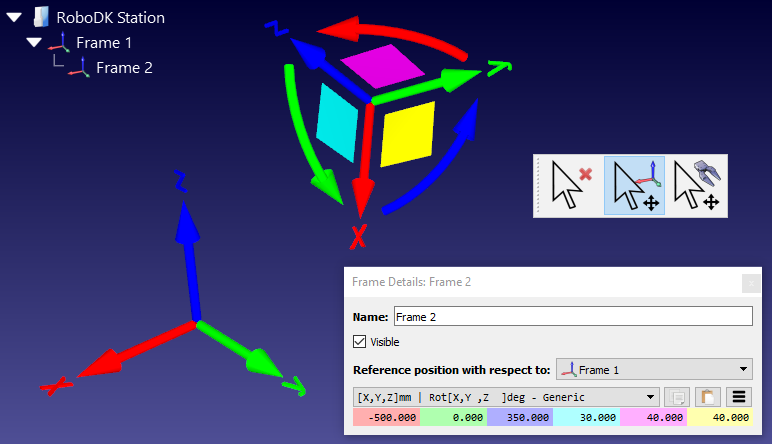
3. Create Your Pick Target
To start creating your program, create a target where the robot will pick up your chosen object. You can quickly move the robot to any object in the RoboDK simulation by right-clicking on the object and choosing “Get with robot.”
4. Set an Approach Offset
It’s almost always a good idea to add an approach offset when you are programming any robot motion.
This avoids the robot colliding with the object when it is moving through open space. You can program the robot to move quickly to the approach distance (using an uncontrolled Joint Move) then slowly move (with a controlled Linear Motion) to grasp the object.
5. Program the Attach Sub-program
It’s often a good idea to program pick and place tasks with two separate sub-programs: the pick action and the place action. This allows you to easily duplicate the actions of the robot and keeps your robot program as manageable as possible.
Create the attach sub-program with the following steps:
- Move the robot to the approach offset with a Joint Move.
- Use a Linear Move to go to the grasp location.
- Grasp the object with the Attach Object simulation event.
- Retreat the robot to the approach offset with a Linear Move.
6. Create Place Location Targets
You will now have all of the fundamental building blocks of the pick and place motion that you need. At this point, it’s often most efficient to just copy and paste parts of your program then tweak them.
For example, you can quickly create the place location by copying your pick location and moving it to another part of the workspace. This should also copy the approach offset.
7. Program the Detach Sub-program
The place action is basically the same as the pick action. However, instead of using Attach Object, you choose the Detach Object simulation event. You can copy your pick sub-program and then just tweak it.
8. Incorporate into Your Main Program
Finally, you want to create your main program. In this, you will first include your pick sub-program, then your place sub-program. When you run the main program, the robot should pick up the object from one location and place it in the other location.
9. Bonus Trick: Replace Simulation Objects
Once you have run your program, you will find that the object is now in the wrong place to restart the simulation. You can quickly reset your program by choosing the simulation event Set Object Position and saving the starting position of your objects.
See This in Action in Our Free Pick and Place Programming Course
It can be hard to follow instructions like the ones above without seeing it in action, right?
You can see all this training and much more in our free pick and place programming video course. It includes training for simple pick and place applications and more complex examples, such as with differently shaped objects.
Just click here to access the full course.
What questions do you have about programming pick and place tasks with RoboDK? Tell us in the comments below or join the discussion on LinkedIn, Twitter, Facebook, Instagram, or in the RoboDK Forum.. Also, check out our extensive video collection and subscribe to the RoboDK YouTube Channel