Thread Rating:
  • 0 Vote(s) - 0 Average
  • 1
  • 2
  • 3
  • 4
  • 5

Problems integrating a rotary 7th axis on a KUKA KCR2

#1
We've been having great success using a Kuka KR210 w/ KRC2 Ed 05 control with RoboDK and Fusion 360 to mill parts.  The real world programs have always done what we expected based on the simulation until we added the 7th axis.  Everything looks fine in the sim but in the real world the robot tries to collide with itself.  We suspect that we have a problem with the configuration in the control but need some folks who are much more knowledgeable than us to help us move in the right direction.  We read this post:

https://robodk.com/forum/Thread-How-to-c...ernal+axis

and tried to follow along the best we could.  We did the 6 point calibration of our table in RoboDK and entered that info into the control as Base (3).   We referenced that in the program but the robot still doesn't behave correctly. 


Attached Files
.rdk   ForumPost.rdk (Size: 3.19 MB / Downloads: 38)
.src   bas.src (Size: 12.94 KB / Downloads: 41)
.txt   $config.dat.TXT (Size: 22.48 KB / Downloads: 41)
.txt   $machine.dat.TXT (Size: 49.22 KB / Downloads: 43)
.txt   $robcor.dat.TXT (Size: 16.58 KB / Downloads: 43)
#2
I tried to generate your simulation and program. As mentioned in the forum post you linked. You should customize the header of your program and/or your set reference frame instruction to properly link your robot arm with the turntable.

For example, by looking at your BAS function, this will reset your base frame definition to be the world:
Code:
BAS (#BASE,0)
Which is exactly the same as:
Code:
$BASE=$WORLD
This is suitable if you have one robot but not if you want to pair with a turntable. Therefore, you should define your reference differently.

Also, defining your frame as seen by default in RoboDK won't work because you are ignoring the link with the turntable:
Code:
$BASE = {FRAME: X 2017.840,Y -867.551,Z 167.000,A -80.000,B 0.000,C 0.000}
You should do something like this instead:
Code:
BASE_DATA[9] = {FRAME: X 0, Y 0, Z 0, A 0, B 0, C 0}
$BASE=EK(MACHINE_DEF[2].ROOT,MACHINE_DEF[2].MECH_TYPE,BASE_DATA[9])

There are other ways to configure it as well. You can find more information here:
https://robodk.com/doc/en/Robots-KUKA.ht...ADriverExt
#3
Forgive my ignorance. Which parts of your post are related to the robodk software vs the post processor vs the krc2 control? The part that confuses me is which thing I am supposed to be editing? The bas file? The post processor?
#4
You can edit the KUKA post processor. This section of the documentation shows an example of how you can customize a post processor:
https://robodk.com/doc/en/Post-Processor...ampleSpeed

We can do it for you if you send us an email at info@robodk.com.
#5
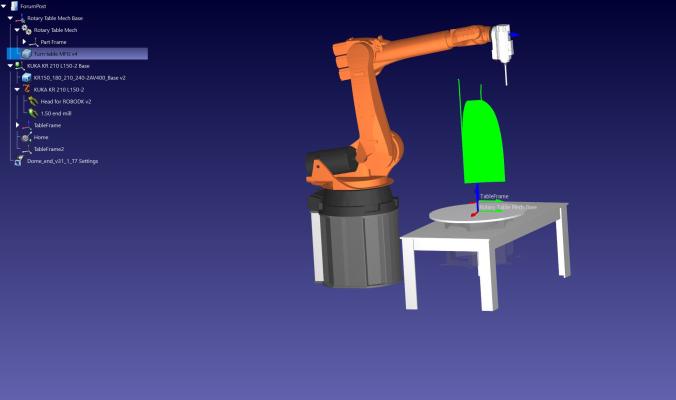
We've made progress with our 7th axis.  We had some settings that weren't enabled in the Axisconfigurator and $Machine.DAT.  We've also rebuilt our robot cell from scratch in RoboDK.  Now when we jog the 7th axis the robot follows it as expected.
  Unfortunately we're still having issues with the robot not behaving as expected compared to the simulation.   Any advice would be greatly appreciated. 


Attached Files
.rdk   New Station2.rdk (Size: 2.48 MB / Downloads: 45)
.src   Swarth (2).src (Size: 127.55 KB / Downloads: 35)
.src   CircleTest_Ji.src (Size: 5.15 KB / Downloads: 38)
#6
The video seems to produce the desired result when moving to the same Cartesian target attached to the turntable while changing the 7th axis. 

I noticed the way you setup the base with the program that worked is like this:
Code:
BAS (#BASE,3)

This should also be the case when programming the robot from RoboDK but I understand this does not work by default.  However, this is easy to customize in the post processor. In short you should override the setFrame of your post processor to use the correct BASE and external kinematics system. 

You should be using one of these options which you can enable accordingly by simply removing the commented lines:
Code:
    def setFrame(self, pose, frame_id, frame_name):
        """Change the robot reference frame"""
        self.addline('; ---- Setting reference: %s ----' % frame_name)
        if self.nAxes > 6:
            # Code to output if the robot has external axes:
            self.BASE_ID = frame_id
            if self.BASE_ID <= 0:
                self.BASE_ID = self.DEFAULT_BASE_ID
           
            # option 1: Build the kinematics based on the MACHINE_DEF array and the provided offset
            #self.addline('$BASE = EK (MACHINE_DEF[2].ROOT, MACHINE_DEF[2].MECH_TYPE, { %s })' % self.pose_2_str(pose))   

            # option 2: Build the kinematics based on the EX_AX_DATA array and the provided offset
            #self.addline('$BASE=EK(EX_AX_DATA[1].ROOT,EX_AX_DATA[1].EX_KIN, { %s })' % self.pose_2_str(pose))
           
            # Option 3: Build the kinematics based on the EX_AX_DATA array and the pre-defined offset
            #self.addline('; Using external axes')
            #self.addline('; $BASE=EK(EX_AX_DATA[1].ROOT,EX_AX_DATA[1].EX_KIN,EX_AX_DATA[1].OFFSET)')
            #self.addline('; $ACT_EX_AX= %i' % (self.nAxes - 6))
           
            # Option 4: Use the BAS(#ex_BASE) init function from the BAS.src file
            #self.addline('; BASE_DATA[%i] = {FRAME: %s}' % (self.BASE_ID, self.pose_2_str(pose)))     
            #self.addline('BAS(#ex_BASE,%i)' % self.BASE_ID)
           
            # Option 5: Use the BAS(#BASE) init function from the BAS.src file
            self.addline('BAS (#BASE,%i)' % self.BASE_ID)
           
            # Option 6: Directly take the base from the BASE_DATA array (usually what the BAS(#BASE) does)
            # self.addline('$BASE=BASE_DATA[%i]' % self.BASE_ID)
In your case, with the file attached which reimplements the setFrame function, you should enable Option 5, which outputs the same BAS (#BASE,id) function.

To use this post processor you should follow these steps:
  1. Place the KUKA_KRC2_Custom_Base.py file attached here: C:/RoboDK/Posts
  2. In RoboDK, right click your robot, and select Select Post processor
  3. Select the KUKA KRC2 Custom Base post
Also, if you want to use ID 3, you should call your coordinate system as Frame 3. The post processor will receive the last index of the name of the reference frame.

Attached Files
.py   KUKA_KRC2_Custom_Base.py (Size: 12.69 KB / Downloads: 34)
#7
The robot did not come with a turn table and we added the 7th axis. The video was us verifying that we had the external kinematics in the KRC2 control working correctly. Today was a busy day in the office we didn't get much time to mess with the post you sent. Hopefully we will verify tomorrow as we really need to do a 7 axis swarth soon.
#8
We've changed the post processor and our problems persist.  We've noticed that in RoboDK the targets we create do not work properly when we enable External Axis synchronization.  Even though the target are with reference to the base of the robot.  Is this normal behavior?


Attached Files
.rdk   New Station2.rdk (Size: 2.32 MB / Downloads: 46)
#9
If you are planning to have targets that are not attached to the turntable it is better to remove the synchronization between the robot and the turntable or just use joint targets.

The synchronization will make Cartesian targets work relative to the moving turntable.
#10
We're still trying to sort this out. A friend who set up an older robot like mine said something about possibly a sintax changing in kss software in older versions. He never sorted it out in robodk and ultimately switched to robot master.

We're currently using it as an indexer. Can we tie multiple gcode operations together with E1 rotation positions between operations?


Users browsing this thread:
1 Guest(s)