You need to extend your robot’s capabilities with a robotic positioner. Now… what’s the best way to program it? There is a hard way and then there’s the easy way.
You’re probably keen to get your new positioner up and running as soon as possible. After all, every minute that your new robot cell is not running means time and money wasted. Ever since you first decided to go with robotic automation, the clock has been ticking.
Positioners are a great way to increase the flexibility of a robot. They effectively increase the robot’s workspace, allowing you to reach the workpiece from multiple different angles. Some positioners give you the ability to quickly switch out one workpiece with another, reducing your turnaround time and improving productivity.
The only problem with adding a positioner is that it increases the complexity of programming.
Industrial robots can be tricky enough to program as it is, but adding 1, 2, or maybe several extra programmable axes can make the programming task a real headache… unless you approach it in the right way.
If you’re already experienced with programming robots, you certainly have the skills to program a positioner from scratch but it will take you extra time. However, if you’re just getting started with robot programming, the extra difficulty might just be enough to dissuade you from using robotics at all.
You Can Probably Program the Positioner From Scratch… But Should You?
If you are an adept programmer, you might just look at the positioner’s datasheet and think…
“Challenge accepted!”
You might be keen to test your programming mettle to see if you can integrate it properly using just the control inputs of the positioner, kinematic math, and the robot’s own programming language.
So, you look on robotics forums. You ask questions like “How do I program this complex positioner movement for a robotic machining application.” You read academic publications on the subject and try to decipher their math. You spend hours or days deriving your own kinematic equations to incorporate the movements of robot and positioner.
I can certainly relate to this feeling. It’s the mark of a good engineer. We think “I can to do this” so we go ahead and try to build it ourselves. But, we rarely ask ourselves if we should do it. I once redesigned and built a brand new controller for a robot just because the one it had already wasn’t to my liking… but it took me months!

The question is not whether you have the ability to hard-code the positioner from scratch.
The question is whether or not that is the best use of your time.
There is an easier way to program a positioner. One which requires no coding at all.
Positioner Programming That’s Simpler Than Simple
One of the great things about programming a single industrial robot is that the kinematics have been solved many times. It’s easy to find programming methods that don’t require you to draw kinematic linkages and derive inverse kinematic equations.
When you add a positioner to the system, suddenly you make your simple 6-axis mechanism into a mechanism with 7, 8, 9, or more axes.
Some people choose to deal with this by programming the two mechanisms separately — e.g. first moving the positioner to roughly where they need it to be and then programming the precise movements with the industrial robot. However, this is not the best way to use a positioner.
You’ll usually get the most from your positioner when you incorporate it as part of the whole mechanism. The easiest way to do this is by using a good offline programming tool.
The right software will automatically synchronize your robot with the other external axes in the system. If the robot is mounted on a linear track, for example, the offline programming software will add this as an extra axis. If the workpiece is mounted on a turntable, the software will automatically incorporate the turntable into the program as well.
How to Program the Robot Positioner In a Unified Way
The key to combining a robot and positioner with offline programming is to synchronize their axes and optimize those axes for your particular task.
Synchronizing Your Robot and Positioner
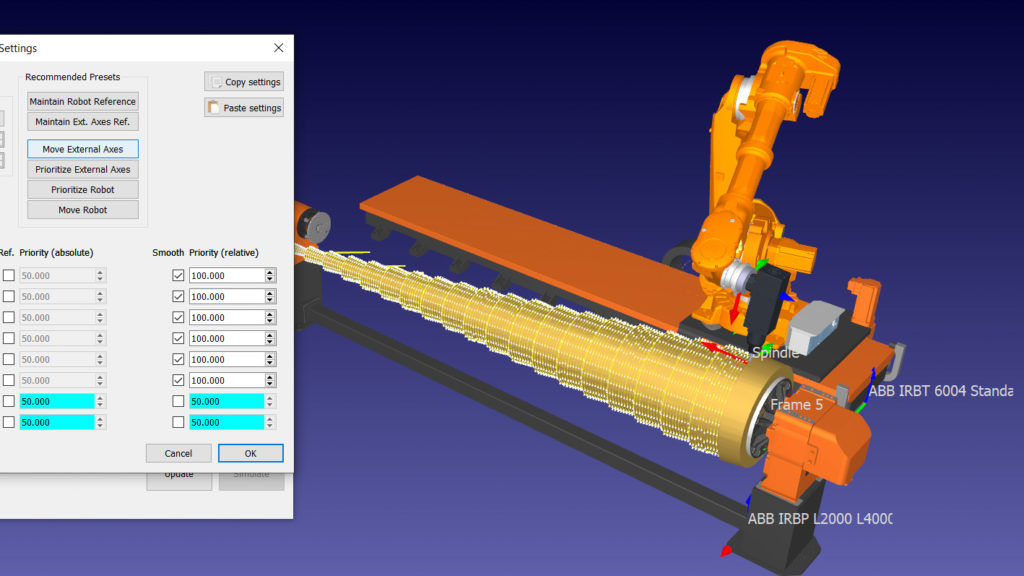
In RoboDK, this can be achieved very easily by using the integrated “Synchronize External Axes” tool. You can synchronize up to 6 additional axes, allowing for a system with up to 12 axes if you are using a 6-axis industrial robot.
The tool will then view the combined system as if it were a single mechanism. It will automatically program the positioner and other external axes alongside the robot when using the wizards for robot machining, 3D printing, curve following, and point following projects. These wizards cover many of the use cases of combined robot and positioner projects.
Unlike when you are programming a positioner manually, it doesn’t matter where you have placed your robot and positioner. The software will automatically adjust its programming to suit your setup.
Optimizing the Automatic Programming
You can also perform additional optimization of the positioner by using the “Smart Optimization” option.
Optimization allows you to set parameters and restrictions on your program.
Options include:
- Prioritizing the positioner motion over the robot motion.
- Prioritizing the robot motion over the positioner motion.
- Imposing desired positions for some or all joints (e.g. when you want to maintain a particular angle of the wrist joint).
- Minimizing motions of some joints (e.g. to ensure that the positioner always moves gradually and doesn’t produce sudden or unexpected movements).
You can find out more about the tools in RoboDK on the documentation page.
Getting Started With Robot Positioner Programming
Whatever level of programming skill you already have, there is no reason that programming a positioner needs to be a difficult task.
With the right software tools, programming your system can be just as easy as programming the industrial robot alone.
To try out RoboDK’s tool yourself, download a copy for a free trial. You might find it useful to look at the example “Robot machining with a rail and turntable” that comes with RoboDK to see what’s possible.
What challenges have you encountered when using positioners? Tell us in the comments below or join the discussion on LinkedIn, Twitter, Facebook, Instagram, or in the RoboDK Forum.