Our newest feature — the RoboDK PRM motion planner — allows you to create AI-powered robot trajectories at the touch of a button. But how does it work?
We don’t always have the luxury of a clear, free workspace, do we? That’s true for our own personal workspaces (e.g. my desk is covered in unnecessary items). It’s also true for our robot’s workspace.
Sometimes the robot’s workspace is just smaller than we’d planned it to be. Sometimes there is a huge pillar in the middle of the workspace that we can’t get rid of. Sometimes, there’s a pile of boxes that can’t be stored anywhere else.
Whenever there’s a chance your robot might collide with something in the workspace, our new motion planner is here to make your life easier.
With the touch of a button, it can create a collision-free path for your robot program.
This article provides an introduction to PRM motion planning and explains when you should use this new feature.
What Does PRM Mean?
The new RoboDK motion planner uses an algorithm called “PRM” which stands for “Probabilistic Roadmap.” It is a very common type of motion planner, for reasons we’ll get into in a moment.
https://robodk.com/blog/robot-motion-planning-made-easy/There are a bunch of different motion planning algorithms available for robotics, ranging in complexity from pretty basic to extremely elaborate. If you’re not familiar with motion planners at all, check out our previous article Back to Basics: Robot Motion Planning Made Easy
Here’s what PRM means:
- P = Probabilistic — The points in the “configuration space” (i.e. the set of points that the planner uses to know where the robot can move in its workspace) are chosen randomly by the planner. This random placement is called “probabilistic.” The alternative is a “uniform” placement, where points are placed at regular intervals throughout the entire workspace.
- RM = Roadmap — PRM algorithms work by first creating a “roadmap” of the entire robot workspace. This map is similar to the one used by the GPS directions feature on your smartphone. It can take a while to generate this map in the first place, but once it has been generated you don’t need to calculate it again so you can “query” the map much quicker.
From these two terms, we can say the following about a PRM motion planner:
- It will always find a viable robot trajectory (if one exists).
- It saves a roadmap of the configuration space to speed up the “query” phase.
These are two reasons why PRM planners are popular.
How PRM Works
Unlike some motion planners, PRM algorithms split their work into 2 separate phases. Before using the planner in RoboDK, you have to set a few properties.
Setup Phase
There are 3 properties that you set up manually before running the planner.
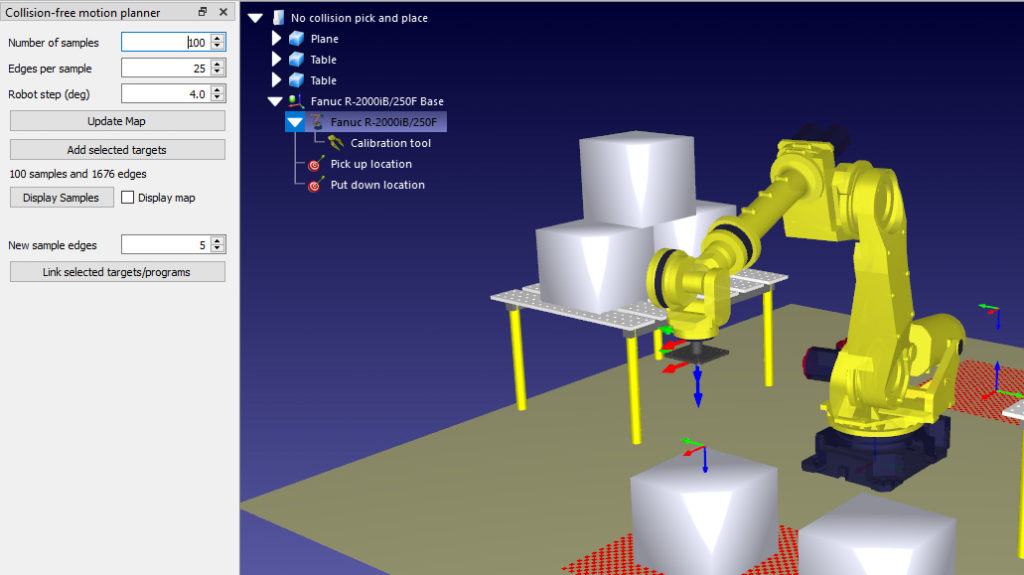
This is how you set these properties in RoboDK (and what they mean):
- Number of Samples — You choose a number of “samples” which the planner locates around the robot’s workspace during the construction phase. Fewer samples means a faster construction phase, but a cruder roadmap.
- Edges per sample — Each sample has a maximum number of “edges.” Each edge connects two of the samples together. Again, fewer edges means a faster construction phase, but a cruder roadmap.
- Robot step (deg) — When the PRM algorithm runs through the construction phase, it moves the robot a small distance every time. This distance is defined by the robot step. A bigger step means a faster construction phase, but there’s more chance the planner will fail to notice a potential collision.
You then click “Update Map” to start the construction phase.
Phase 1: Construction (slow)
The first phase of planning is to generate a roadmap. This can take a long time (roughly 15-30 minutes for 100 samples with 25 edges per sample).
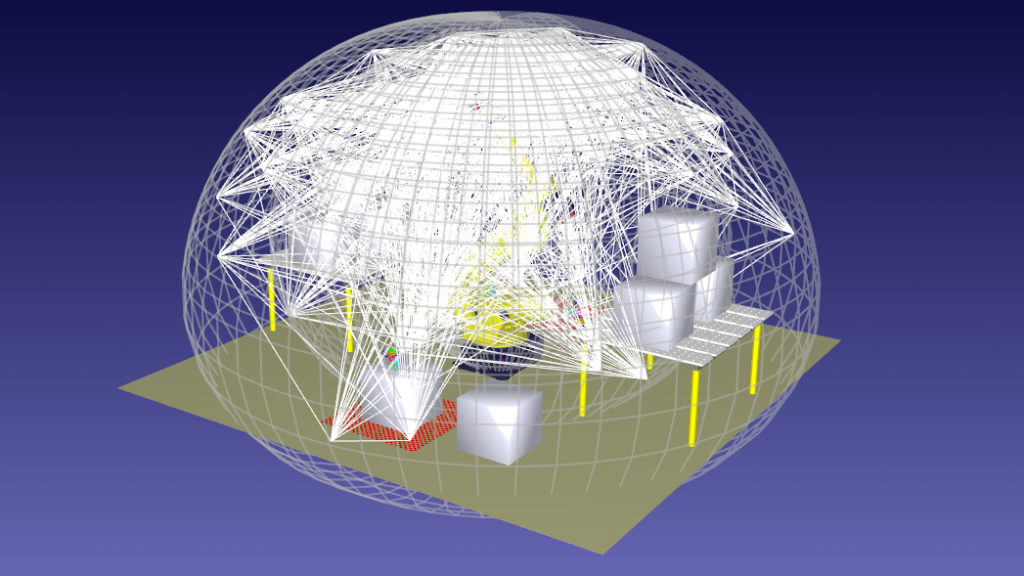
This is how the construction phase works “under the hood”:
- The planner places a “sample” in a random location in free space somewhere within the robot’s workspace.
- The algorithm then tests the path between this sample and the surrounding samples. It moves the robot along the path by the “robot step” and checks for collisions. If the path is free, it adds the path as an “edge” to the roadmap.
- When the planner reaches the maximum number of edges for this sample, it moves on to the next sample.
You can see why this phase takes a long time — the algorithm has a lot of samples to test. Thankfully, once the map is created, you don’t need to calculate it again (unless you add new objects to the environment).
Phase 2: Query (fast)
The query phase is the part of motion planning that you will use most often. You provide the planner with two targets (a start target and an end target). The planner then tries to create a collision-free trajectory between them using its stored roadmap.
This is how this phase works “under the hood”
- You select two targets and tell the planner to “link” them.
- If either of the targets isn’t already added to the roadmap, the planner will add it as a new sample and create a set of edges between the new location and the existing samples nearby.
- The planner then uses its roadmap to find the path with the shortest distance between the two targets.
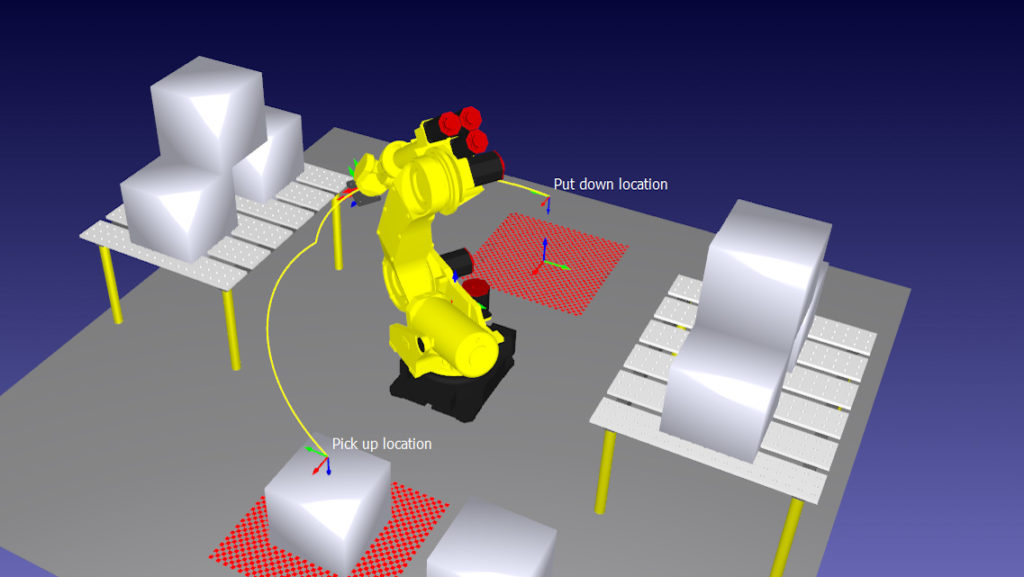
With a sufficiently detailed roadmap, this allows you to create complex, collision-free robot movements in seconds at the touch of a button.
When Should I Use the Motion Planner?
The standard way to program a motion into RoboDK is to manually plan the moves yourself using either Joint Moves, Linear Moves or Circular Moves. This is still the fastest way to program the robot to move between two targets.
However, these standard commands only work when there is free space between the two targets. If there are objects in the way, you may have to spend a lot of time creating intermediate targets to avoid the collisions.
The motion planner provides a way to automate this process. It automatically finds the best set of motions to move the robot between targets with no collisions.
But, there is a trade off. You have to wait a long time for the construction phase to finish before the planner can start finding paths for you.
Most of the time, this long wait is not a problem. You just have to “set it and forget it.” Let the construction phase run while you do something else.
Check out the documentation for more details on how to get started.
What’s could you do with a good motion planner? Tell us in the comments below or join the discussion on LinkedIn, Twitter, Facebook, Instagram or in the RoboDK Forum.