Robot vision can be tough to simulate. Virtual environments are not usually realistic enough for vision… but RoboDK’s realism just got a boost!
A short while ago, a RoboDK user asked us a question…
“Is it possible to have multiple camera views at once?”
A simple question, you might think. The answer was simple too: Yes! You can already have multiple cameras in RoboDK.
But, we had an important question for the user: “What are you trying to achieve?”
With any new robot programming project, it’s always important that we define what want to achieve before we get started. Although our customer wanted more camera views, when we delved into it further, it turned out that he really wanted some much wider functionality…
This functionality was something that many robot programmers are also interested in — the ability to make the simulated camera more realistic.
As our customer explained “I’m particularly interested in the control of light on the camera. It would be extremely useful to me if I was able to have a common light source between multiple cameras.”
The Problem: Simulations Aren’t Realistic Enough for Robot Vision
Robot simulation can be extremely powerful. It allows you to iron out the kinks from your robot program before trying it in the real world, saving you time and improving your whole programming process.
Robot vision, however, can sometimes be a challenge. You need a visually realistic simulation if you want to test your computer vision algorithms properly.
Before now, RoboDK only provided a very simple form of lighting for its camera simulations. This was great for a rough test of your vision algorithms, but it’s not realistic enough for more demanding tests.
There’s a good reason for this.
In general, offline programming does not require advanced surface modeling or visual effects. Such aesthetic features can actually make an OLP software less useful, as we’ve discussed before.
For most robot applications, fancy visual effects would just be an unnecessary distraction from the functionality of the simulation…
… expect when it comes to robot vision.
The Solution: Customizable Shaders
We needed to find a solution which would preserve all of RoboDK’s high-performance for robot programming, whilst allowing users to increase the level of visual realism only when they need to test computer vision algorithms.
The solution? Customizable shaders!
Shaders are an extremely powerful tool for manipulating the visuals of a 3D simulation. They are used extensively in the creation of 3D games and animated movies.
Here are some reasons that introducing customizable shaders was a perfect solution:
- They use the graphics processor — Shaders are run on the computer’s graphics processor (GPU). This means that they don’t interfere with the computation RoboDK carries out to compute the robot trajectory.
- They are lightweight and fast — RoboDK uses the high-performance graphics engine OpenGL. Simple shaders written for OpenGL will have very little impact on the graphics processing time and are executed in parallel on the graphics processor.
- They are easy to code — The GLSL programming language which you use to create OpenGL shaders is pretty easy to learn. There are some great tutorials which can help you to get started.
In the latest version of RoboDK, we have introduced support for customizable shaders.
How the New Customizable Shaders Work in RoboDK
On a basic level, shaders work in the following way:
- There is an input: e.g. the RGB color value of a pixel.
- The shader algorithm is executed on that input: e.g. a value of 0.2 is added to the green value of the pixel.
- The shader outputs the resulting value: e.g. the pixel is now 0.2 units greener than it was.
Shaders are executed on the GPU. As a result, all of the inputs (e.g. all of the pixels in an image) are operated on in the same way simultaneously. This is different from CPU computation which would run through each pixel individually in a loop.
Of course, the above example is very basic — it just increases the green value of all pixels. The real power of shaders comes when we start adding slightly more advanced algorithms, such as those used to calculate lighting!
For a nice video explanation of how shader lighting works, check out this video.
Types of Shader
There are several types of shader available in OpenGL. Each one carries out a different function in the graphics rendering “pipeline” (which means the sequence of algorithms computed to display 3D models). However, you don’t need to know about all of them for robot vision simulation.
There are two shaders that are really important to robot vision:
- Vertex shader — This is performed on every vertex (i.e. 3D point) in the 3D models in RoboDK. It is executed first and takes care of the camera’s perspective.
- Fragment shader — This is performed on every pixel of the output image. It is executed last and is the key to implementing more realistic lighting.
The new functionality in RoboDK allows you to load one of each of these shaders. You write your shaders in the GLSL programming language and load them using a Python script within RoboDK.
You will be able to see the effect of your shaders by using a camera window, which shows the picture that the simulated camera sees. The main window of RoboDK will not show the lighting effects which means the calculations won’t interfere with the simulation.
How to Get Started With RoboDK’s Customizable Shaders
This new functionality can be accessed through the function “Cam2D_Add” in the Python API. It has two new parameters that you can pass:
- Vertex Shader — This is a link to a GLSL vertex shader file.
- Fragment Shader — This is a link to a GLSL fragment shader file.
The best way to see this new functionality in action is to try out the demo which is included in the latest version of RoboDK.
You can access it with the following steps:
- Download and install the latest version of RoboDK if you haven’t already (version 4.0 or later)
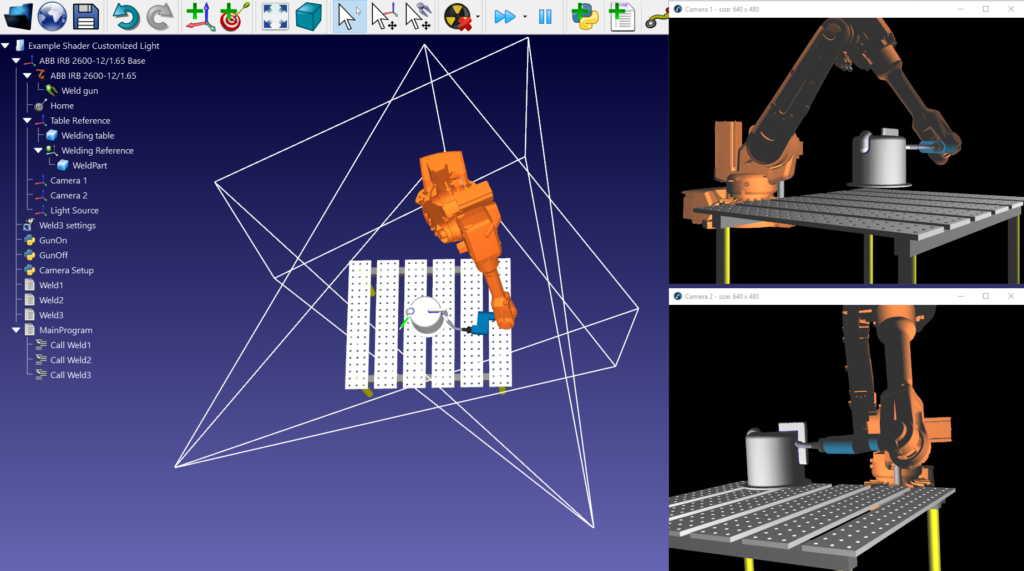
- Open the sample project 10.a called “Example-10.a-Shader-Customized-Light.rdk” from the Library directory wherever RoboDK is installed.
- Run the Python program called “Camera Setup” to bring up the two camera windows with the shaders setup.
- Run the “Weld3” program to see the simulation in action.
- You can edit the shader code by opening the files “shader_fragment.glsl” and “shader_vertex.glsl” in the directory Library/Macros/Camera-Shaders.
If you get stuck, you can post a question on the RoboDK forum!
What could you achieve with more realistic simulated cameras in RoboDK? Tell us in the comments below or join the discussion on LinkedIn, Twitter, Facebook, Instagram or in the RoboDK Forum.


Great work. It’s really amazing. Regards: Best Cameras Hub