Don’t know which post-processor to choose? Here are 5 steps for picking the perfect robot post-processor.
Post-processors are the bridge between the offline programming software and your robot.
If you pick the right post-processor, your program will work out-of-the-box — the real robot will move exactly as it did in the simulation. However, if you pick the wrong post-processor, you are in for a difficult time — the robot might move erratically, it might move in the wrong direction, or it might not move at all.
RoboDK provides a lot of different post-processors to choose from. It’s worth becoming familiar with how post-processors work, how to choose the right one, and how to customize or create your own post-processor if the ones provided are not exactly right for you.
This article will tell you everything you need to know about robot post-processors in RoboDK.
What Is a Post-Processor?
Most robot programs contain the same basic commands, which are used over and over again. The three most common are:
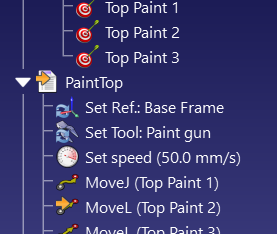
- Move Joint — This moves the robot to a point in space by sending the robot joints to their desired position the quickest way possible, which is useful when moving through free space.
- Move Linear — This moves the robot from the current position to a point in space by following a precise line, which is useful when moving to pick up an object, painting, etc.
- Set Speed — This defines the speed of the robot’s end effector and/or joints.
Offline programming software creates programs using a generalized version of these (and other) commands which can be applicable to any robot.
Robots Speak Different Languages
The problem is that each different manufacturer has a different way to program commands into their robots. Many manufacturers have their own custom programming language and some even use slightly different commands for different versions of their controllers.
For example, here is how the three commands I listed above are expressed for different robot controllers. In parentheses, I’ve also shown the minimum number of parameters and values required to control a 6DoF robot:
| Robot | Joint Move | Linear Move | Set Speed | Path Rounding |
| ABB IRC5 | MoveJ (4) | MoveL (4) | speeddata(4) | zonedata(4) |
| Fanuc RJ3 | J (2) | L (2) | speed (1) | CNT (1) |
| Kawasaki | JMOVE (1) | LMOVE (1) | SPEED (1) | ACCURACY (1) |
| KUKA KRC | PTP (1) | LIN/SPL (1) | $VEL.CP (1) | $APO.CDIS (1) |
| Motoman JBI | MOVJ (2) | MOVL (2) | VJ/V (1) | PL (1) |
| Universal Robots | movej (1) | movel/movep (1) | v(1) | r (1) |
As you can see, each command is similar between each robot type. However, there is a difference in the wording and in the amount of information required to define each instruction.
Without offline programming and post-processors, you would have to learn a completely new programming language every time you programmed a new type of robot. This significantly slows down robot programming.
Post-Processors Make It Easy
Post-processors work by translating the commands into a specific program for your robot model.
With RoboDK, you don’t have to learn a programming language to get your robot moving. The post-processors provided are usually enough to generate usable, bug-free code for over 30 brands of robot.
The post-processor also generates all the necessary initiation code and variable definitions, which are often a nuisance to define in regular text-based programming.
5 Steps for Picking the Perfect Post-Processor
RoboDK comes packaged with over 40 post-processors. You have to pick the right post-processor for your robot controller.
How do you choose between them?
If you have used one of the robots from our Robot Library, you will find that one post-processor is already selected as a default. Often, this is assumes you are using the latest (or default) controller for that robot. However, you may find that you need to select another one if the default post does not suit the needs of your application or setup.
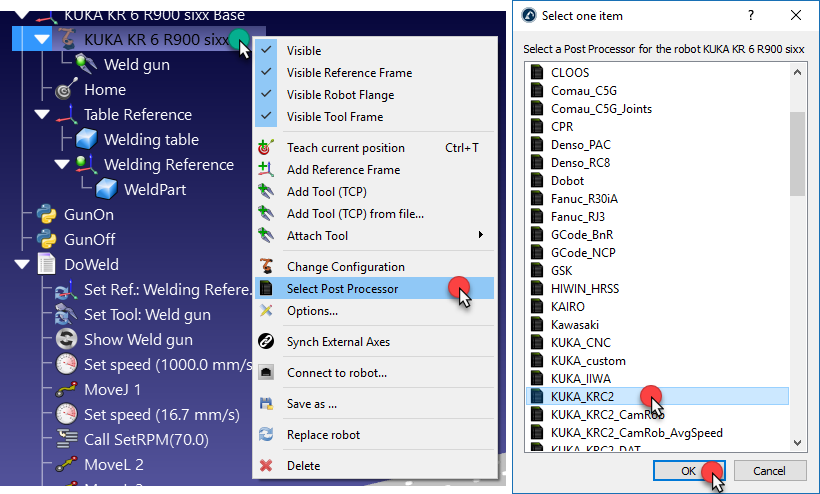
1. Pick the Post-Processor for Your Robot Brand
Usually, it’s best to try the default or most basic post-processor first.
Some robot brands only have one option provided by default in RoboDK, e.g. Mecademic, Kawasaki, CLOOS, etc. In this case, your choice is very simple.
2. Pick the Post-Processor for Your Controller
Some robot brands have different post-processors for different controllers or versions of their programming language. For example, Denso has one post-processor for its older RC7 controllers and one for its newer RC8 controllers, as between these models they moved from programming in the PAC programming language to programming in PacScript.
Use the post-processor for your specific controller if one is available. If there is no option for your specific controller, try the one which is closest to your controller’s version number.
3. Pick the Post-Processor for Your Application
Some robot brands have quite a few different post processors. KUKA has 10!
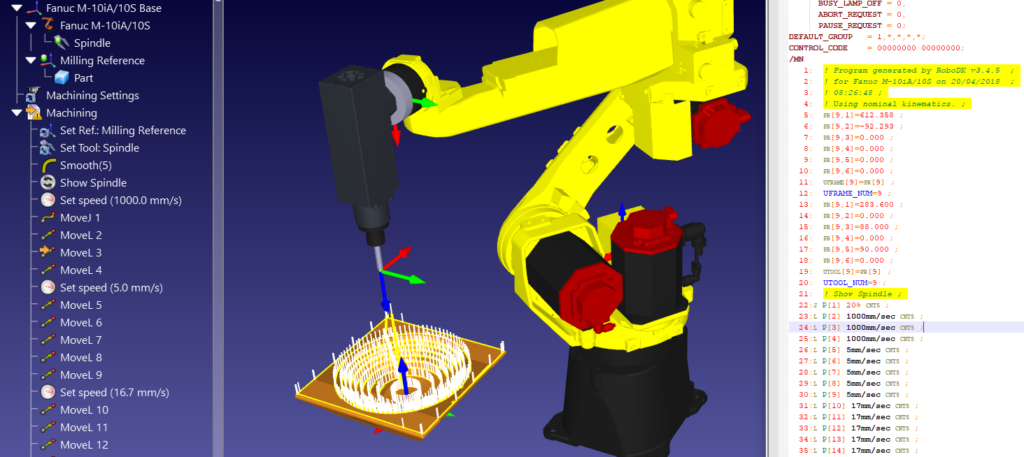
Some of the extra post processors are for specific applications or setups. For example, there are 5 post-processors for the KUKA KRC2 controller. Two of these are for applications using their CamRob milling add-on or KUKA CNC control, which allows having thousands of lines of code in one program file (suitable for robot machining). One is specifically for Arc Welding applications. Similarly, there is a UR post-processor that integrates Robotiq grippers.
If there is a post-processor for your controller which is correct for your specific application or setup, use it. However, if there is none for your application just use the basic post-processor for your brand and controller.
4. Pick the Post-Processor Which You Can Easily Update
Sometimes, the program generated by RoboDK won’t be exactly right for your application. You might want to add extra lines of code to extend the functionality. This very easy to do if you are a little familiar with your robot’s programming language.
A few of the post-processors are provided to make it easier to change and update the generated code.
For example, the KUKA KRC2 has options which generate a DAT file. These are an interesting feature of the KUKA controller. In this configuration, positions are stored as variables into a separate DAT file, which can sometimes make it easier to update the code as you only need to change the variables to alter the positions.
Similarly, there are two Siemens Sinumerik post-processors: one where the positions are provided in millimeters and the other where they are provided in inches.
Choose the post-processor which makes it as easy as possible for you to update the robot code, should you need to.
5. Create or Customize a Post Processor
In some circumstances, you might need to write your own post-processor, such as when you are using your robot in a unique configuration.
You may also want to customize an existing post-processor for your specific setup or application.
It is very easy to write custom post-processors in RoboDK as all of them are Python programs and are written in a similar format.
You can see a simple tutorial which shows how to create or update a post-processor in this video.
Check out the post-processor page in our documentation for more details.
What questions do you have about post-processors? Tell us in the comments below or join the discussion on LinkedIn, Twitter, Facebook or Instagram.

Hi Taylor,
Thanks for your question. I’m glad you enjoyed the post!
Do you mean how long does it take to write a post-processor? If so, it depends. If you are writing one for yourself, it depends on your programming skill and familiarity with both the programming languages (Python, for writing the post-processor, and the specific programming language of the robot you are using). If we are writing the post-processor, it will obviously be quicker as we are very familiar with the process but I can’t tell you exactly how long it would take us.
Or do you mean how long does it take for the post-processor to generate code for the robot? In which case, it takes seconds (or, at the very most, minutes for a very long program). RoboDK generates robot code very quickly.
Hope that helps.
Cheers,
Alex